


Print Profile(3)


Description
We’ve decided to open up our lamp designs to the maker community and allow anyone to print one!
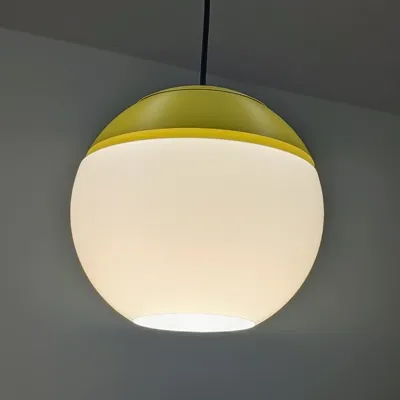
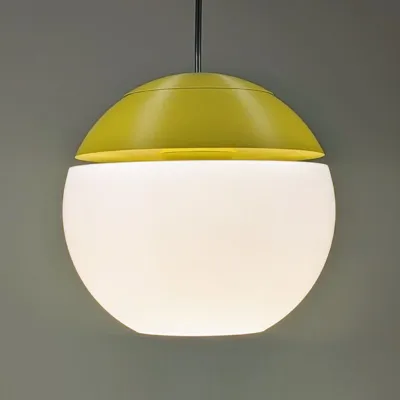
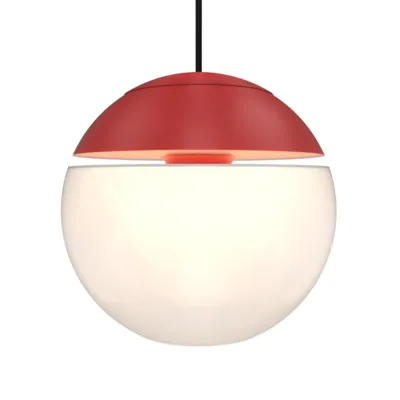
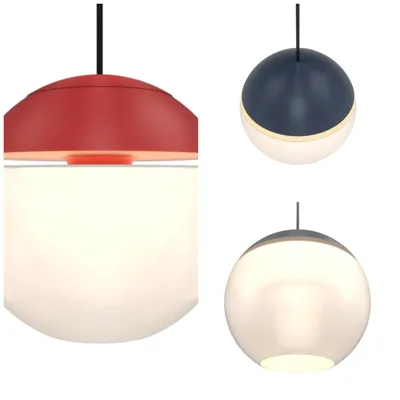
Bring a soft, sculptural glow to your space with the Nimbus Pendant Light. The Nimbus is one of our favorite pendant light designs at Dryft Home because of its beautiful globe-inspired form — and now you can make your own version at home. If you can't print one yourself and you're in Canada or USA, consider supporting us at https://www.dryfthome.com.
Inspired by the shape of the earth, the Nimbus pendant casts a gentle, diffused glow that works beautifully as an accent light above a table, in an entryway, or along a hallway. It's a fully 3D-printed shade designed to work with a wide range of pendant light cords.
Print instructions are very important for a high-quality finish on your light, so please follow closely. These settings are from Orca Slicer and can be replicated in most modern slicers. We’ve also included Bambu Studio 3MF files to make printing easier — they haven’t been fully tested, so please check your settings before printing. In Bambu Studio you need to implement scarf seams in filament settings if you are using a different filament for the base parts.
Print Details - Nimbus Shade
- Printer type: FDM
- Material: PLA - White recommended
- Adaptive Layer Height: ON, Quality 0.25
- Shade Size: 250mm wide by 150mm tall
- Filament needed: ~163g
- Nozzle size: 0.4mm
- Line width: Standard (~0.42)
- Outer Wall Line width: 0.8mm
- Sprial Vase mode: On
- Smooth Spiral: On
- Brim: No brim
- Supports: No
- Bottom layers: 5
- Infill density: 0%
- Outer wall speed: 60mm/s or less
Print Details – Base Main
- Printer type: FDM
- Material: PLA - Matte filament recommended
- Layer height: 0.16 mm
- Base main size: 230mm wide by 160mm tall
- Filament needed: 150g
- Nozzle size: 0.4mm
- Line width: 0.6mm
- Top layers: 0
- Bottom Layers: 6
- Infill density: 0%
- Sprial vase mode: Off
- Wall loops: 4
- Brim: No brim
- Supports: No
- Scarf joint seam: Contour
- Staggered inner seams: checked
- Staggered inner seams: checked
- Scarf joint for inner walls: checked
- Scarf length: 100mm
- Scarf steps: 20
- Wall speed: 100mm/s or less
Print Details - Base Cap (and shim)
- Printer type: FDM
- Material: PLA - Matte filament recommended
- Layer height: 0.16 mm
- Base main size: 138mm wide by 21mm tall
- Filament needed: 75g
- Nozzle size: 0.4mm
- Line width: 0.6mm
- Top layers: standard
- Bottom Layers: standard
- Infill density: 15%
- Sprial vase mode: Off
- Wall loops: 2
- Brim: No brim
- Supports: No
- Scarf joint seam: Contour
- Staggered inner seams: checked
- Staggered inner seams: checked
- Scarf joint for inner walls: checked
- Scarf length: 100mm
- Scarf steps: 20
- Wall speed: 100mm/s or less
Assembly
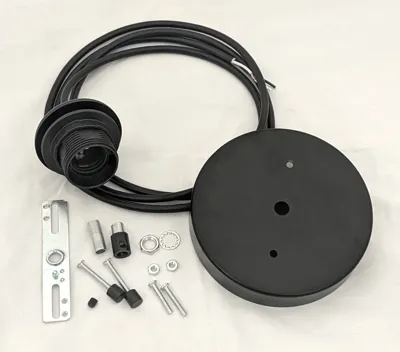
To assemble the pendant, you’ll need a pendant cord with a 40mm threaded socket and nut, plus a ceiling canopy kit. We typically use an E26 socket with a roughly 1.5m cord (you can cut to length).
Use LED bulbs only — 9W or less recommended.
If you want the exact cord and canopy kit we use, it’s available here: https://www.dryfthome.com/products/pendant-light-cord?variant=45162523525177
Assembly is more involved than our table lamps but still straightforward:
- Slide the socket through the base, then the shim, then the shade, and secure it with the socket nut.
- Pull the cord through the cap and slide the cap down over the assembled lamp.
- Install the canopy to your ceiling box using wire nuts.
**If you’re not comfortable installing electrical fixtures, please hire an electrician.**
Commercial License
If you're interested in printing and selling our lamp designs please explore the commercial license options on our profile.
License
You may create derivative works based on this object, provided that all such derivative works are published exclusively on the MakerWorld platform and include proper attribution to the original creator. You may not share, upload, host, distribute, or publish this object—or any derivative work of this object—on any other digital platform, marketplace, or distribution channel. Commercial use of this object and any derivative works is strictly prohibited. This includes, but is not limited to, selling, renting, sublicensing, or using the object in any context in which you receive monetary compensation or other financial benefits.
Comment & Rating (10)