P/A/H系列窗户封边隔离排气系统


Print Profile(0)
Description
Bambu Lab Model Window Baffle Exhaust System Printing and Installation Specification Tutorial
This tutorial is specifically designed for the Bambu Lab Model Window Baffle Exhaust System, covering printing parameter settings, core dimension verification, component assembly, and installation debugging throughout the entire process. This system features a modular design, enabling quick splicing via semicircular snap slots. It boasts characteristics such as no air leakage and strong adaptability, and its downward exhaust design effectively prevents drafts and rainwater backflow. Below is a detailed operation guide; please strictly adhere to the core dimension requirements and material recommendations to ensure stable system operation.
Boost Me (for free)
I. Preparation: Core Information and Tools
1.1 Core Dimensions Overview (Must Read! Directly Impacts Adaptability)
System adaptability is determined by key dimensions. The following three dimensions are core parameters; before printing, repeatedly confirm whether the model file matches to avoid rework:
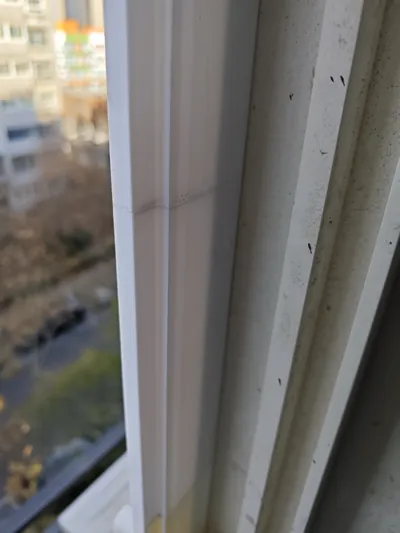
- Baffle clamp width 12mm: Refers to the width of the baffle used to clip onto the window frame's snap opening, corresponding to the dimension of the window frame's shaded area in the model design. There are no strict requirements for depth; as long as the clamp width meets the standard, a secure fit is ensured.
- Sliding window snap opening width ≥10mm: The minimum standard for the system to adapt to the sliding window snap opening width is 10mm. If the actual sliding window snap opening width is greater than this value, it can still adapt normally without requiring additional model modifications.
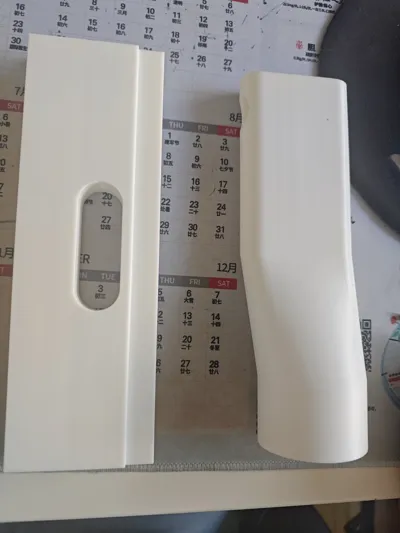
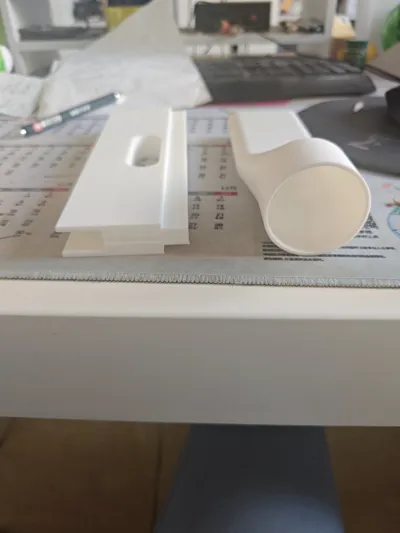
- Window height and module combination: The system consists of 5 types of modules of different heights, which can be freely combined according to the actual window height. Modules are spliced together via semicircular snap slots, offering excellent sealing performance. The height specifications for each module are as follows: Middle module: available in 100mm and 200mm heights, used to adjust the overall system height;
- Exhaust port module: fixed height of 200mm, integrates the exhaust channel, serving as a core functional module;
- Top module: total height 222mm (200mm main body + 22mm top structure), used for top sealing and fixation of the system;
- Bottom module: total height 44mm (32mm main body + 12mm bottom structure), used for bottom support and fitting of the system.
1.2 Recommended Materials and Tools
- Printing filament: PETG filament is highly recommended due to its excellent high-temperature resistance, impact resistance, and sealing properties, making it suitable for long-term use in exhaust systems. If cost reduction is desired, the exhaust port module can be made from PLA filament (Note: a slight color difference may occur when splicing PETG and PLA filaments, which is normal).
- Printing equipment: Bambu Lab series 3D printers (e.g., X1, P1P), ensuring the printer is properly debugged and nozzle and hot bed temperatures are stable.
- Auxiliary tools: Calipers (for measuring actual dimensions and consistency with the model), utility knife (for removing print supports), sandpaper (for sanding module splice surfaces), silicone sealing ring (optional, for enhanced sealing performance), tape measure (for measuring window height and frame dimensions).
II. Printing Stage: Parameter Settings and Quality Control
Printing parameters can be reconfigured for infill to find a balance between module quality and material usage. It is recommended to prioritize quality for sturdier modules, though 5% infill has also been tested and is usable (approximately 400g of filament).
2.1 Model File Preprocessing
1. After obtaining the model file of the corresponding dimensions, import it using Bambu Lab slicing software. Check model integrity, focusing on confirming that critical areas such as the 12mm baffle clamp width and sliding window snap opening adaptation structure are undamaged.
2. Calculate the required module combination based on the actual window height. For example: if the window height is 800mm, a combination of “Top Module 222mm + Exhaust Port Module 200mm + Middle Module 200mm + Middle Module 100mm + Bottom Module 44mm” can be used (Total height 222+200+200+100+44=766mm; remaining dimensions can be supplemented by fine-tuning bottom shims or top seals).
3. When slicing the model, set the splice surface (semicircular snap slot area) as the print bottom surface to ensure this surface is flat and reduce subsequent splicing gaps.
2.2 Printing Process and Quality Inspection
1. Before printing, perform nozzle calibration and hot bed leveling to ensure high first-layer adhesion and prevent model warping.
2. During printing, closely monitor the formation of critical dimension areas (such as the 12mm baffle clamp width). If dimension deviations occur, promptly pause and adjust the nozzle temperature or print speed.
3. After printing, wait for the model to cool to room temperature before removal. Carefully remove supports with a utility knife, especially internal supports of the exhaust port module, to avoid damaging the channel structure.
4. Measure the dimensions of each printed module with calipers. Confirm that core parameters such as baffle clamp width and snap slot dimensions match the design values. The error must be controlled within ±0.5mm; otherwise, parameters need to be readjusted for reprinting.
III. Assembly Stage: Modular Splicing and Sealing Treatment
3.1 Module Preprocessing
1. Gently sand the semicircular snap slot splice surfaces of each module with 800-grit sandpaper to remove print burrs and layer lines, ensuring a tight fit during splicing and reducing air leakage.
2. Check if the snap slots of the top, exhaust port, middle, and bottom modules are intact. If any breakage or deformation exists, the module needs to be reprinted.
3.2 Modular Splicing Steps
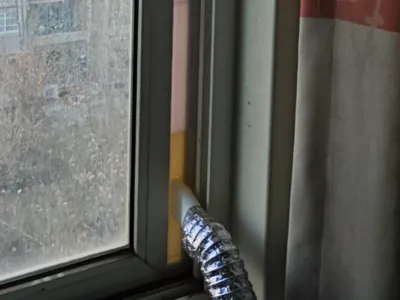
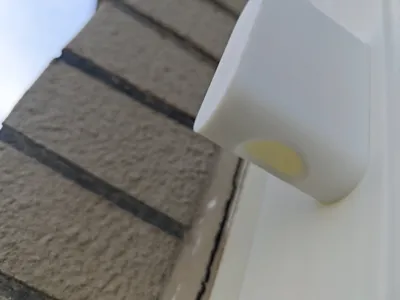
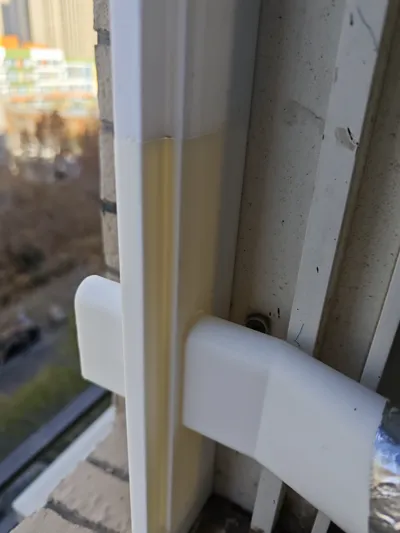
- Determine splicing order: Splice in the order of “Bottom Module → Middle Module (combine according to height requirements) → Exhaust Port Module → Top Module”. The exhaust port module must face outwards (ensuring the exhaust direction is downwards, complying with the downward exhaust setting requirements).
- Snap slot alignment: Align the semicircular protrusion of the lower module with the semicircular recess of the upper module, and gently press until the modules fully fit together, with no obvious gaps at the splice. If fitting is difficult, a small amount of silicone can be applied to the snap slots (to enhance sealing and aid fixation).
- Overall inspection: After splicing is complete, place the system upright and observe for any tilt or looseness. Gently push each module by hand to ensure no wobbling, and that the exhaust port channel is clear and unobstructed.
- Sealing reinforcement: If there are tiny gaps at the splice, a high-temperature resistant silicone sealing ring can be wrapped around the exterior, or a specialized sealant can be applied (choose a type that does not corrode 3D printed materials), to ensure no air leakage.
IV. Installation Stage: Window Frame Fixation and Position Debugging
4.1 Pre-installation Preparation
1. Use a tape measure to measure the actual snap opening width of the window frame and the sliding window gap. Confirm that the sliding window snap opening width is ≥10mm, and the 12mm baffle clamp width can perfectly snap into the window frame structure.
2. Clean the window frame installation area, removing dust, grease, and other impurities, ensuring the installation surface is dry and clean.
4.2 Formal Installation Steps
- Position exhaust direction: Clarify the system's exhaust port orientation, strictly install according to the downward exhaust setting, meaning the exhaust port outlet faces downwards, to avoid rainwater backflow and outdoor drafts entering the room.
- Fix baffle structure: Align the bottom baffle of the system with the window frame snap opening and gently push it in, ensuring the 12mm baffle clamp width area is fully snapped into the window frame, without looseness (If the snap opening is too wide, anti-slip pads can be attached to both sides of the baffle for auxiliary fixation).
- Adjust verticality: After installation, use a spirit level to check if the system is vertical. If there is a tilt, subtly adjust the baffle's position within the snap opening, or insert thin shims at the bottom for correction.
- Seal window frame gap: The gap between the system and the window frame can be filled with foam weatherstripping or silicone sealant to further enhance sealing performance and prevent cold air infiltration.
4.3 Post-installation Debugging
1. Activate the exhaust function of the Bambu Lab printer. Feel the airflow by hand at the system's exhaust port outlet to confirm smooth exhaust without significant resistance.
2. Close doors and windows, light a candle indoors (or use a smoke generator), and observe whether the candle flame is stable. If the flame does not waver, it indicates good system sealing with no air leakage.
3. Simulate a rainy environment (by spraying water towards the exhaust port outlet with a spray bottle). Check for water seepage on the indoor side, ensuring the downward exhaust design effectively blocks rainwater.
V. Precautions and Maintenance Suggestions
- Material selection: If consistently in high-temperature or humid environments, it is recommended to use PETG filament for all modules to prevent PLA filament from deforming due to moisture absorption or high temperatures.
- Dimension adjustment: If the actual window frame dimensions are unique, the model dimensions can be finely adjusted in the slicing software, but the 12mm baffle clamp width and exhaust port structure must not be arbitrarily modified to avoid affecting functionality.
- Routine maintenance: Check the exhaust ports for blockages weekly, clean dust from module splice points monthly, and promptly replace aging seals if found.
- Safety tips: Avoid touching the hot nozzle during printing. If using silicone sealant during installation, ensure the sealant is fully cured before activating the exhaust system.
By following the steps above, the printing and installation of the Bambu Lab Model Window Baffle Exhaust System can be completed. The modular design of this system provides extreme adaptability, allowing for stable and efficient exhaust results as long as core dimension requirements are strictly followed. If dimension adaptation issues are encountered during operation, the number of middle modules can be increased or decreased based on the actual situation.
Comment & Rating (1)