TRAC Cable Organizer - TRAC D (+)


Print Profile(1)

Description
Boost Me (for free)
Would really appreciate a boost! 🙏

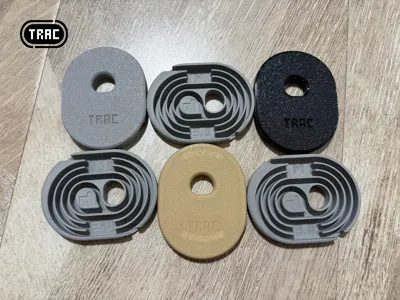
The design concept of the TRAC series is not to hide clutter, but to organize the layout with basic graphics, presenting order and neatness
New experimental work TRAC D (+):
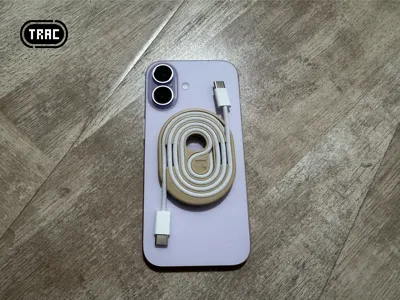
- Based on TRAC D, MagSafe magnetic attraction is added, allowing it to be attached to the back of an iPhone or an iron surface
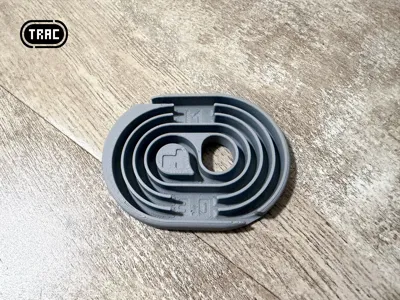
- Can store a 3.0mm diameter, 1-meter long cable (perfectly compatible with Apple iPhone's original Type-C braided cable)
- Length: 68mm, Width: 53mm, Thickness: 8.2mm
- Added an 'M' (MagSafe) mark to the TRAC D model
no supports, no brim, quick printing, using 0.2mm layer height, 15% spiral infill, single model printing takes 32 minutes
To ensure printing success, please read the following instructions!!!
MagSafe magnets need to be prepared in advance. MagSafe magnets come in two versions: built-in and external. Since this model only uses the magnet itself, both versions can be used; just confirm the direction during installation
This model uses 0.8mm thick MagSafe magnets, which is a common size. Theoretically, anything thinner than 0.8mm can also be used


This model will use 12 of the annular magnets, meaning one set of MagSafe magnets can make three TRAC D (+)
First, remove the adhesive paper from both sides of the MagSafe magnet

The measured magnet thickness is 0.8mm; anything thinner than 0.8mm can also be used

Start model printing; at the default 0.2mm layer height, printing will pause at the 7th layer

Place the previously prepared magnets into the model's grooves one by one; 12 magnets per model, pay attention to the magnetic pole direction!!!

Below is the model with all magnets placed

To ensure successful printing, it is recommended to apply a small amount of build plate adhesive to the magnet surfaces with a cotton swab after placing the magnets. This prevents grease on the magnets from affecting print quality
Finally, confirm that the magnet height is flush with the model's print height (or lower than the print height, depending on magnet thickness). If it is higher than the print height, do NOT resume printing, as this will cause nozzle damage!!!
Once the height is confirmed correct, resume printing, observe the entire process of the magnets being sealed, and then wait for the model to complete
PS:
Please choose filament with a low TD value, otherwise the magnet's outline will show on the bottom surface

The flipped magnet can be used to attach MagSafe power banks
Boost Me (for free)
Feel free to share your actual usage results. Drop a comment if you have any suggestions or inspiration 🙏
 Folding fan with feather textures
 spool - a decent cable winder
 LOOP - a decent cable organizer
 Decayed Master Sword Metal Strut Remix
 Master Sword Metal Strut Remix
Boost Me (for free)
Would really appreciate a boost! 🙏
License
You shall not share, sub-license, sell, rent, host, transfer, or distribute in any way the digital or 3D printed versions of this object, nor any other derivative work of this object in its digital or physical format (including - but not limited to - remixes of this object, and hosting on other digital platforms). The objects may not be used without permission in any way whatsoever in which you charge money, or collect fees.
Comment & Rating (0)