Expedition 33 Journal Marker


Print Profile(3)


Bill of Materials


Description
Even if we fail, we lay the trail for those who come after.
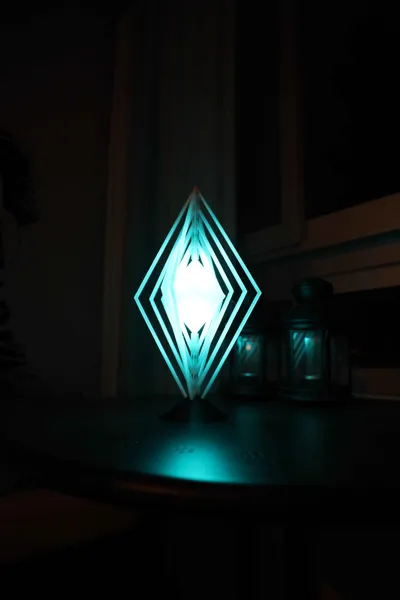
Life sized journal marker from the game Clair Obscur: Expedition 33
This 3D-printed journal marker is designed to be printed in separate parts, in either PLA Natural or PETG Translucent Clear, to then be assembled with super glue, 12x 4x2mm round magnets, 12x 8x2mm round magnets and RGB tealights. I will link which specific ones in the bill of materials below.
I have uploaded .3mf files for both materials, and pictures of both to show the differences. In short:
PLA Natural:
Easier to print
Shows better colour
PETG:
Stronger
Brighter light
Print guide:
This is a difficult model to print, and should only be printed if you know what you are doing. The printed parts are very thin, and thus need support to print well. It will also challenge the setting “slow_down_layer_time” in the cooling tab in your filament settings. I have found that increasing this to 20 seconds gives a good quality of the printed part.
The infill pattern in the .3mf files is set to Cubic. This can be changed of course, but it will affect how the light spread inside of the parts. I have found Cubic infill to give the best light spread.
The downloadable .3mf files includes all the settings i used to successfully print this model multiple times without any failures.
If you are printing this in PETG, then you will need to dry your filament well both before and during the print, or you will get horrible stringing.
You need to print one of each buildplate in the uploaded files (Either PLA OR PETG, not both. Base is in a separate file.)
Assembly Guide:
Carefully remove all support on the layer parts. This includes the small support bits in the outside magnet holes. the support panes on the outside can be carefully bent/twisted loose.

Glue together the two halves of each layer. This is fiddly and requires patience. Apply the glue to the contact area, on the inside half of each end.

While waiting for the the glued together layer frames to set, prepare the magnets in the core parts. This is done by glueing four 4x2mm round magnets into the holes on the inside of each core half. Ensure that the polarities between the two core halves fit together. I recommend placing all four magnets the same way on each halves, so that you do not have to rotate the core halves to fit them together.

Add two 4x2mm round magnets to the outside of the two core halves. I recommend placing both of these the same way so that the core can be placing upside down without any issues. This is only to avoid having to find which direction the parts fit together.

Once the glue for the layer frames, glue in the magnets to each layer. The layer closest to the core (Layer 4/the smallest one) uses two 4x2mm round magnets on the inside and two 8x2mm magnets on the outside. Make sure that the directions of the magnets fit together between the different parts while glueing these in place. I recommend placing them in the directions shown in the image below. Again, this is only to avoid having to find which direction the parts fit together.

Repeat this process with layers 1-3, but this time only using 8x2mm round magnets. Layer 1, the largest layer, only uses magnets on the inside.
You should end up with this.

Turn on the RGB tea lights, and turn them off using the controller. Put them inside of each core half upside down, then put the two core halves together.


Put The core inside of the layer 4 frame. The core will just fit between the bars.

- Repeat this for each layer.

Place the finished journal marker in the base. Do not use glue for this!

Turn on the RGB using the controller and set the light to the second green option, circled below.

Learn from the recorded journals of past expeditions.

Tomorrow comes.
Membership
Interested in selling these in your store? Join my newly set up Commercial License Membership today!
License
You shall not share, sub-license, sell, rent, host, transfer, or distribute in any way the digital or 3D printed versions of this object, nor any other derivative work of this object in its digital or physical format (including - but not limited to - remixes of this object, and hosting on other digital platforms). The objects may not be used without permission in any way whatsoever in which you charge money, or collect fees.
Comment & Rating (18)