Multi-Voltage Power Tool Battery


Print Profile(3)


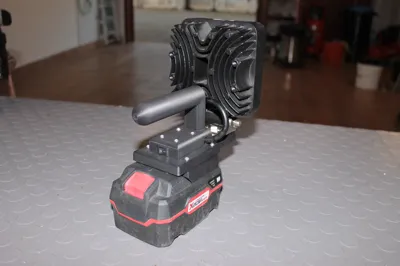
Description
🔦 Professional Multi-Voltage (10-30V) Flashlight with Universal Tool Battery Adapter
Do you need a powerful and reliable light source on construction sites, in workshops, or during excursions Tired of low-power flashlights or having to buy specific batteries
This project allows you to transform your common power tool batteries (Parkside X20V, Milwaukee M18) into a robust and very bright portable flashlight, ensuring superior power and autonomy
✨ Technical Specifications and Strengths
- Light Source: Uses a standard LED headlight for vehicles or work, compatible with a wide DC voltage range from 10V to 30V
- Battery Compatibility: Modular design that natively supports Parkside X20V and Milwaukee M18 batteries (other adapters can be easily designed)
- Control: Robust toggle switch, easy to operate even with gloves
- Construction: Solid, ergonomic, and durable structure, optimized for 3D printing
🛠️ Required Components List
To replicate this flashlight you will need the following items (in addition to the 3D Printed parts):
| Component | Specifications | Quantity |
|---|---|---|
| LED Headlight | Working Voltage 10V-30V DC | 1 |
| Switch | Toggle Switch | 1 |
| Threaded Inserts | M3 Heat-set Brass Inserts | 8 |
| Screws | M3x20 Screws | 8 |
| Connectors | Male Fork Terminals | 2 |
| Electrical Wire | Two-color (Red and Black) | Approximately 1 m |
🔩 Quick Assembly Instructions
- Preparation: Insert the 8 M3 brass inserts into the seats using a flat-tip soldering iron (heat-set inserts)
- Wiring: Secure the LED headlight and the switch. Connect the headlight to the switch and then bring the Red and Black wires to the base of the handle
- Battery Adapter: Secure the Male fork terminals to the ends of the main wires. These will be the contact points for the specific battery adapter (M18 or X20V)
- Closure: Assemble the handle and flashlight head parts using M3x14 and M3x20 screws
- Test: Insert the desired battery into the adapter and test the switch operation
⚠️ IMPORTANT SAFETY AND BATTERY DISCHARGE WARNING
WARNING: This project does not include a deep discharge protection circuit (Low Voltage Cut-Off - LVC)
License
You shall not share, sub-license, sell, rent, host, transfer, or distribute in any way the digital or 3D printed versions of this object, nor any other derivative work of this object in its digital or physical format (including - but not limited to - remixes of this object, and hosting on other digital platforms). The objects may not be used without permission in any way whatsoever in which you charge money, or collect fees.
Comment & Rating (7)