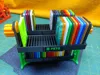
Filament Swatch Carousel - Rotating Holder Display


Print Profile(1)
Description
Swatch Carousel - Rotating Display/Holder for Filament samples
Here we are … holder for swatches/filament samples that is not only fully functional, but also quite funny :-) All samples in one place, clearly arranged and with minimal space requirements. Moreover, there should be sufficient capacity for everyone's needs – just choose the right size.
There are 3 sizes available:
- M - total 45 samples in 3 holders (15 pieces each)
- L - total 75 samples in 3 holders (25 pieces each)
- XL - total 105 samples in 3 holders (35 pieces each)
The versions are compatible - if you decide to change the size over time, you only need to print new holders and the BaseLink - you can reuse the other parts without the need for repeated (and unnecessary) printing.
BTW - the overall size of the model varies only in length depending on the selected size - M - length 18 cm; L - length 24cm; XL - length 30 cm. Other dimensions remain the same for all versions - height 18 cm and width 13 cm
IMPORTANT - Compatibility
This particular model is designed (and therefore intended only) for the  |
It may be suitable for other types of samples, but of course it may not be.
I plan (eventually) to make a version for other swatch models. So if you're interested, check back here from time to time as any links to new models will be posted here.
Material
PLA appears to be the ideal material - after all, the model was developed and tested using Bambu PLA Basic.
(By the way, no part of the model requires support. Therefore, support is set to OFF)
What to print?
All necessary parts of all versions/sizes are included in the Main model profile.
1. Print all parts on Plate 1 and Plate 2 (they are universal - the same for all sizes).
2. Then, depending on the size you have chosen, print two more plates (you need 3 holders and 1 "Baselink") :
- Plate 3 and 4 for size M
- Plate 5 and 6 for size L
- Plate 7 and 8 for size XL
Note: In the print profile, the model is set according to my favorite color combination: orange, black, and green. Of course, you can change the colors to suit your taste, which is certainly better than mine :-)
The last Plate 9 is optional - contains labels (inserted into slot in the hodler) - you can use them or not. If you want to use them, use the pre-prepared ones or customize them according to your needs. You can change the color, text for each one. There are no limits to your imagination.…
Assembly
Assembly is simple and should be clear from the model's images. However, here is the recommended procedure in individual steps
1. Connect both rotating carriers (yellow) to the holder (red) using a screw pin (blue). There are two carriers and they are identical/interchangeable. First on one side, then on the other.

Note: The screw pin must be tightened all the way (in reasonable manner, of course). If printed correctly, even when fully tightened, it still allows the carrier and holder to rotate freely. If it restricts free movement after tightening, loose it slightly - free rotation of the carrier and holder is must.
2. Repeat step 1 for the other two holders, so that all 3 are now connected to both carriers

3. Join the “BaseLink” (step A) and one Side of the Stand (there are 2 and they are the same).

Then place this side on the shaft of the rotating carrier (step B).
Then attach the second side to the shaft of the second carrier (step C) ….
… and connect that Side to the BaseLink (step D).
4. You are almost done … this is what you (should) have ..

5. Screw the two rotating knobs onto both shafts (knobs are identical)

NOTE: Tighten the knobs securely – they are designed so that even when fully tightened, they do not restrict free rotation. If they restrict free rotation after tightening, loosen them slightly – free movement/rotation is (understandably) important.
6. Now you're really done :-)
The model is complete and ready to use. I hope you like it.
7. Optional - Labels - if you decide to use them, print the appropriate labels and insert them into the holder. You can use either the pre-prepared labels or customize them according to your needs. You can change the text, color, etc.
The labels have different print settings than the rest of the model to ensure the highest print quality. The layer height is 0.16 mm and the width is 0.35 mm. The print profile contains the all necessary settings.
Note: If the label is too small or too large after printing, you can adjust its size in the slicer (Scale function on the X axis). Changing the size by 0.5% (i.e., from 100% to 100.5%) will change the size by 0.2 mm, which should be sufficient.
Enjoy !
License
You shall not share, sub-license, sell, rent, host, transfer, or distribute in any way the digital or 3D printed versions of this object, nor any other derivative work of this object in its digital or physical format (including - but not limited to - remixes of this object, and hosting on other digital platforms). The objects may not be used without permission in any way whatsoever in which you charge money, or collect fees.
Comment & Rating (0)