P2S / P1S/ X1C bulit-in toolhead cover holder


Print Profile(1)

Description
Membership
Welcome to Den!🐾 Join the BigTeddy community. Support my creative work as a 🧸Cub Teddy, or unlock commercial sales rights as a 💼 Big Teddy.
******** 2026.01.12 Update ********
I made V2, Which doesn't need magnet, and re-calibration.
please check out below, if you interested :)
P2S bulit-in toolhead cover holder V2

---------------------------------------------------------------------------------------------------------------------------------------------------------------
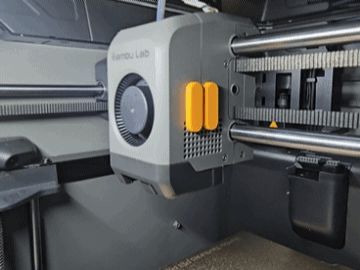
I created a magnetic toolhead cover holder that attached to the toolhead itself for easy access.
Designed for P2S,
but may work with P/X series.
(they have the same side holes on the toolhead)
It stays with no problem during the use of printer,
and of course, it works perfectly for its original purpose of holding the cover :)
If you use a P/X series printer, you might want to give this a try.
It only requires 1.18g of filament.
You only need two materials:
- 1.18g of filament
- 8mm x 3T magnets 4 eaInsert magnet into each holder's slot.
(I didn't use superglue. )Snap in the pins into the holes as shown below.

Attach a magnet to the inside of the cover.
(This holds the holder more securely and adds magnetic force.)
*** Update on 2025-12-14 ***
I found minor misaligned Nozzle Purge Position problem.
In my case, nozzle is misaligned 2~3 mm left from center.
so I found the solution for this.
the Procedure takes only a few minute,
and completely solve problem.
It doesn't cause any problem during print, but purge.
as shown on photo, when purge, filament from nozzle sits on the wiper.
I had no problem with it yet, but It's better to move it normal position.

Here's the solution.
Bambulab providing Manual calibration for Nozzle Purge Position.
https://wiki.bambulab.com/en/p2s/troubleshooting/purge-wiper-position-calibeation
download and run
Purge offset detection file: purge_pos_test.gcode
- measure your offset between the nozzle and groove on the nozzle wiper.
run corresponding Calibration file from the package
Calibration file package: cali.7z
- You will need USB flash memory duiring this process.
hope this will help, who need it.
thanks :)
Boost Me (for free)
I truly enjoy creating models and communicating with all of you. Your active feedback always makes my designs better! Your boosts are a huge help in letting me test and develop more fun models (you'd be surprised how much filament gets wasted in testing! :)). 🐻Thank you so much for your support!
License
You shall not share, sub-license, sell, rent, host, transfer, or distribute in any way the digital or 3D printed versions of this object, nor any other derivative work of this object in its digital or physical format (including - but not limited to - remixes of this object, and hosting on other digital platforms). The objects may not be used without permission in any way whatsoever in which you charge money, or collect fees.
Comment & Rating (54)