【Open Source】 - Imitation Ruger Mark 4, modular gun-type vacuum cleaner, air blower. STEP files provided


Print Profile(1)

Description
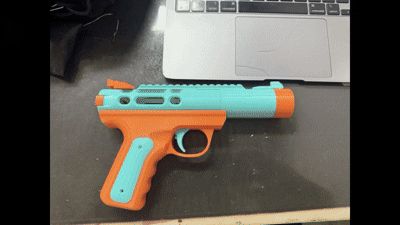
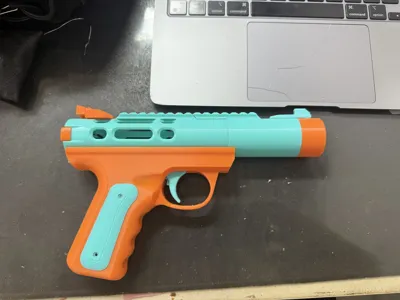
Open Source - Modular: Ruger Mark 4 Style Dual-Mode Air Blower

Boost Me (for free)
Introduction
- Dual-Purpose Device: The motor can be installed forwards or backwards, transforming it into a blower or a vacuum cleaner
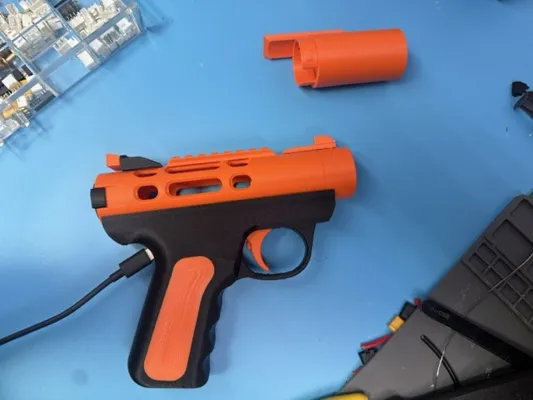
- Modular Design: Modules of various lengths can be replaced
- If you are satisfied, please leave a good review

Two Modes
🌀 Blowing Mode (Motor forward)
- Dust cleaning|Charcoal ignition|Car dust removal
🌀 Suction Mode (Motor reverse)
- Smoke extraction|Debris removal
Design Highlights
- Precisely replicates the Ruger Mark 4 appearance
- Full 3D printed lightweight structure, minimal support design
- Ergonomic grip
- Modular design allows adjustment of length, easy maintenance. Add filter cotton
Required accessories


Core Components
| Part | Specification | Quantity |
|---|---|---|
| High-speed brushless motor | 7.4V, φ29mm Purchase link https://item.taobao.com/item.htm?abbucket=1&id=908644531064 | 1 pc |
| 2S lithium battery | 2S 18650 typec charging port Purchase link https://item.taobao.com/item.htm?abbucket=1&id=765271827185 | 1 pc |
| Micro switch | Two-pin side 12×12×4.5mm | 1 pc |
| Housing fixing screw | M2×10mm | 1 pc |
| Silicone wire | 16AWG | 30cm |
| Rocker switch | 8.5*13.5 6A | 1 pc |
| Type-C port | Purchase address https://item.taobao.com/item.htm?spm=a1z0d.6639537%2F202410.item.d689905051322.6d847484hXKAWh&id=689905051322
| 1 pc |
Installation Method
Confirm the quantity of accessories

Use glue to secure the left and right decorative panels of the grip

Force the trigger button (12×12×4.5mm) into position

Insert the trigger

Then use 2cm of 1.75 filament to secure the trigger

Trim the retaining pin

Circuit Part
Trim and reduce the size of the charging board. (Some batteries may integrate smaller charging modules, so trimming is not necessary)

Remove the Type-C port

Trim

Solder the charging board

Test Circuit
12 is the fan switch. 34 is connected to the trigger button. +- connects to the 2S battery

Solder the button, switch, battery, and remove after testing is complete

Install Barrel Part
Insert the motor as needed, and route the wires to the center


Solder the control circuit switch

Snap on the control switch

Install Battery
Prepare to insert the battery

Solder the Type-C. After inserting the battery, install the barrel. Then push forward to secure it

Use M2-8mm screws to fix the barrel and main body


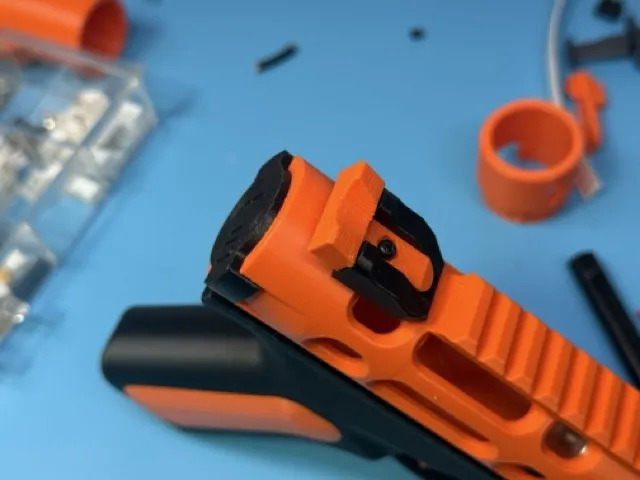
Install Decorations
Use M3-5 screws to fix the nozzle and front sight

Use M3-5 screws to fix the rear sight mount
Usage Test
Charging and usage tested perfectly. Welcome everyone to come and make it. If you'd like, you can follow me! See more fun stuff

License
You may create derivative works based on this object, provided that all such derivative works are published exclusively on the MakerWorld platform and include proper attribution to the original creator. You may not share, upload, host, distribute, or publish this object—or any derivative work of this object—on any other digital platform, marketplace, or distribution channel. Commercial use of this object and any derivative works is strictly prohibited. This includes, but is not limited to, selling, renting, sublicensing, or using the object in any context in which you receive monetary compensation or other financial benefits.
Comment & Rating (7)