P2S Easy-Clean Debris Tray - Diaper


Print Profile(2)


Description
The model details are just below—feel free to scroll down!
Boost Me (for free)
Thanks for checking out my design! If you liked it, a Boost would mean a lot. I truly appreciate every follow, download, like, and boost. Thank you for your support!

- Making 3D Printing More Fun & Functional. -
◀ Printer Upgrade Collection ▶


🚀 Looking for the Easy-Clean Debris Tray for Bambu Lab P1/X1/H2/X2D Series? This is available here.
👉 Easy-Clean Debris Tray for Bambu Lab P1S /P1P / X1C
👉 Easy-Clean Debris Tray for Bambu Lab H2C / H2S / H2D
👉 Easy-Clean Debris Tray for Bambu Lab X2D
Easy-Clean Debris Tray for Bambu Lab P2S
🆕 Update Log
- [2026-01-18]: Added a dedicated profile for Vento Box for P2S.
Overview
Keep your printer clean and simplify maintenance. This tray system is designed to catch filament scraps, purge lines, and dust before they scatter across the printer floor. Instead of vacuuming or picking up debris by hand, you can simply lift out the entire unit and carry all the collected waste directly to the trash.
Thanks to your amazing feedback on the [Easy-Clean Debris Tray for P1 & X1 Series] (4.8 stars / 100+ reviews!), the P2S version is finally here.
This isn't just a resized model; I’ve completely redesigned it from scratch to ensure a precise fit for the P2S. It’s optimized to make your printer maintenance as effortless as possible.
Key Features
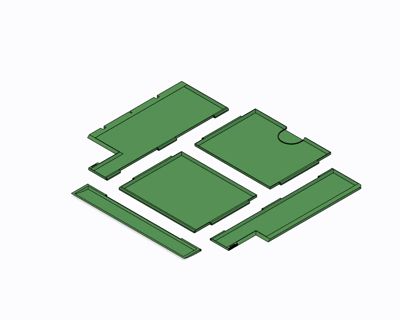
- Effortless Cleaning: A 5-part tray system (Front Extend, Front, Rear, Left, Right) that neatly catches debris, filament scraps, and dust inside your printer.
- Quick, Tool-Free Removal: Left and right trays are connected with smart filament hinges that fold slightly, allowing the entire tray set to be lifted out with ease.
- No Tools Required: Hinges are assembled using standard 1.75mm filament—simple and fast.
- Secure Fit: Locks firmly in place at multiple points to prevent movement during printing.
Dimensions & Compatibility
- Designed Dimensions: 338mm (W) × 304mm (D)
- Confirmed Compatibility: Bambu Lab P2S
⚠️ IMPORTANT - Before You Print:
- Measure the internal width of your printer from the left inner wall to the cooling fan unit on the right. Ensure it is at least 338mm.
- Ensure the internal depth is at least 304mm.
- Print the Left Tray first as a test piece to verify proper fit before printing all components.
- Due to individual printer tolerances, if the test piece does not install smoothly, consider adjusting your slicer settings.
Assembly Instructions
- Print all five components (Front Extend, Front, Rear, Left, Right) according to your recommended settings.
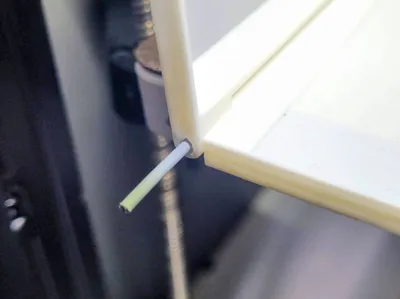
- Cut 1.75mm filament to the following lengths for the hinge pins:
- 266mm × 2 pieces (for the main left/right hinges)
- 248mm × 1 piece (to connect the Front and Front Extend trays)
- Main Assembly: Align the Front and Rear trays with the Left and Right trays, then insert the two 266mm filament pins. After insertion, trim any excess filament flush with the outer edge of the hinges.
- Extend Tray Attachment: Align the hinge holes of the Front tray and the Front Extend tray, then insert the 248mm filament pin to connect them. Trim the excess filament flush with the edge.
- 💡 Tip: If the filament is difficult to insert, try cutting the end at a 45° angle for easier threading.
- Testing: Test the hinges by gently folding the left and right trays—they should move smoothly.

Installation Guide
- Position the Set: Place the entire connected tray set into the printer. Ensure the Front and Rear sections are pushed all the way to their respective ends of the printer floor.
- Place Left & Right Trays Finally, press down the left and right trays so they sit flush with the bottom and secure the full set in place.
Print Notes & Handling
- Cooling: Wait for the build plate to cool down completely before removal. Attempting to peel it off while hot may cause the parts to warp or deform.
- Bed Adhesion: Ensure your build plate (ideally the official Textured PEI Plate) is thoroughly degreased with dish soap or IPA. Avoid touching the surface with your bare hands, as skin oils can ruin adhesion.
- Filament Condition (Dryness): Ensure your filament is dry before printing. Moisture-laden filament can cause stringing, bubbling, and poor surface finish. For hygroscopic materials like PETG, PLA, we recommend using a filament dryer or oven before use.
- Calibration: If you experience failure with this print, it may indicate calibration issues that will affect your future projects. We recommend performing printer and filament calibrations beforehand.
Before You Use
- Minor adjustments (light sanding) may be needed due to individual printer tolerances. Do not force installation.
- Check Before Use: Ensure nothing interferes with moving parts (print head, bed, etc.) and that the tray set is fully seated and stable.
- 🛑 Use at your own risk. The designer is not responsible for any damage caused by use or misuse of this model.
🔥 my favorite printer upgrade for P2S 🔥 | |
 |  |
 |  |
 |  |
 |  |
 |  |
 |  |

License
You shall not share, sub-license, sell, rent, host, transfer, or distribute in any way the digital or 3D printed versions of this object, nor any other derivative work of this object in its digital or physical format (including - but not limited to - remixes of this object, and hosting on other digital platforms). The objects may not be used without permission in any way whatsoever in which you charge money, or collect fees.
Comment & Rating (187)