Modular FPV Drone Race Gate


Print Profile(1)

Description
Please read this entirely before you print!
If you find this model useful, please consider boosting as it takes a lot of time and spent filament to design and test. This model can consume a lot of filament, so please print the test bed before you proceed to the full model.
Boost Me (for free)
Complex models take time and burn through a lot of filament. Please consider boosting if you find this model useful. Please also make suggestions for my models and I will do my best to address them.
I have a much simpler FPV gate here if you are looking for a quick print:
https://makerworld.com/en/models/502631-fpv-drone-race-gate-modular-assembly#profileId-440515
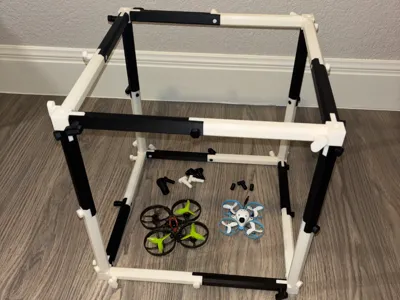
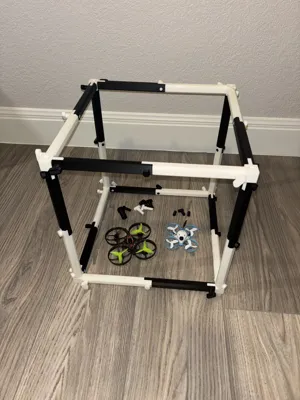
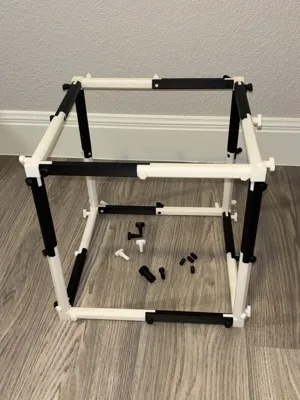
This is a heavier-duty modular FPV drone gate (cube) which can be printed in 300mm(12”) through 600mm(24”) size using various pieces in the kit. You can also stack them using included dowel plugs or superglue the dowels if you want the stack to be permanent. There is an additional corner pieces for attaching side-by-side.
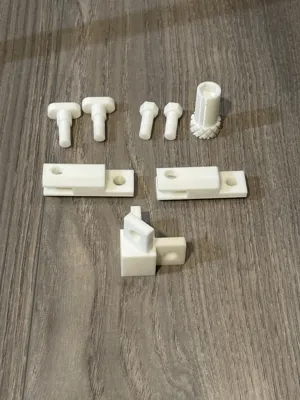
At a minimum, you will need to print 8 corner pieces, 24 side-segments (12 inside-facing and 12 outside-facing marked I and O), and 30 thumb screws or 30 bolts. This will complete 1 full cube.
If you want to stack vertically, you will need to print an entire second cube and a set of 4 dowel pins to line them up. Stacking horizontally can use the t-shaped connector in the at each of the 4 connecting corners.
I’ve printed mine in PLA+ esun, Sunlu PLA + 2.0, and Jayo PLA +. Using 10% infill on rectilinear infill is plenty for all segments. For the dowel pins, thumb screws, and bolts, use 15% infill for strength and rectilinear for sparse infill.
Orcaslicer estimates based on my printer and filaments:
- Plate of 24 corners and 30 thumb screws = 264 grams (25 less if all bolts) PLUS
- 300mm/12” cube: 436 grams PLUS assembly hardware above = 700 grams
- 450mm/18” cube: 637 grams PLUS assembly hardware above = 901 grams
- 600mm/24” cube: 1269.24 grams PLUS assembly hardware above = 1533 grams
Based on my recent purchase of Jayo white and black filaments at $12 all in per 1.1KG, total cost comes out to the following based on .0109 per gram:
- 300mm/12” Cube: $7.63
- 450mm/18” Cube: $9.82
- 600mm/24” Cube: $16.71
Each side of the cube is 2 pieces. You can mix and match – i.e. use one 12” and one 9” if you mate them equally on all sides so you can create in-between and non-square shapes.
There are two options for assembly: An 8mm bolt with a printed assembly tool and a thumb screw. Using all bolts will save about 25 total grams per cube. I would suggest using the bolts everywhere you won’t regularly take it apart and the thumb screws elsewhere for quick disassembly.
Assembly is straightforward. 45-degree corner points are used for vertical sides and t-shaped corner points are used for horizontal segments. Pay attention to the holes. On each side, the threaded half should face inside the cube (also marked with an “I”) so it is easy to assemble from the outside using the thumb screws or bolts. Outside facing parts are marked with an “0”.
PRINT THE TEST PLATE FIRST. It is about 28 grams of material but only 13 grams is scrap. Test the thumb screws and/or bolts in the threaded pieces and check for overall fit before printing the larger segments. It helps if you screw the thumb screws or bolts in the threaded holes once before assembly to clean the threads of any strings or stray bits.
Suggestions for printing to get the best results:
- Make sure your filament is properly tuned as you are printing tight tolerances and threaded material
- Use rectilinear fill. 10% for segments and 15% for the hardware
- For smaller printers you will need to organize the segments diagonally and will be limited to the smaller segments
- Print pieces by object vs. layer. It will take much longer but you will get better layer adhesion and better overall fit/finish
- Print the thumb screws/bolts on a separate plate and keep infill at 15% high with rectilinear.
- MAKE SURE YOUR BED IS CLEAN as the segments have small contact areas at the edge
Some ideas for use:
- Use two or more high contrast colors to make up the segments so it is easier to see in low light
- Use different filament colors on different sides of the cube to indicate entry/exit directions for races or competitions
- Stack one cube on top of the other for multiple gates
- Attach horizontally using the t-shaped connector
- Make a rectangle instead of cube. With varying (and equal) opposite side lengths, it doesn’t have to be a perfect cube
- Connect cubes or rectangles long-ways and wrap to make a tunnel
- If you are setting up something vertically, consider zip-tie the cubes together once pins are in place or super-glue the dowels so it is more stable
- Mount a very thing inward-facing LED strip along the frame to make them visible in complete darkness
License
You shall not share, sub-license, sell, rent, host, transfer, or distribute in any way the digital or 3D printed versions of this object, nor any other derivative work of this object in its digital or physical format (including - but not limited to - remixes of this object, and hosting on other digital platforms). The objects may not be used without permission in any way whatsoever in which you charge money, or collect fees.
Comment & Rating (3)