Gallantmon - Articulated


Print Profile(2)


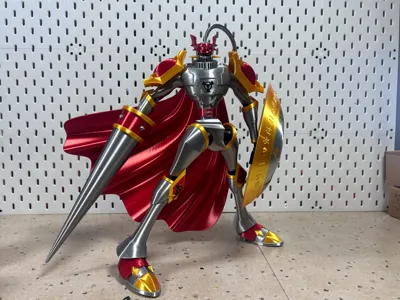
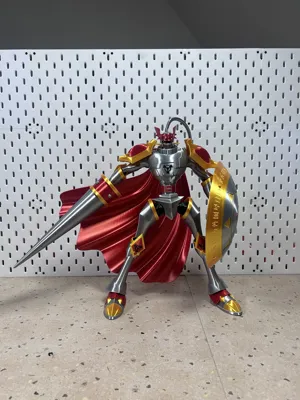
Description
40cm tall
Except for the hair, the exterior has almost no visible supports
Assembly requires glue
Please print the joints with PETG
Due to the weight of the shield and cape, the model can only stand in a standard pose for other poses, please prepare your own stand
Before printing, please clean the printing plate and apply glue
The model was tested on an A1 with Bambu PLA Silk+ and Bambu PETG Basic
The assembly of body parts requires glue adhesion
The assembly between the body and joints does not require glue adhesion, to facilitate replacement when the joints become loose over time
If you use different materials than mine, or want to scale up the model (scaling down is not recommended, as facial details may not print well), assembly may encounter looseness or tightness issues due to different material shrinkage rates and model scaling ratios
If it's tight, apply force to make it fit if it's loose, you can apply nail polish to the joints to fix it
If conditions allow, you can adjust the scaling ratio on the joints yourself to solve this Adjust the overall scaling ratio for the tightness between the joints and the body For the movement tightness of the joints themselves, adjust the scaling ratio of the ball joint in the object list
A good method just came to mind, loose joints can be fixed by hand-coating the fuzzy surface
Joint numbers: (except for the connection between the knee joint and the thigh, the others are not distinguished by left or right)
1-Ankle 2-Waist 3-Wrist 4-Shoulder guard 5-Shoulder Neck and hip joints are unnumbered
Knee joints and elbow joints notch direction

The red mask and eye parts are too small, making assembly somewhat difficult you can choose to print them in multiple colors
These two red parts on the shoulder guards are for increasing bottom adhesion, they need to be clipped off with pliers during installation

The golden rings on the waist, hands, and feet require joint-assisted positioning for installation When applying glue, just dab a small amount on the edges, applying too much can easily glue the joints together with them
Boost Me (for free)
If you like my work, please consider giving me a boost.
License
You shall not share, sub-license, sell, rent, host, transfer, or distribute in any way the digital or 3D printed versions of this object, nor any other derivative work of this object in its digital or physical format (including - but not limited to - remixes of this object, and hosting on other digital platforms). The objects may not be used without permission in any way whatsoever in which you charge money, or collect fees.
Comment & Rating (10)