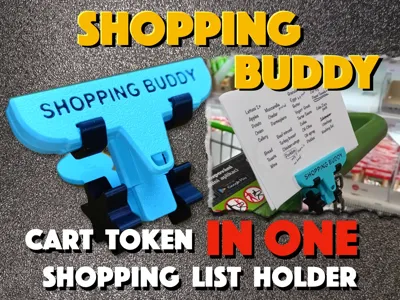
Shopping Buddy - Cart Token & List Holder in One


Print Profile(1)

Description
Shopping Buddy - Cart/Trolley Token & Shopping List Holder in One
A useful helpmate – a shopping cart token and shopping list holder in one. A little "gadget" I made for myself, and then I thought it might be useful to others too. If you're going on a big shopping for your household, you need three things:
- money
- a shopping cart/trolley token
- a list of things to buy
I can't help you with the money... Sorry. I could use some myself :-)
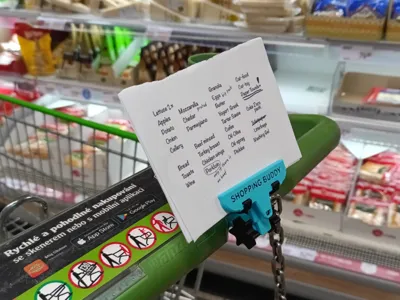
You can find shopping cart tokens everywhere - there are even models here on MW. But they're small, so I tend to lose them. And when I need one, I don't have it with me.
I write my shopping list on paper, but where do I put it? I crumple it up in my hand or stick it in my pocket ... back and forth … until I lose it. And shopping without a list... isn't great - especially when you get home and realize that half of the things you need are missing. (BTW, don't bother me with smartphone apps - I'm old school - paper is paper :-) )
So I thought it would be great to combine Token with a Shopping list holder. And when I finished another model (Hercules Clip) I realized this could be a good starting point ... so here we are now … and I present to you Shopping Buddy.
By the way, if you like the clip used on the Shopping Buddy, take a look at its source - Hercules Clip … link here
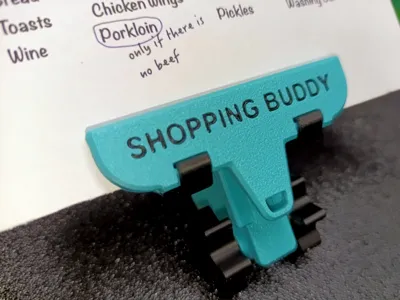
There's not much to add about how to use Shopping Buddy – it should be clear from the photos. Insert the token into the cart (there are different versions of the token available for different countries), turn the joint to the correct position, tighten it, and snap your shopping list into the clip's jaws. Then all you have to do is shop …. and answer questions about where you got such an amazing thing :-)
Printing the model
- Regular PLA is perfectly sufficient - I use it myself and it works great. If you can print PETG, it will be even better.
- The model, based on its size, is printed with a layer size of 0.16mm (tested & verified value on the Herclues Clip model).
No support needed.
You will find everything you need in the Main Print Profile:
Plate 1 - Basic Model
contains all the basic parts needed for Shopping Buddy with a "European" token.
Plate 2 - Alternative Parts
these are optional parts that you may or may not need to print, depending on your requirements. You will find the following items there:
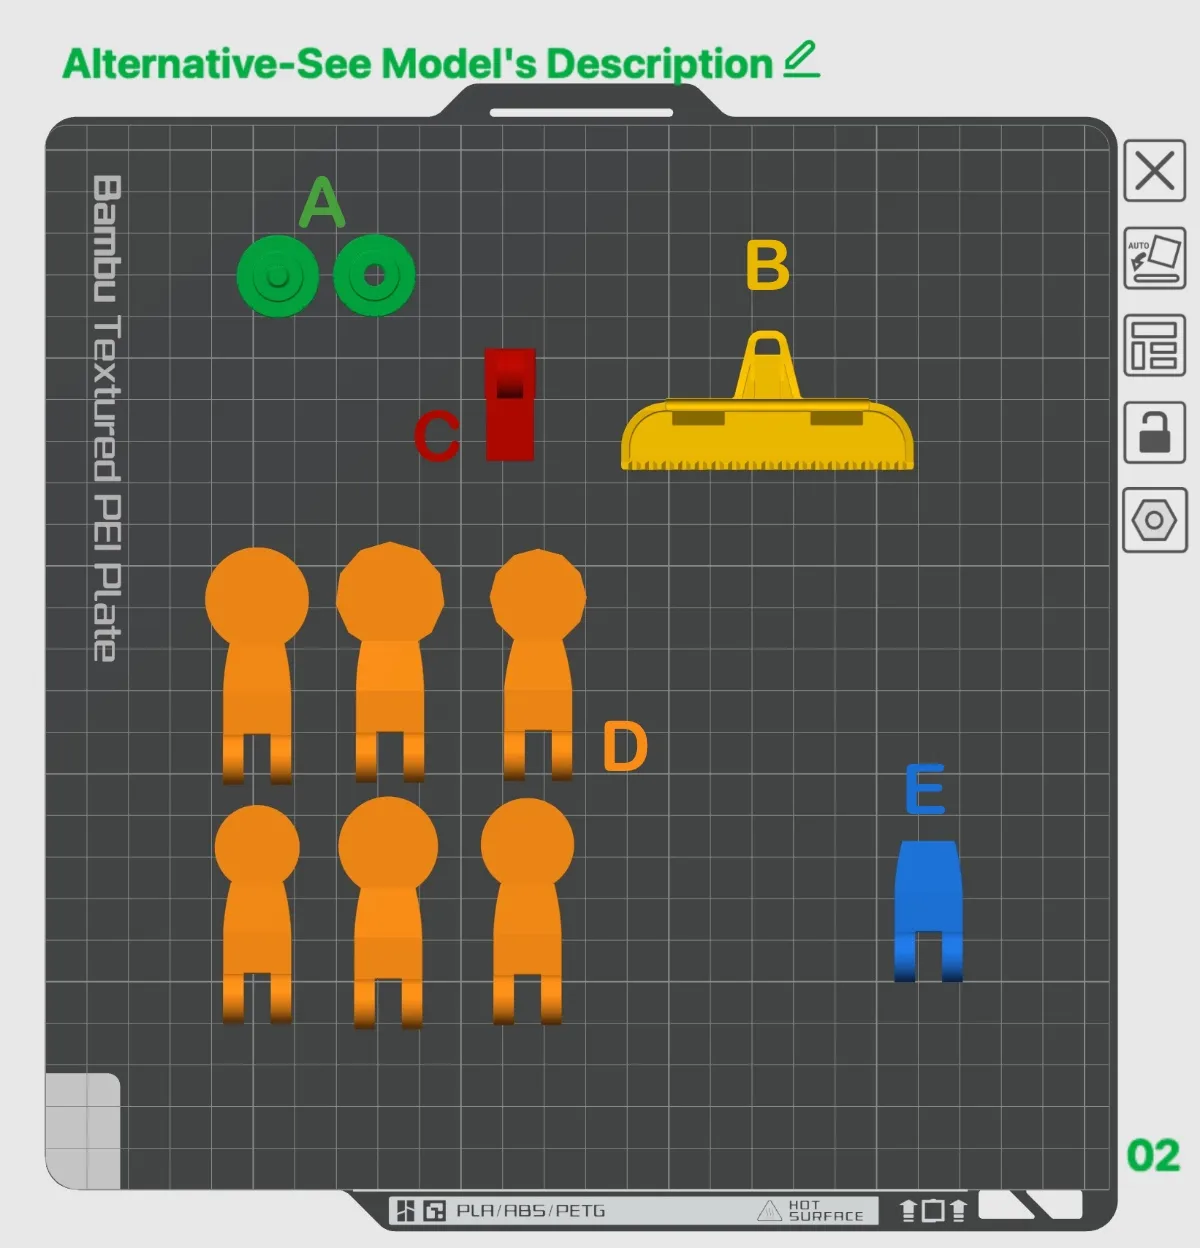
- Alternative Screw and Nut for the joint - this is purely an aesthetic change. If you prefer this to the standard "star" (on Plate 1), print them out...
- Two-color jaw of the holder - unlike the standard single-color one from Plate 1, this one is prepared for two-color printing - if you like a colored inscription, it will save you the work of coloring in the slicer.
- Alternative Part with a dovetail connection... should be used if the standard one (on Plate 1) is too tight for installation (more information below in the "How to assemble the model" section).
- Tokens for countries other than "European". The token on Plate1 is intended as a replacement for a 1 Euro coin. If you need a different one, the following are available: US version, UK versions 1 and 2, Canadian version, Australian versions 1 and 2.
You can easily recognize them by the embossed symbol on the token.
- "Blank Token" - may come in handy if none of the existing tokens suit you... just use the "blank body" and "paint the head" you need onto it...
How to assemble the model
The model is printed in several parts (this was the only way to avoid supports and to maintain the highest quality of all surfaces).
1. Start by connecting one jaw to the joint part - both are equipped with "dovetail". Slide them together until they stop – it should be REALLY TIGHT. This is a one-time connection that you will never take apart again, so it must hold firmly. That's why a really snug fit was designed on purpose.

If the connection is too loose, I recommend adding a drop of "Superglue." If, on the other hand, it is _really_ impossible to connect, there is a alternative version on Plate2, that is slightly smaller - by a few tenths of a millimeter. Try using this one.
2. Align both jaws and snap both springs into place. Both the jaws and springs are based on the Hercules Clip model.
Due to the smaller size of the clip, I recommend using the so-called "alternative method," where you first insert one half of the spring to the hole in the lower jaw and then push the spring into place on the upper jaw with an "up and forward" movement until you hear a "click." You will need to press firmly - the spring is quite strong.

3. Connect both parts of the joint using the tightening screw.

4. OK, your model is assembled and you can go shopping :-)
Actually... don't forget to write a list... so that Shopping Buddy is really put to good use :-)

:-))
Problems?
When assembling and using Shopping Buddy, you may encounter the following issues:
1. The two parts with "dovetail grooves" cannot be connected. I have already mentioned that this connection is "one-time" and therefore designed to be very tight. However, if it is too tight and even the alternative, reduced part (part “C” on the Plate 2) did not help, you can make further reductions of it yourself in the slicer (Bambu Studio).
- Use the SCALE function and decrease the size of “part C” (on the Plate 2) a little bit more - from 100% to 99.5% or 99.2%... This will reduce its size by approximately 0.05mm or 0.1mm... this should be sufficient for the connection grooves, and such a change is irrelevant for the other dimensions of that part.
2. The token does not work - since I am from Europe, I developed and tested the model with a "European token."
I found tokens used in other countries on the Internet - I know what coins are used, I know their dimensions, etc. I designed the tokens exactly according to the dimensions of real coins, but (logically) I couldn't test them in person.
Therefore... if the token does not work for you (and it should work – means - you have the right one), please let me know with a description of "what is wrong" (too small... too thin, too big, too thick...). Making a change/fix is not a problem if I know what is needed. If you dare, you can modify the token yourself - e.g. SCALE in the slicer.
I would also appreciate it if you let me (and others) know that the standard token works OK in your area (thanks in advance).
If you find that none of the tokens are usable in your area, let me know what size/type you need. If you dare, you can use the "empty token" from Plate2 and add-draw the necessary "head" for it.
Hope you'll enjoy your next shopping with Shopping Buddy :-)
License
You shall not share, sub-license, sell, rent, host, transfer, or distribute in any way the digital or 3D printed versions of this object, nor any other derivative work of this object in its digital or physical format (including - but not limited to - remixes of this object, and hosting on other digital platforms). The objects may not be used without permission in any way whatsoever in which you charge money, or collect fees.
Comment & Rating (1)