Search models, users, collections, and posts

Jeep Kit Card

Print Profile(23)

All
X1 Carbon
P1S
P1P
H2D
X1
P2S
H2D Pro
A1
X1E
H2C
H2S
X2D
A2L
A1 mini

0.16mm layer, 2 walls, 15% infill
Designer
4.5 h
1 plate
4.9(1.4 k)

0.16mm layer, 2 walls, 15% infill
Designer
46 min
1 plate
4.8(3.3 k)

0.16mm layer, 2 walls, 15% infill
Designer
26 min
1 plate
4.9(210)

3xMulticolor_0.16mm layer, 2 walls, 15% infill
4.6 h
1 plate
4.8(432)
Click to see more

Open in Bambu Studio
Boost
21976
51481
7557
4.7 k
70.9 k
44.9 k
Released 

Description


edit: 04.03.24 added accessories - canvas top (separate print, no support needed)


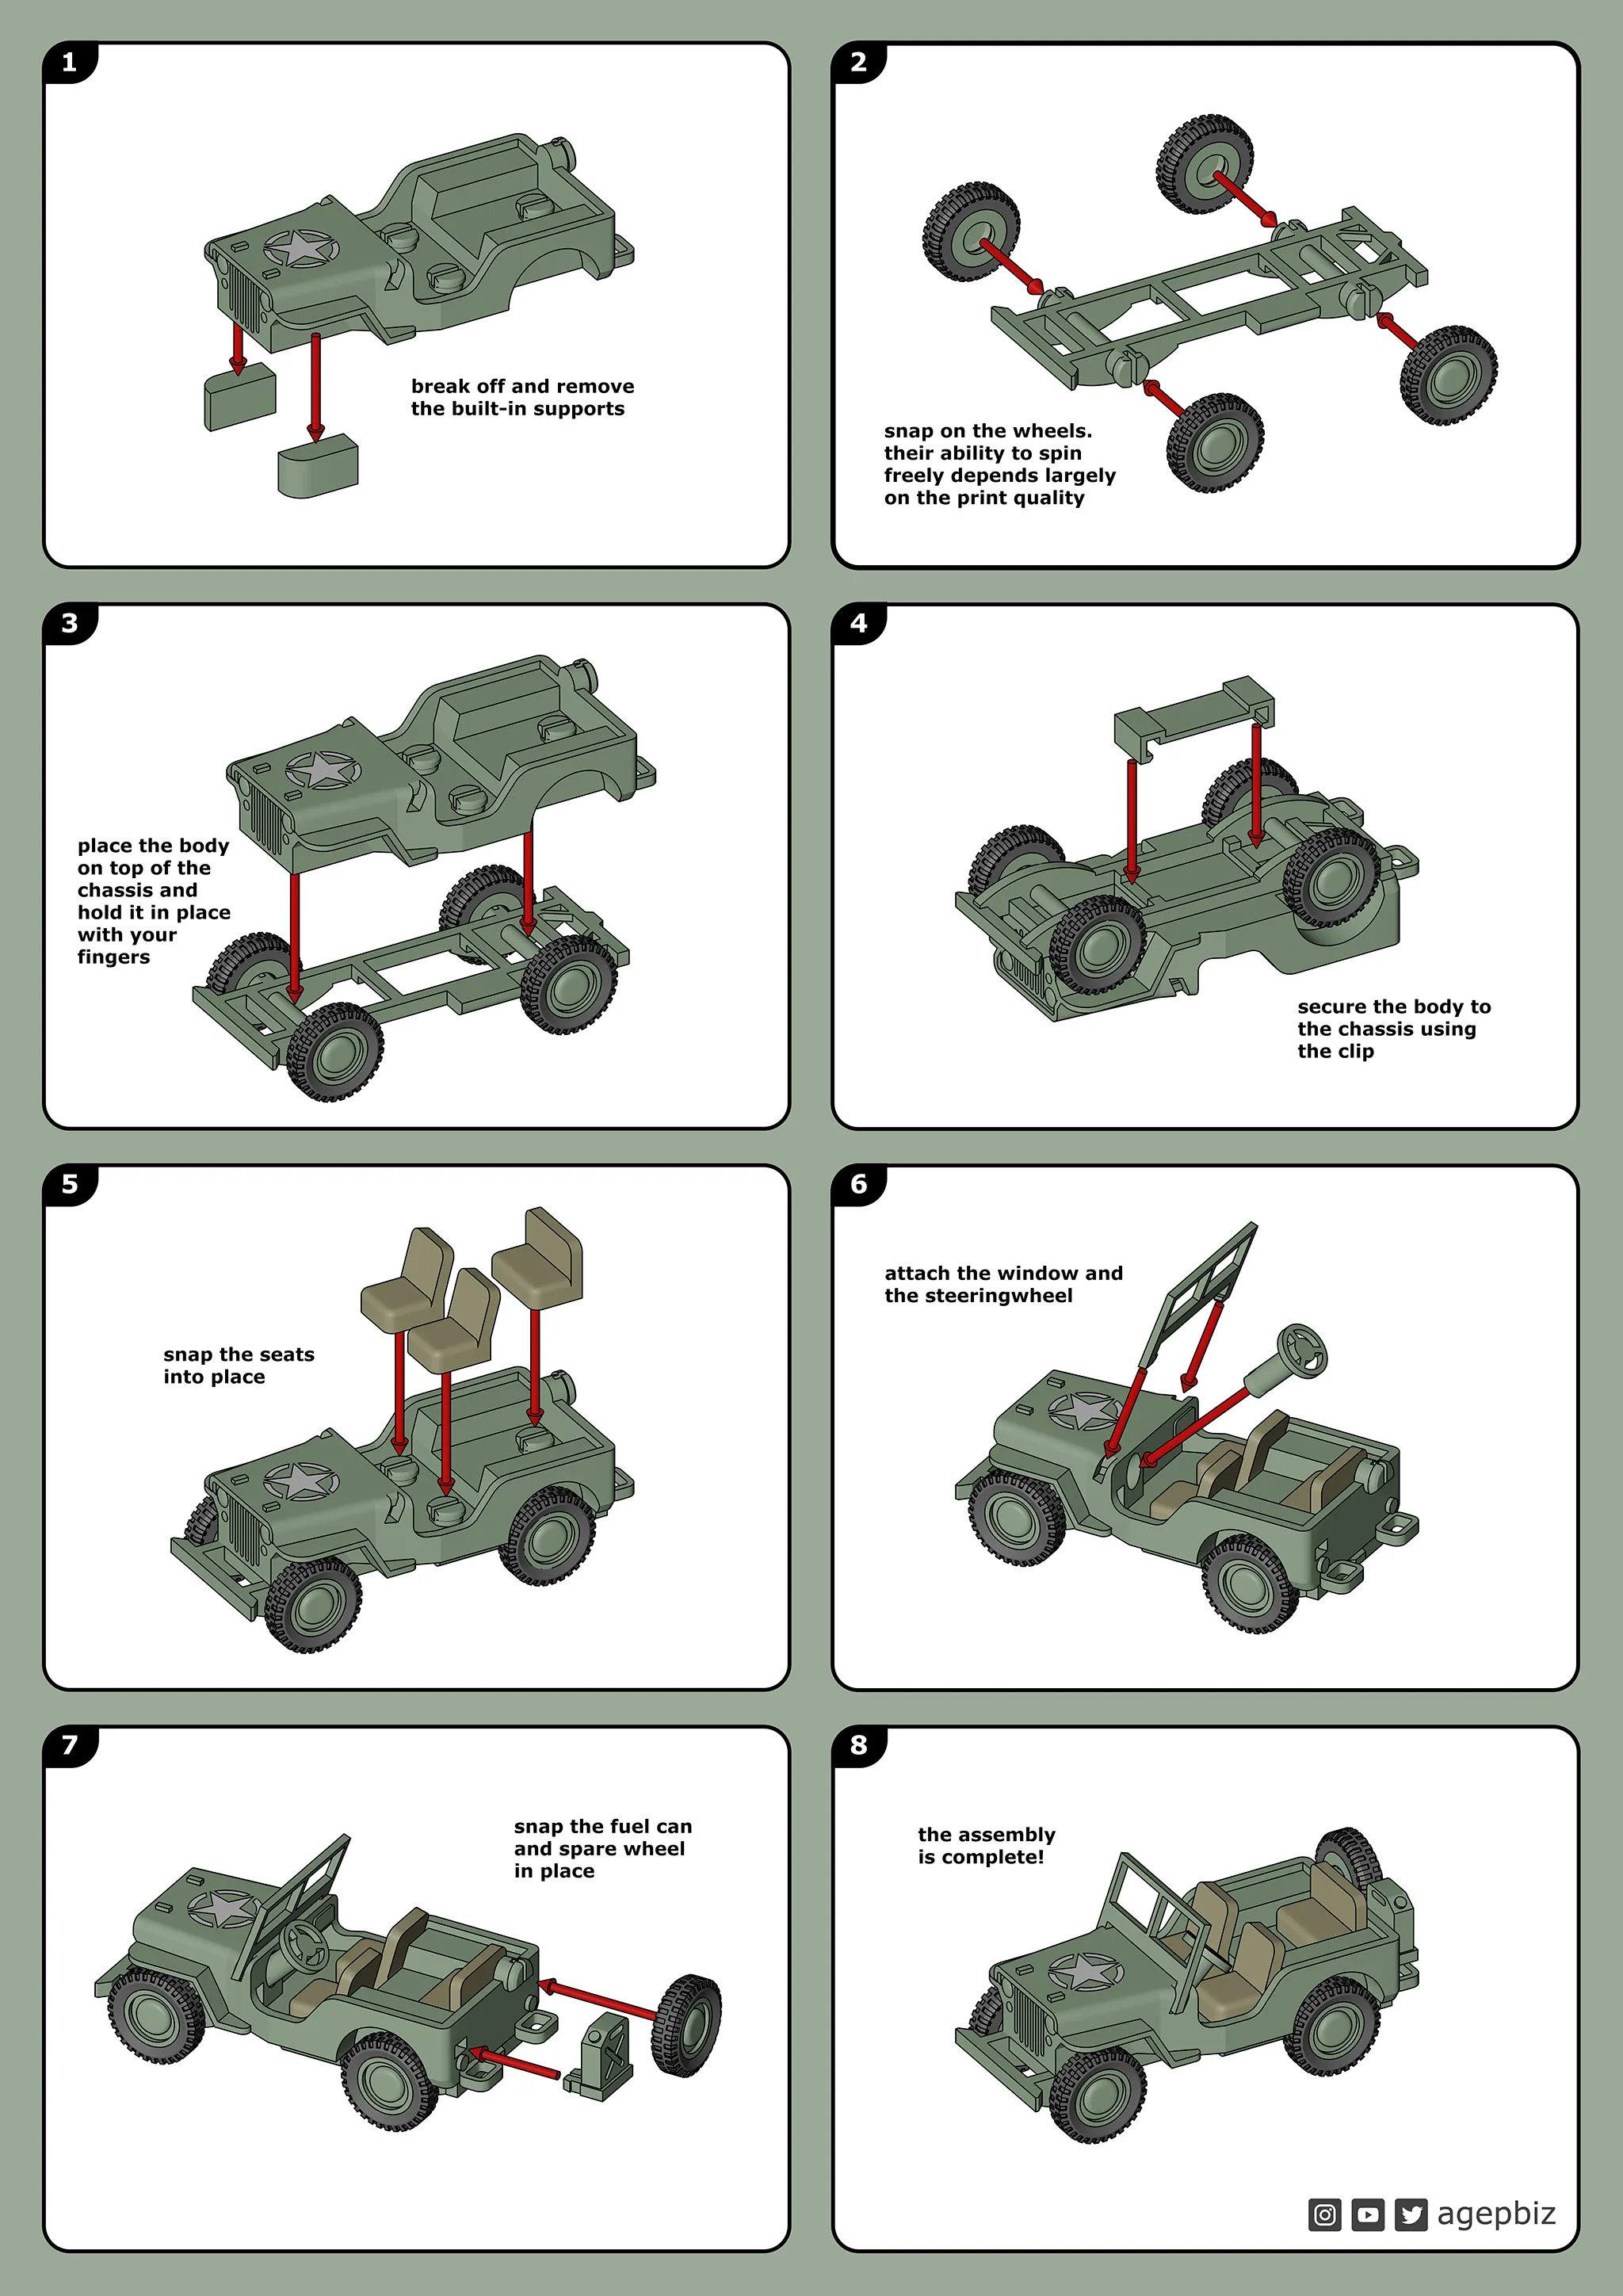
Print in place kit-card toy. Use a pair of flush cutters to separate the parts then assemble the toy. I have included both a single color version and a multicolor version. I wanted to do a project where I used several tools and machines to tie it all together into one project


The Jeep Kit Card:
https://makerworld.com/en/models/223303
The Trailer:
https://makerworld.com/en/models/428258

The Gun:

https://makerworld.com/en/models/469311


Subscribe or follow me on:
Instagram: www.instagram.com/agepbiz
YouTube: www.youtube.com/user/agepbiz
Twitter: www.twitter.com/agepbiz


WARNING: CHOKING HAZARD - Small parts
Not for children under 3 yrs.


Printsettings:
No support
No raft
0,16mm layer height


Comment & Rating (7557)

(0/1000)

I modified the model and used a 2*20mm shaft to connect the tires. Now it can move. The children like it very much.
69
Reply
Please post as a remix!
9
Reply
did you just glue the wheels on the axel's?
1
Reply
Replying to @MusicCity3D :
yes
3
Reply
Good !~~~^^;
58
Reply
Everyone is painting it for a war but your's 😂 its like fortnite edition ❤✨ nice
43
Reply
lol wow those colors give me an early 90s flashback.
12
Reply
That hurts to look at lol
7
Reply
Brilliant design! prints easy, and easy assemble too, love that there is no need for paint 👍
designer
51
Reply
What Filament and Colors are these? Great work!
1
Reply
That's awesome!
Show original
2
Reply
Replying to @RPM3DINC :
Thx, Bambu Matte Dark Green, Matte Latte Brown
7
Reply
Print Profile
0.16mm layer, 2 walls, 15% infill
I used Micro Kristal Klear for the windscreen
44
Reply
That is super cool! How does that work? Do you just pour it in?
(Edited)
3
Reply
it’s a liquid, I used a toothpick dipped in the Krystal klear, start on the outside edges and gradually work towards the center, adding more Krystal klear as you draw it towards the middle.
(Edited)
24
Reply
Boosted
Great tip, thank you!
(Edited)
1
Reply
I love this model! Fantastic design. I don’t have an AMS, so I just used white Bambu PLA Basic and painted it. I think it turned out pretty well!
47
Reply
That looks amazing. What kind of paint do you use?
1
Reply
Awesome! Looks like it was in the mud or is camouflaged!
1
Reply
The model looks great you could add a base like this for display
Show original
37
Reply
That's cool!
0
Reply
It turned out great on the base 😍 how did you make this base?
Show original
0
Reply
Print Profile
200% Scale Multicolor - 0.16mm layer, 2 walls, 15% infill
Pretty cool 👍 just printed separately the tyres in TPU 🙂
profile
14
Reply
Hallo, kunt u mij de impressie van het plafond sturen?
0
Reply
Replying to @user_257351320 :
Hello, with the translation I have, I'm not sure of well understanding your question.
0
Reply
Replying to @BrianS2K06 :
sorry sorry I would like to know if you can share the print of the jeep cover
0
Reply
Great model! Original size and 175%. Tires printed in TPU, the rest in PLA Matte.
(Edited)
16
Reply
does the 175% stay together? usually joints doesn't scale well?
2
Reply
Replying to @karl.liljestrom :
It's perfectly fine. I keep it on my desk and fiddle with it during conference calls.
3
Reply
Replying to @scott.reiser :
exactly the usecase i had in mind as well! 🤣
3
Reply
Here it is at 400%. I didn't have green, so I used gray instead. Everything fit surprisingly well even at this scale. I did add a small lip to the outside of the wheels, and some oval holes just for some detail - not standard, but I'm learning fusion 360 so I thought I'd try it. Also printed the tires in TPU.
(Edited)
19
Reply
Print Profile
0.16mm layer, 2 walls, 15% infill
printed great, 5 stars there. I'm bad at these things, but I've spent a while trying to connect the chase to the car and it just doesn't fit at all. I watched the video and it doesn't snap in the way yours does. let me know what I'm doing wrong. completely stuck here and spent a solid 20 mins on this. thanks!
4
Reply
Did you figure it out? Mine doesn't snap either.
0
Reply
Replying to @user_2612944947 :
You need to remove the blocks that support the front wheel wells. They pop right out.
(Edited)
4
Reply
I am having the same issue andt ook out the supports. the chassis is the same size as the base on mine
0
Reply