STANDRUSH: The Adjustable Solid Stand for Your Amp


Print Profile(1)

Description
STANDRUSH: The Adjustable Stand for Your Amp
Tired of not hearing yourself properly? Need a solid stand or tilter for your next Rockin'1000 gig? 😉
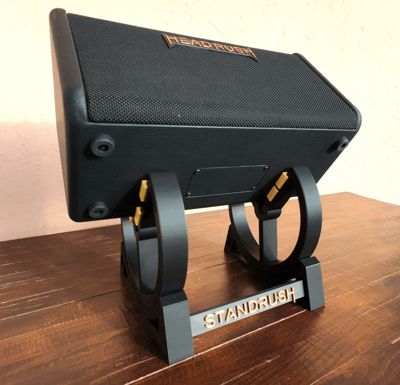
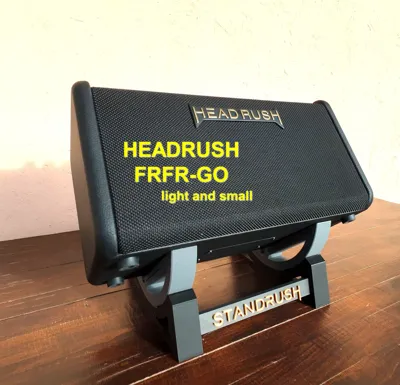
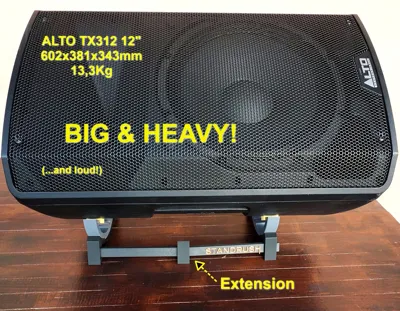
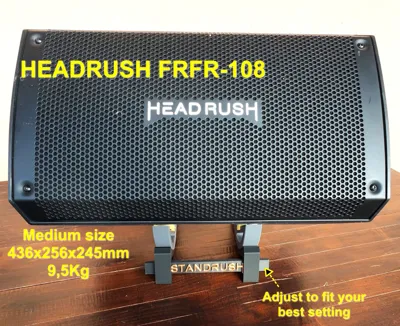
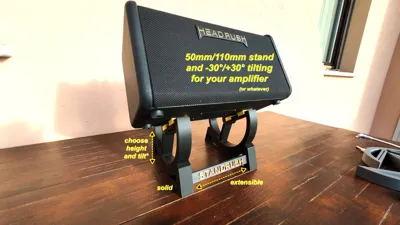
STANDRUSH is a rugged, 3D-printable support designed to stop you from playing for your ankles and start aiming your sound right at your ears. It’s perfect for small to medium-sized amps—it was born for the Headrush FRFR-GO, but works great with many others: tested with Headrush FRFR-108, Laney L30R, Alto TX 312 (12").
Main Features
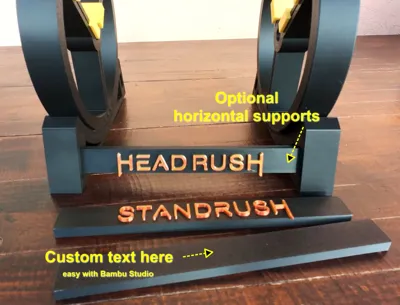
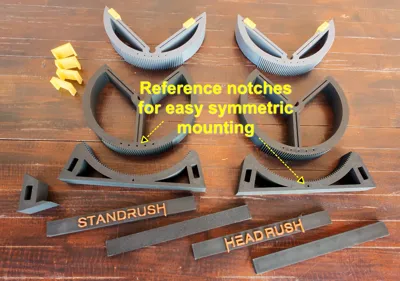
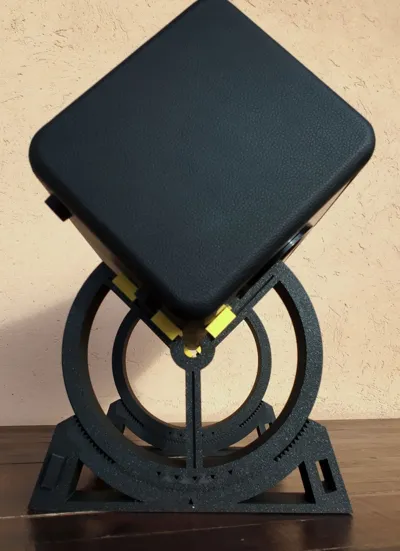
- What to print: You will need to print two bases and two "wheels".
- Two heights for the wheels: Available in LOW (50mm rise) or HIGH (110mm rise) versions. The base is the same.
- Tilt: Adjustable from 0° to ~30° in 2° increments. Built-in alignment notches make it incredibly easy to sync both sides to the same angle.
- Solid Fit: The base and the wheel interlock firmly via toothed gears. They don’t come apart easily, and that’s a good thing—it means you can pick up and move the stand without the parts falling off in your hands, saving you from having to reassemble and realign everything every single time.
- A1-Mini friendly: Main components fits perfectly on the Bambu Lab A1-Mini build plate.
Stability & Customization
For maximum stability, I recommend printing the front horizontal brace (and the rear one) to lock the two sides together. The brace is extendable via a dedicated connector, but you can also scale the parts in your slicer if you need a larger footprint for your specific gear.
Spacers & Protection
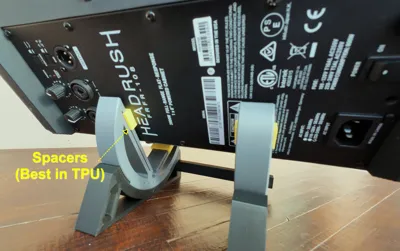
I’ve included spacers that I highly recommend printing regardless of your amp model to protect the cabinet.
- Materials: PLA or PETG work fine for the structure. For the spacers, TPU is the best choice for grip and cushioning.
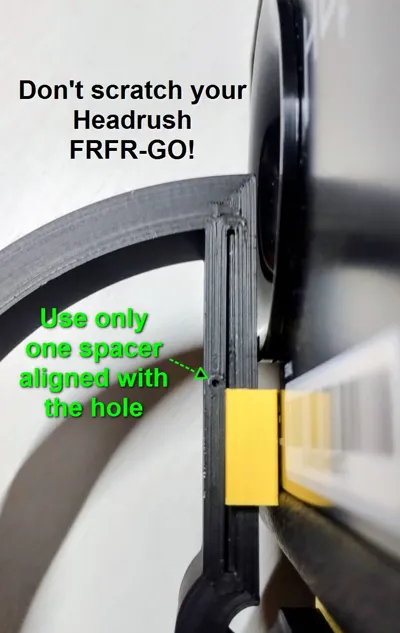
- Note for Headrush FRFR-GO: On this specific amp, use only one spacer on the left side, aligning it with the small hole. This prevents the glossy plastic cone protruding from the back of the amp from making direct contact with the stand and getting scratched.
Warning (Disclaimer)
Tilt settings must be adjusted based on your amp's weight and height. Big or tall amplifiers might become unstable and tip forward or backward if the tilt is too extreme or insufficient for their center of gravity. Always perform carefully a stability test before final use.
If you print it, please upload a photo and let me know which amp you’re using. See you on stage! 🤘
ITA
STANDRUSH: Lo stand regolabile per il tuo ampli
Stanco di non sentirti bene mentre suoni? Ti serve un inclinatore serio per il tuo prossimo concerto dei Rockin'1000? 😉
STANDRUSH è un supporto robusto pensato per smettere di suonare per le tue caviglie e puntare il suono dritto alle orecchie. È ideale per amplificatori di piccole e medie dimensioni, è nato per l’Headrush FRFR-GO ma l’ho testato su Headrush FRFR-108, Laney L30R Alto TX 312.
Caratteristiche principali
- Configurazione: È necessario stampare due basi e due "ruote".
- Due altezze per le ruote: Versione LOW (50mm di rialzo) o HIGH (110mm). La base è in comune.
- Inclinazione: Regolabile da 0° a circa 30° con scatti di 2°. Le pratiche tacchette di riferimento rendono l'allineamento dei due lati semplicissimo.
- Incastro solido: La base e la ruota dentata si accoppiano in modo fermo. Non si smontano facilmente ed è un bene: così puoi spostare lo stand senza che i pezzi ti rimangano in mano e tu li debba rimontare e riallineare ogni volta.
- Stampabile su A1-Mini: I componenti principali rientrano nel piatto della piccola di casa Bambu Lab.
Stabilità e Personalizzazione
Se cerchi la massima sicurezza, stampa il supporto orizzontale frontale (e quello posteriore) per unire le due parti. Il supporto è estensibile tramite un apposito connettore, ma puoi anche scalare le parti per ottenere una base d'appoggio ancora più ampia.
Spacers e protezione – opzionali ma raccomandati!
Ho previsto degli spacers che consiglio di stampare sempre, a prescindere dall'amplificatore, per proteggere il cabinet.
- Materiali: PLA o PETG vanno bene per tutto, ma per gli spacers il TPU è la scelta migliore per grip e protezione.
- Nota per Headrush FRFR-GO: Su questo specifico ampli, usate un solo spacer sul lato sinistro allineandolo al piccolo foro. Serve a evitare che il cono in plastica lucida che sporge dietro l’ampli vada a contatto diretto con il supporto e si righi.
Attenzione (Disclaimer)
L'inclinazione va tarata in base al peso e alle dimensioni del tuo ampli. Amplificatori grossi o alti potrebbero sbilanciarsi se inclinati troppo o troppo poco rispetto al loro baricentro. Fate sempre un attento test di stabilità prima dell'uso.
Se lo stampi, carica una foto e scrivi nei commenti che amplificatore stai usando. Ci vediamo sul palco! 🤘
License
You shall not share, sub-license, sell, rent, host, transfer, or distribute in any way the digital or 3D printed versions of this object, nor any other derivative work of this object in its digital or physical format (including - but not limited to - remixes of this object, and hosting on other digital platforms). The objects may not be used without permission in any way whatsoever in which you charge money, or collect fees.
Comment & Rating (2)