Ahsoka Tano LightSabers


Print Profile(1)

Bill of Materials


Description
Boost Me (for free)
Summary
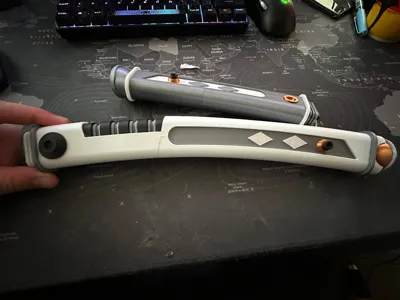
Replica of Ahsoka Tano's white-bladed lightsaber hilts from Rebels and The Mandalorian.
Design
This file has been split to minimize the number of supports and allow it to be printed in different colors before assembly (to minimize finishing work). The included images have not been sanded or painted and are practically just printed, cleaned, and assembled.
Color Printing
If you want to print this in separate colors (rather than painting it yourself), you will need (with the brands I used in parentheses)
- Light Gray (Filamentum Extrafil Electric Grey PLA)
- Dark Gray (Filamentum Extrafil PLA Iron Gray)
- Silver (Polyalchemy Elixir Lucid Pearl PLA, not the best option but it's what I had)
- Bronze (Fiberlogy FiberSilk Metallic Bronze, looks dull on the spool but prints bright)
- Black (old rigid ink spool, but it no longer exists)
Printing Guide
All parts have been pre-aligned for printing.
You will likely need to enable a brim on several of these parts, especially on the larger hilt pieces that have very small contact areas.
While no supports are required on most parts, there are a few smaller parts that do require supports and 4 parts (2 per hilt) that need bridge supports due to long bridges (these are used as glue surfaces, so while the bridges are not visible, they do need to be relatively flat to create a good surface for aligning things). Where supports are required is indicated in the file name.
Note: Bridge supports must be enabled manually in some slicers (like Prusa slicer)
I printed this in various PLA at 0.1 to 0.2mm layer heights (depending on the part) with the default infill settings. I increased the number of perimeters on the large hilt pieces to give them some extra strength.
File Naming Conventions
The file name contains information about:
- Whether the part is for the large or small hilt
- a part number
- The color to print (from light gray, dark gray, silver, bronze, black)
- If supports and/or bridge supports are required
- The part name
Assembly
A PDF document with basic assembly instructions is included.
In addition to the printed parts, you will need two D-rings. I used 30x20mm D-rings with a 3mm cross-section; any size should work as long as the cross-section is the same. Amazon sells them by the bag full for cheap.
Some of the glue surfaces are quite small, which is bad, but it's too late to change them, so you should use super glue with a narrow applicator or brush. Be careful when aligning the main hilt parts or you will end up with an ugly seam; other parts tend to hide alignment issues due to how the hilts are assembled
Documentation (1)
License
You shall not share, sub-license, sell, rent, host, transfer, or distribute in any way the digital or 3D printed versions of this object, nor any other derivative work of this object in its digital or physical format (including - but not limited to - remixes of this object, and hosting on other digital platforms). The objects may not be used without permission in any way whatsoever in which you charge money, or collect fees.
Comment & Rating (74)