Snapmaker U1 - 180 Degree Door Hinge


Print Profile(2)


Bill of Materials


Description
Update 5/26/26: The glass inserts have been changed from a compression-style to a simpler dual-insert. This insert is easier to print, and easier to use. The hinges have been modified slightly to allow more clearance between the hardware and the glass, as I found them rubbing together slightly in some test prints while testing other modifications. Countersunk screws are now no longer needed.
The old profile remains for posterity, but the instructions below have been updated to use the new version of the hardware.
-------
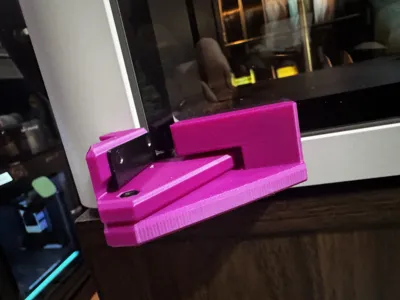
The door on the Snapmaker U1 doesn't open much further than 90 degrees by default, and I wanted less restrictive access, so I put together this 180-degree door hinge.
It uses compression-style fittings to hold the glass door to the hinge and has a stopper to prevent the door opening wide enough to hit side mounted spools. Prints with minimal supports. A 3MF file for Orca Slicer for use with the U1 itself is included in the additional files.
Printing Notes:
Print these hinges out of whatever material you please, as they bear very little load. I recommend 3 walls with 15% gyroid infill. Supports are needed for three of the pieces. Supports are manually painted in the included profile and Orca 3MF file.
Printed Parts:
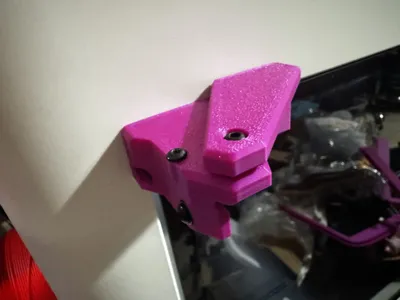
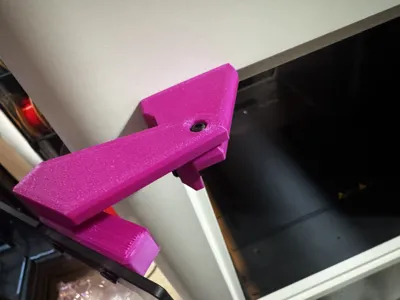
- Top Hinge (Glass)
- Top Hinge (Bracket)
- Bottom Hinge (Glass)
- Bottom Hinge (Bracket)
- Glass Insert x4
- Bottom Shim
Required Hardware:
- 8x M3 8mm screws (socket or button head)
- 2x M3 10mm screws (socket or button head)
- 1x M3 4-6mm screw (socket or button head)
- 2x M3 Nuts
- 6x M3 Washers
Assembly:
WARNING: The hinges on the U1 are not particularly robust, and will easily twist or bend if roughly handled. Please use care.
- Remove the stock screws and silicone grommets from the glass door and secure them for storage in a safe place, in case you decide to return the door to it's original state.
- Place the inserts into the glass.

Place the glass-side of the hinge in place, and drive in two M3x8 screws to secure them.

Drive a 10mm M3 screw (button or socket head) into the remaining screw hole for each hinge, until it protrudes slightly.

For each of the hinge-side parts, press-set an M3 nut using pliers.

Mount each hinge-side part to the door hinge using two 8mm screws and washers. Apply inward pressure (towards the machine) when tightening the screws. These parts should not have any movement or play in them once the screws have been tightened down.

Place the glass into the door frame and position it so that the protruding screws rest at the connecting point between bracket parts. It may take a little effort, but place a washer over the connecting screw between the parts, as nearly shown in this unfortunately blurry photo. Once in place, tighten these screws to complete the hinge. If the hinge is too stiff, loosen the screws slightly.

Place a 3-6mm (no longer) button or socket head M3 screw into the remaining hole on the top bracket. This will act as a stopper to prevent the hinge opening far enough to collide with any mounted spools.

(Optional) If you find that the door sags slightly, brushing against the bottom of the frame, use the included shim as shown to slightly raise the angle of the bottom hinge.


_____________________________
All of my original models are free to be remixed with attribution and used commercially.
Feel free to sell or give away prints, or use them in your marketing materials in any way you like.
Support a free and open 3D printing community.
Remixes of others' models are shared using the same license as the original work.
Comment & Rating (37)