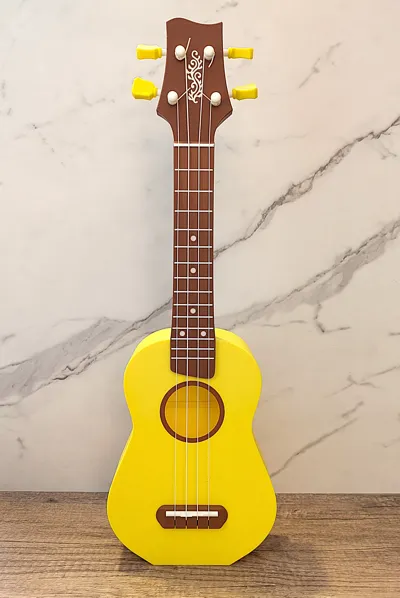
Soprano 2 Ukulele


Print Profile(3)


Description
Boost Me (for free)
If you like my work, I'd really appreciate the Boost!
Introducing the Soprano 2 Ukulele!
The Soprano 2 Ukulele - a new version of my original soprano uke with the the same great sound, but a new way to print, allowing for full color body tops.
- Print the body flat, rather than upright like the original soprano uke design.
- Easy assembly.
- .3mf files with support for multi-color prints with AMS and without.
- Full color body top.
- A new easier to use inlay design
- A template for easily integrating Hueforge prints onto the body top.
How's it sound? Check out my new song, "Family of Ukes" below for a sound demo that includes all of my 3D printed ukuleles.
Building the Uke
For details on building the uke, see the video below. Although I made the video to document the build of my Mini 2 ukulele, the build process is the same for the Soprano 2.
The saddle is a compensated saddle. When placing it in the slot in the bridge, pay attention to the orientation. The peaks in the middle part of the bridge should be further from the top of the uke, and peaks on the edges of the bridge should be nearer the top. I like Gorilla brand super glue gel for parts that need to be glued.
Filament
I use PLA or PETG. I recommend avoiding filaments with additives, such as PLA silk, matte, or wood as these often have much lower strength. Bambu PLA basic has a bending strength of 76 MPa and tensile strength of 35 MPa according to Bambu Lab's Technical Data Sheets. I have found that filaments with similar or greater values work well.
Print Settings
- Rafts: No
- Supports: None of the parts require supports
- Resolution: 0.12 mm
- Wall loops: 5
- Infill: 50%
- I use variable layer height on the fretboard, so that the bottom prints with large layer height, but the frets print with 0.08 mm layer height for the smoothest feeling fret.
- No supports, rafts, or brims required for any part.
Parts needed
- Body
- Body top
- Braces
- Top glue aide
- Neck
- Headstock
- Headstock screw cover
- Inlay
- Fretboard
- Fret markers (if printing the non-AMS fretboard)
- Saddle
- Strap pin, if you want to use a strap
In addition to the printed parts, you'll need
- Eight, #2, 3/8'' wood screws for installing the tuners. Metric equivalent is M2x8mm.
- Ukulele strings - I like D'Addario Nyltech.
- 200 mm long, 5 mm diameter carbon fiber rod in the neck for strength. The rod is available from Amazon. If you don't want to use the carbon fiber rod, there is a version of the neck available without the rod hole.
- One Number 4, 1'' wood screw to screw the headstock to the neck. Metric equivalent screw is an M3 x 25 mm.
The Body Top
The body top can be printed in multi-color with or without AMS:
- With center ring and bridge in different colors using the AMS. Bridge and center ring are attached to the body. A .step file is included for making full-color tops.
- With the bridge and center ring attached to the body top, and printed in different colors by pausing the print and switching filaments.
- With the bridge printed separately from the body.
Printing the bridge separately from the body top
Printing the bridge separate from the body top allows additional flexibility in customizing the look. For example, the body top can be printed upside down and different build plates used for effects such as a flat shiny top or a top with rainbow textures from a holographic build plate. If printing the top and bridge separately, you'll need to print
- The body top
- The bridge
- Two bridge pins
You'll also need
- Two #2, ¼'' wood screws. Metric equivalent is M2x5mm.
When assembling, insert bridge pins into the bridge. You may want a dab of glue in the hole in the bridge to hold them firmly. Put glue on the back of the bridge, place the bridge on the body top using the bridge pins to guide placement, and clamp in place for 15 minutes or so. Screw in the two #2, ¼'' screws from the back of the top to add additional strength in holding the bridge to the top.
The Fretboard:
The fretboard can also be printed in multi-color with or without AMS:
- With the frets, fret markers, nut in different colors using the AMS
- With the frets and nut in different colors by pausing the print and switching filaments.
Tuners
You'll need four of my Model 3 Ukulele Tuners. The video on the tuner page provides instructions on installation.
Stringing and Tuning the Uke
- For the strings, I use regular soprano uke strings. I like D'Addario Nyltech. There are many instructions on YouTube available for stringing a uke. Search for how to string a slotted bridge uke.
- I tune the Soprano 2 to the standard tuning : GCEA.
Using the HueForge template
HueForge template .step and .3mf files are provided to make it easy to integrate a Hueforge print onto the ukulele body top. To use this template follow the instructions below. Instructions are for Bambu studio. Modify accordingly for your preferred slicer.
- Load the “S2 HueForge Template.step” file into Bambu Studio. Print settings should be set to 0.08 mm layer height, 0.16 mm initial layer height, 5 wall loops, 100 % sparse infill density, and Rectilinear sparse infill pattern.
- In the left pane in the Objects view in Bambu Studio right click on the Assembly and select split to objects. This has already been done in the Mini 2 Hueforge Template.3mf file.
- Drag your HueForge .stl into Bambu Studio.
- Position the HueForge with respect to the top as desired. It helps to turn off visibility of the Body Top and Bridge in the Objects pane to position the HueForge. Make sure not to move the top with respect to the bridge accidentally.
- If you adjust the size of the HueForge .stl for a better fit on the top, make sure that the vertical dimension (thickness) remains unchanged. Only change the horizontal dimensions. Changing the vertical dimensions will change the number of layers, and the Hueforge design will be off.
- Select both the Body Top and the HueForge (I use CTRL click for this).
- Click on Mesh Boolean in the Bambu Studio tool bar, select Intersection and click Execute. This can take a while so wait for a bit.
- Select both the bridge and the Top/HueForge Boolean in the Objects pane, right click, and select merge.
- Slice the plate.
- In the preview pane, add color filaments changes at the layer heights indicated by the Hueforge describe.txt.
- Reslice, print, and enjoy.
Notes on Designing the HueForge for the Ukulele Top
For the best sound, the top of the body shouldn't be too thick. However, it also can't be too thin or the top will become too weak to hold the string tension. I use these general rules of thumb when designing a HueForge for the ukulele top.
- I use a Layer Height of 0.08 mm.
- Base Layer of 0.16 mm.
- Base Thickness of 1.2 mm
- I target a thickness for the first color (including Base Thickness) of around 1.4 mm, which is the thickness of the top of the uke without a HueForge.
- I try to keep the maximum height of the HueForge at 2.5 mm or less so it doesn't get too thick.
Comment & Rating (10)