Full-Size Modular Vending Machine


Print Profile(7)


Bill of Materials


- Nema 17 Stepper Motor x 12: https://www.omc-stepperonline.com/e-series-nema-17-bipolar-1-8deg-17ncm-24-07oz-in-1a-42x42x23mm-4-wires-17he08-1004s
- DRV8825 Stepper Driver x 12: https://www.amazon.co.uk/DRV8825-Stepper-Suitable-8-2V-45V-Printer/dp/B0CCRXGKLV/
- Arduino Nano x 2: https://www.amazon.co.uk/Binghe-Controller-Interface-Microcontroller-Compatible/dp/B0CX1B4X7M/
- Arduino Nano Expansion x 2: https://www.amazon.co.uk/Extension-Binghe-Expansion-Terminals-Compatible/dp/B0D86FB59B
- 12V Power Supply x 1: https://www.amazon.co.uk/inShareplus-100-240V-Adapter-Voltage-Transformer/dp/B08P75KKCS/
- 5V Relay Module x 1: https://www.amazon.co.uk/AEDIKO-Channel-Optocoupler-Isolation-Support/dp/B09M62VCGX/
- Door Solenoid x 1: https://www.amazon.co.uk/JZK-Electric-Solenoid-Assembly-Security/dp/B074MX923N
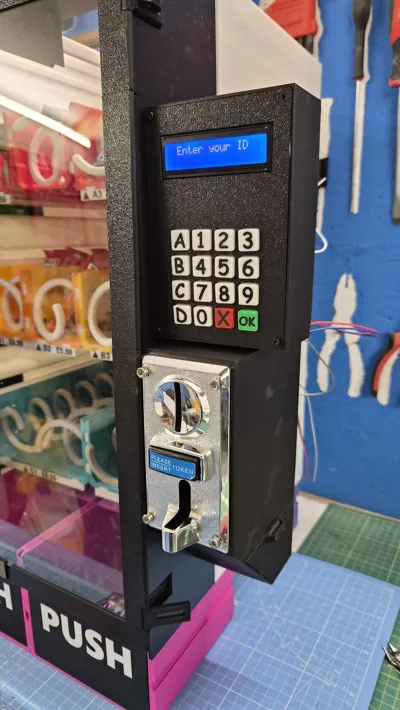
- I2C Screen x 1: https://www.amazon.co.uk/FREENOVE-Display-Compatible-Arduino-Raspberry/dp/B0B76Z83Y4/
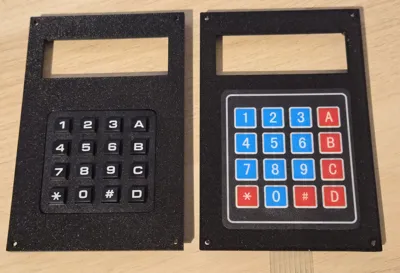
- Flat Keypad x 1: https://www.amazon.co.uk/AZDelivery-Membrane-Keyboard-Arduino-including/dp/B07ZF7YHKC
- Black Keypad (optional upgrade) x 1: https://www.amazon.co.uk/Sarini-Keyboard-Compatible-Arduino-Raspberry/dp/B0D6TV2YT6
- 6mm x 3mm magnet x 1: https://www.amazon.co.uk/MOXYOY-60-Piece-Small-Magnets-Whiteboards/dp/B0F3JF6BZJ
- Acyrlic Sheet 2mm for Door 271 x 495mm x 1: https://www.simplyplastics.com/catalog/sheet/extruded-acrylic-sheet/clear-extruded-acrylic-sheet/c-24/c-84/p-240
Description
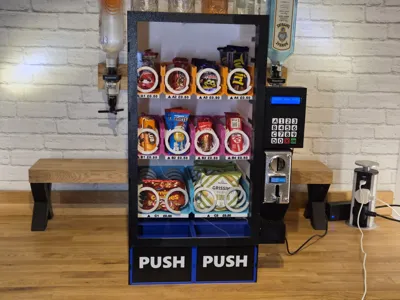
Welcome to the first ever full size 3D printed vending machine!
Whether it’s stocked with nuts for your home bar, snacks in the office, prizes in a classroom, or treats your kids will absolutely love, this machine turns vending into a conversation piece.
The design is fully modular, letting you create a small one for your desk, a medium size for your worktop, or a full-size floor standing vending machine packed to the brim with snacks. There's plenty of accessories you can add to it too including a coin reader that'll work with any currency, a keypad and screen to control it, and a door lock to keep those pesky hands out without paying.
This listing includes all print files, plus drafted build instructions, electronics guide, parts list, and bill of materials to walk you through the entire process from first print to first vend.

Early Access Disclaimer
This model is currently released as early access for makers who are keen to get stuck in early and help shape the project.
You don’t need to be an electronics wizard, but you should be comfortable with Arduino basics and happy controlling stepper motors, an I2C screen, and a button matrix. An electronics guide is included to walk you through the setup step‑by‑step and take some of the fear out of it.
I’m actively working on a plug‑and‑play electronics kit (planned for Etsy) that will make this build far more accessible for non‑techy builders — but that’s still a few weeks away.
Expect the occasional tweak, improvement, or clarification as the project evolves. Feedback is hugely appreciated and directly helps improve future updates.
How It Goes Together
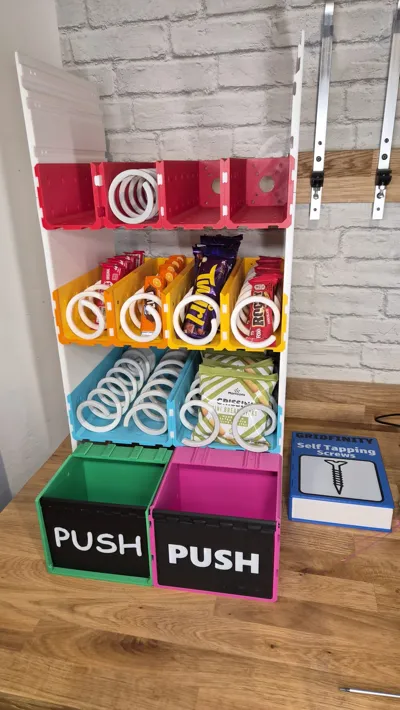
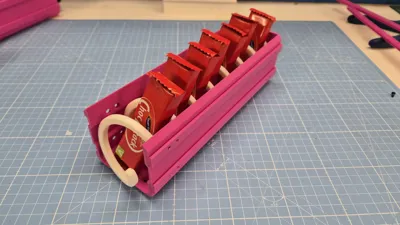
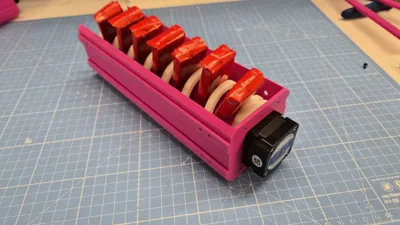
- Print modules & coils - identical parts repeated across the build
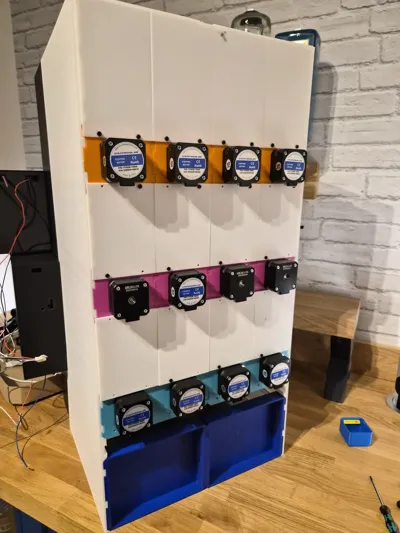
- Assemble module trays - Attach motors, coils and modules together
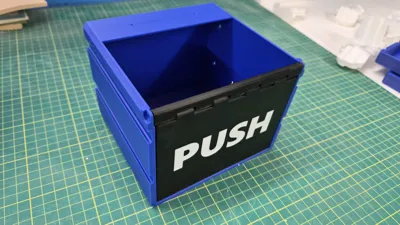
- Add sides & front panels - slide in the sides, add the lid and push bins.
- Install accessories - assemble the keypad, coin reader, screen and door latch
- Fit the electronics - Add your own electronics to control the motors and screen.
Check out the Assembly Instructions for a more detailed breakdown.
Check out the Electronics Guide to help you get started with the overwhelming part.
Also check out the Model Print List so you know which parts to print.
Print Profiles
- Modules - has the modules, push bin, labels and joiner parts.
- Coils - A range of different coils for different size items.
- Module Sides - The white sides around the modules.
- Front Sides - The black sides at the front the snacks drop through.
- Lid - The lid over the module / front sections.
- Accessories - Door lock, keypad & screen, and coin reader.
- Door - Door frame with hinges - just add the 2mm acrylic sheet.
Printing Overview
- Designed for Bambu A1, P1S, P2S, H2S. (min size 240 x 200)
- Doesn’t fit with the A1 Mini (sorry!)
- Only needs an AMS for the keypad buttons.
The coils are printed laying flat with supports. If you’re printing on a bed slinger like the Bambu A1, make sure you print the coils across the bed like this:

A full 4×3 machine typically requires ~100–120 hours of print time, and around 5KG of filament.
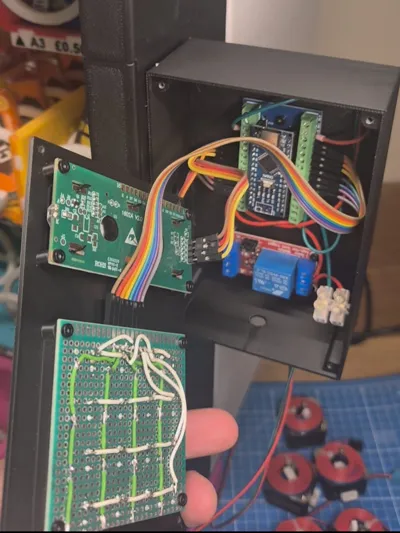
Electronics (Approachable, Not Black Magic)
This project is designed so you don’t need to be an electronics expert, but you should be comfortable with:
- Arduino basics
- Stepper motors
- Simple wiring
Key principles:
- 12 V system for motors and solenoids
- Arduino Nano‑based control
- Stepper motors with A4988 / DRV8825 drivers
The electronics guide explains both a recommended split‑board approach (motors separated from user interface) and alternative single‑controller options.
⚠️ At the time of release, electronics are DIY / protoboard based. A future kit is planned. If you’re not comfortable doing your own electronics, please hold off getting started until this kit is released.
Boost Goals 🚀
Rather than putting this project behind crowdfunding or paywalls, this vending machine is completely free for everyone from day one.
Boost Me (for free)
If you’d like to help take it to the next level, a Boost directly supports future development.
Here’s what each milestone unlocks:

Boosts are effectively a small tip to support development - every one helps push this project further.
Updates, Remixes & Feedback
- Updates and new accessories are planned
- Remixes are encouraged. Share your accessories, decorations
- Feedback is genuinely appreciated - this design will improve over time
If you find an issue, please comment rather than down‑rating. This project has taken hundreds of hours of design and testing, and your input directly shapes future versions.
Commercial License
If you want to license this model to sell, please DM me and we can discuss.
Membership
Support me
If you want to support the fantastic work I do here, consider dropping me a tip! It’s on my profile under commercial licenses I’ve got a tier just for $5 tips.
Development Log
(11/02/2026) - I didn't expect to get 100 boosts in 17 hours, thanks so much! I will get around to these goals ASAP.
(12/02/2026) - Next up I'm working on a module to dispense and hold 330ml cans. I'll release this as a separate model, but it'll be compatible with the vending machine. Then I'll get to working on the electronics kit which will be available some time in April.
(15/02/2026) - Fixed front lid edge, it didn't fit properly to the front sides.
(25/02/2026) - Updated BOM for correct solenoid door lock. Added BOM section instead of separate document.
Added different plates so you can use off-the-shelf keypads to make it easier to source. These are added to Accessories:

(25/02/2026) - Updated parts list to include missing Lid parts.
(26/02/2026) - fixed minor issue on front hinge side.
April 2026 Update
Thanks so much to everyone who's supported this model! over 1000 boosts is incredible.
I am currently designing a V2.0 from scratch which should be much easier to assemble with less screws and parts generally. When I launch this version I will do so with an electronics kit. This will likely be end of the summer as I will likely print several iterations.
On my Tiktok (@That_Robot_Guy) I have got a soda can dispenser working in the vending machine, however this has a lot of clashes and requires a deeper push bin and doesn't work with the labels on. I've decided not to release this, and fix it with V2.0 of the model.
In the meantime; I want to shout out some of the mods and remixes made by members here. I plan to incorporate many of these in the V2.0.
ESP32 Code and Electronics - KreativWelt3D
Here is Code and electronics for an ESP32 control system. Would advise if you know the basics of code / electronics and need a starting point. Available in English and German: https://github.com/kreativwelt3d/ESP32-Vending-Machine
SUM UP Mode - KreativWelt3D
If you're looking for contactless card payment, this remix let's you do that.
https://makerworld.com/en/models/2678974-sumup-solo-terminal-mod-esp23-new-housing
Motor Back Cover - user_533859918
This remix let's you add a back cover to hide the motors and electronics much tidier.
https://makerworld.com/en/models/2647137-motor-and-front-cover
Documentation (4)
License
You may create derivative works based on this object, provided that all such derivative works are published exclusively on the MakerWorld platform and include proper attribution to the original creator. You may not share, upload, host, distribute, or publish this object—or any derivative work of this object—on any other digital platform, marketplace, or distribution channel. Commercial use of this object and any derivative works is strictly prohibited. This includes, but is not limited to, selling, renting, sublicensing, or using the object in any context in which you receive monetary compensation or other financial benefits.
Comment & Rating (831)