Reolink Duo 3V / 2V / RLC-843 Mounting Wedge


Print Profile(1)
Bill of Materials

Description
Boost Me (for free)
A small boost for you, a big one for my project!
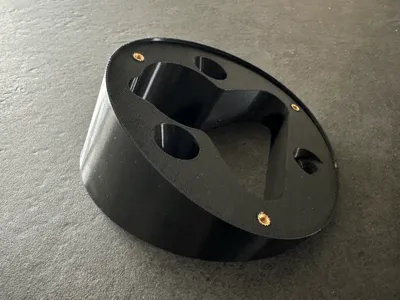
This specially designed mounting wedge enables the clean and secure installation of the Reolink Duo 3V under eaves or sloped surfaces.
The wedge shape optimally aligns the camera, allowing the detection area to be used ideally – especially when mounting under inclined roof boards.
In addition to the Reolink Duo 3V, the model is also compatible with the Reolink Duo 2V. Furthermore, the RLC-843A and RLC-843WA also fit; they use the same hole pattern, even if they differ slightly in outer diameter.
The wedge offered here is optimized for a specific tilt angle. However, should you need a different angle, I would be happy to create a customized version. Just send me a message!
Highlights
- Integrated cavity for neat cable management
- Space for the camera's complete cable harness (wiring loom)
- Integrated receptacles for heat-set inserts (threaded inserts)
- Robust and stable screw connection
- Discreet, unobtrusive appearance
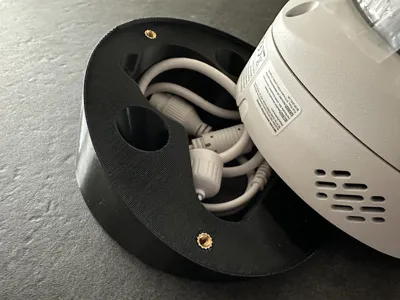
Cable Management

Special attention has been paid to the integrated cable compartment.
The camera's entire cable harness (power, LAN, etc.) disappears completely inside the wedge.
This ensures:
- a visually clean installation
- protection of plug connections from weather
- less strain on the connectors
- no loose hanging cables under the roof
Especially for outdoor installations, this results in a significantly more professional solution compared to open cable routing.
Heat-Set Inserts / Threaded Inserts
The wedge features integrated receptacles for brass heat-set inserts.
Advantages:
- significantly more stable threaded connection than directly into the plastic material
- repeated loosening and tightening of screws possible without problems
- durable and secure camera mounting
The inserts can be cleanly installed with a soldering iron.
Assembly
- Insert heat-set inserts
- Screw the wedge under the roof
- Stow cables inside
- Attach the camera to the wedge
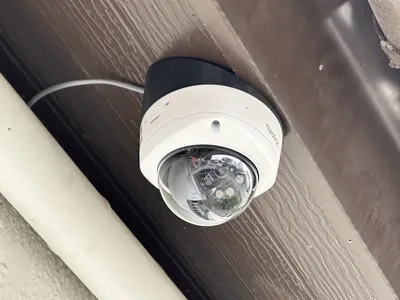
The result is a clean, weather-protected installation.
Print Recommendation
Recommended Material (Outdoor Use):
- PETG – good compromise between stability and weather resistance
ASA – ideal for UV and weather resistance
Material List & Sources
M4 x 12 Pan Head Screws
https://amzn.to/4tIrZ9l- M4 x 8.1 x 6.3 Heat-Set Inserts / Threaded Inserts
https://amzn.to/4aXQk3H

Tip: If you frequently use heat-set inserts / threaded inserts, a complete set with sizes M2–M8 and suitable soldering tips is worthwhile. This way, you'll have the right size directly at hand for various projects and can create clean and permanently stable threads.
- Threaded Inserts Soldering Tip Set, 6-piece
https://amzn.to/4qNpSyG
Transparency Note: The links mentioned above are affiliate links. As an Amazon partner, I earn from qualifying purchases without any extra cost to you! If you support me through them, I can continue to invest time in new projects and publish my models on Makerworld. Thank you very much!
License
You shall not share, sub-license, sell, rent, host, transfer, or distribute in any way the digital or 3D printed versions of this object, nor any other derivative work of this object in its digital or physical format (including - but not limited to - remixes of this object, and hosting on other digital platforms). The objects may not be used without permission in any way whatsoever in which you charge money, or collect fees.
Comment & Rating (2)