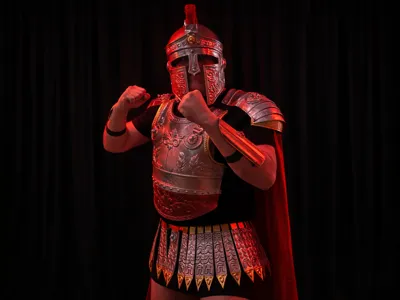
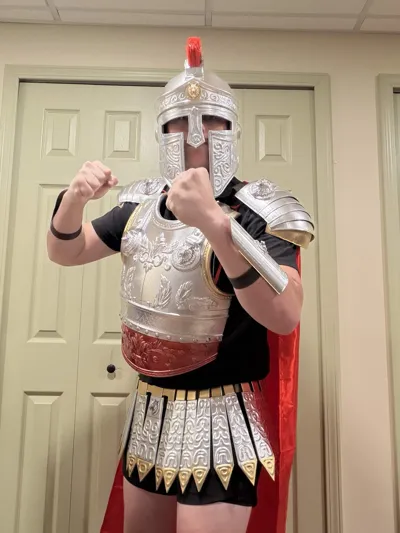
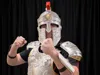
Roman Centurion Armor - Wearable Armor Set


Print Profile(1)
Bill of Materials
.jpg)

- Filler Primer x 1: https://www.amazon.com/dp/B003CT4AM0?th=1
- Silver Paint x 1: http://amazon.com/Rust-Oleum-7718830-7718-830-Automotive-Accessories/dp/B000Z8DGXK/?th=1
- Gold Paint x 1: https://www.amazon.com/Rust-Oleum-Available-7710830-Metallic-11-Ounce/dp/B000Z8FGE2/
- Red Metalcast x 1: https://www.amazon.com/dp/B000994BUM?ref_=ppx_hzsearch_conn_dt_b_fed_asin_title_2&th=1 - This is just what i had around, you don't need it if you don't want red.
- Brown Elastic x 1: https://www.amazon.com/dp/B0FSSDTKH2?ref=ppx_yo2ov_dt_b_fed_asin_title
- Red Cape x 1: https://www.amazon.com/dp/B06VX94KSH?ref=ppx_yo2ov_dt_b_fed_asin_title&th=1
Description
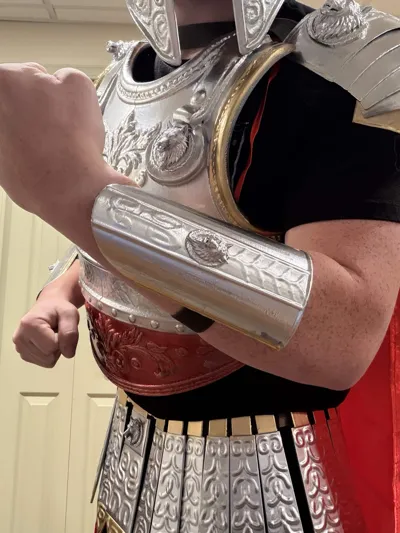
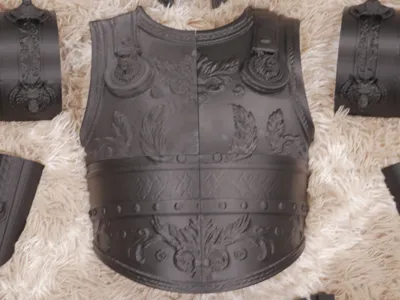
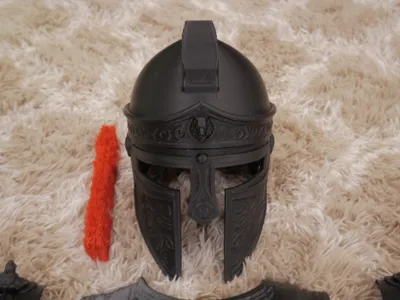
This is the armor worn by a Roman centurion, the professional officers who commanded centuries in the legendary Roman legions. The design recreates the iconic armor seen in historical depictions, featuring the distinctive transverse crest, ornate breastplate (lorica musculata), and articulated pteruges.
Design Philosophy:
While traditional Roman centurion armor featured lion emblems, this armor incorporates wolf imagery throughout all pieces. The wolf holds deep significance in Roman culture—from the legendary she-wolf who nursed Romulus and Remus to the tactical brilliance of wolf pack hunting strategies that inspired Roman military formations. Every piece features detailed wolf emblems in the decorative relief work, creating a unified aesthetic that honors both Roman tradition and the noble characteristics of the wolf.
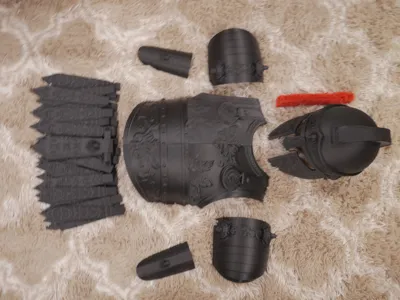
The full armor set consists of 7 parts across 13 plates. Time and filament usage are shown in the table below (Based on PLA):
| Part | Plates | Filament (g) | Print Time (h) |
|---|---|---|---|
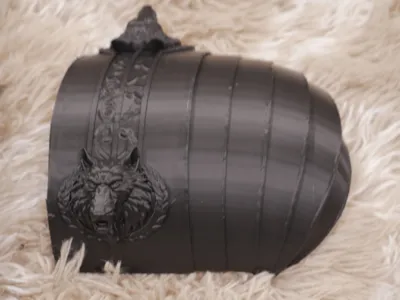
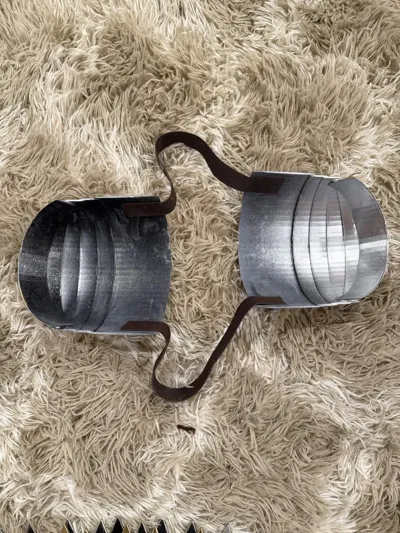
| Shoulders (pr.) | P1 | 335 | 16.5 |
| Helmet | P2-4 | 530 | 24 |
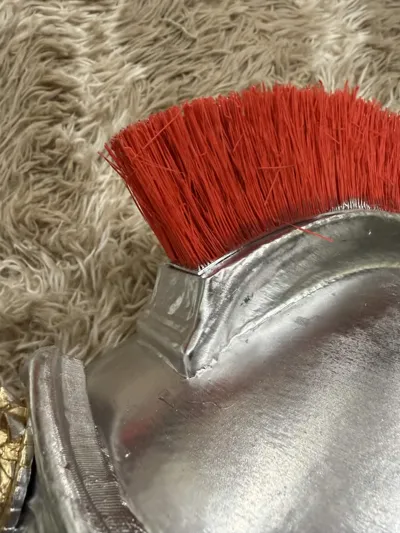
| Helmet Mane | P6 | 60 | 2 |
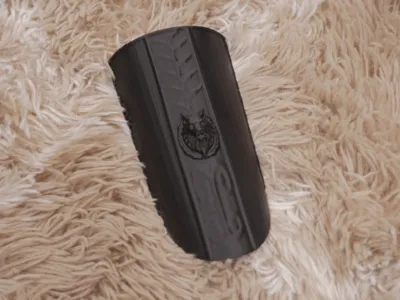
| Bracers (pr.) | P5 | 100 | 3.5 |
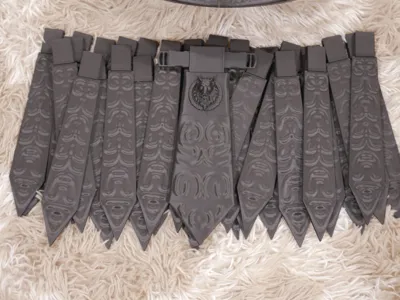
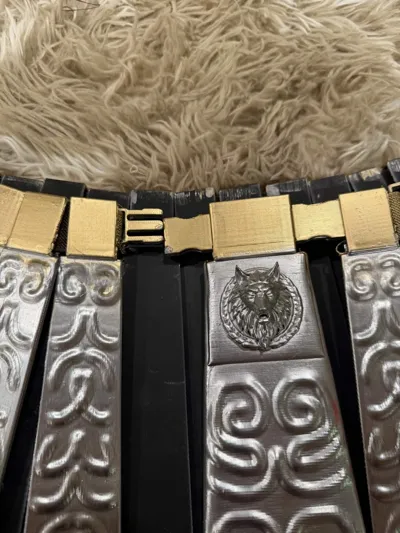
| Belt (Pteruges) | P7-9 | 700 | 24.5 |
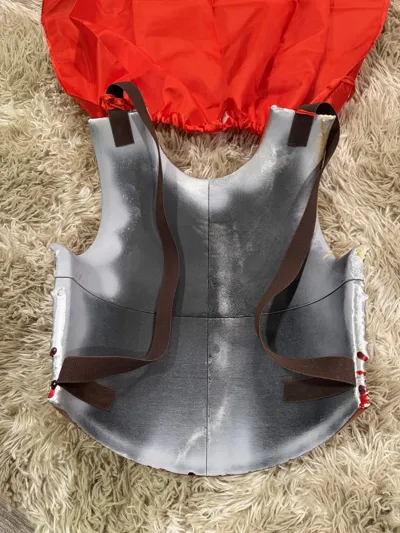
| Breastplate | P10-13 | 410 | 14 |
| Total | 13 | ~2,135 | ~84.5 |
Sizing:
- The overall scale is designed for a height of 183cm (6ft)
- Designed for Medium-Large build: Chest 40-44", Waist 30-34"
- Scaling ratio = (Your Height) ÷ 183
- All parts use straps for fastening with flexible adjustment, accommodating various body types
About Print Profile:
All pieces use the same settings (EXCEPT Helmet Mane):
- Layer Height: 0.2mm
- Infill: 4% (sufficient strength, keeps weight manageable)
- Walls: 2 walls
- Supports: Tree supports (auto-generated)
- Material: PLA or PETG recommended
Helmet Mane (Plate 6) SPECIAL SETTINGS:
- Supports: NONE
- Important: Enable "Detect Thin Walls" in slicer
- Prints with 2 mirrored sides - cut one side off after printing using hobby knife or flush cutters
- Keep the side with better detail
Material Recommendations:
- Both PLA and PETG work well with no significant difference
- PETG recommended for outdoor events (more durable, heat resistant)
- PLA perfectly fine for indoor conventions and display
Print Tips:
- Bed adhesion: Standard settings work fine, brim optional for tall pieces
- Total material cost: ~$20-30 in filament
- Print time: Plan for about 1 week of continuous printing
About Assembly:
Helmet Assembly:
- Plates 2-4 connect using built-in alignment dowels
- Apply super glue to joints - dowels ensure perfect alignment
- Glue the mane onto top crest holder after cutting off one of the flat walls.
- Hold each connection 30 seconds until set
Connection System:
- All armor pieces feature built-in plug and socket connections
- Printed dowels and alignment features make assembly straightforward
- Super glue or plastic cement recommended for permanent bonds
- Test fit before gluing - everything should click together smoothly
Belt System:
- Belt (Plates 7-9) includes printed clip system
- Middle piece has clips
- Functions as actual belt - easy on/off
About Wearing:
Required Supplies:
- 5 yards of 1-inch wide elastic band (brown recommended)
- Super glue for attaching elastic to armor interior
- Black t-shirt and shorts (worn underneath)
- Leather sandals (recommended for authentic look)
- Cape (recommended)
Strap Configuration:
Shoulders:
- One strap runs behind head, one in front
- Connects left and right shoulder guards
- Adjust tension for comfortable fit
Breastplate:
- Straps run from top of each shoulder down to bottom at hips on each side
- Arms go through the strap loops
- Creates secure fit while allowing arm movement
Bracers:
- Simple elastic wrap around each arm
- One strap per bracer
Belt:
- Uses integrated clip system with elastic to act as a belt.
- Quick release for easy on/off
Putting On:
- One person can manage the entire set alone
- Total time to suit up: ~5 minutes with practice
Mobility:
- Good range of motion for arms and upper body
- Walking and standing are comfortable
- Sitting is possible but not ideal (belt interferes slightly)
- Best suited for standing events, photo ops, parades
Comfort:
- Lightweight due to 4% infill
- Total armor weight: ~2.1kg (4.7 lbs)
- Can be worn for 2-3 hours comfortably
About the Wolf Design:
Why Wolves Instead of Lions?
This armor reimagines Roman centurion regalia with wolf iconography throughout. Wolves hold profound significance in Roman culture and military tradition:
- Roman Mythology: Romulus and Remus, Rome's founders, were raised by a she-wolf (Capitoline Wolf)
- Military Tactics: Roman formations drew inspiration from wolf pack hunting strategies
- Symbolism: Wolves represent loyalty, intelligence, and cooperative strength—perfect for a centurion
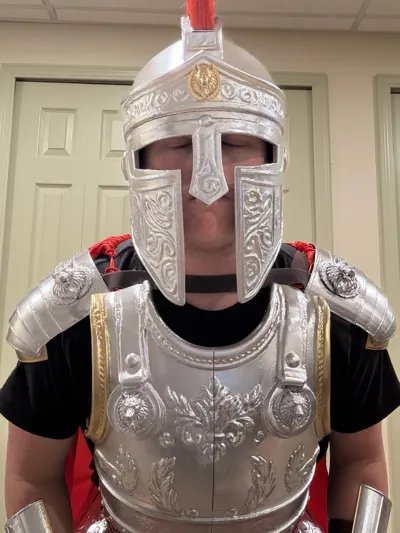
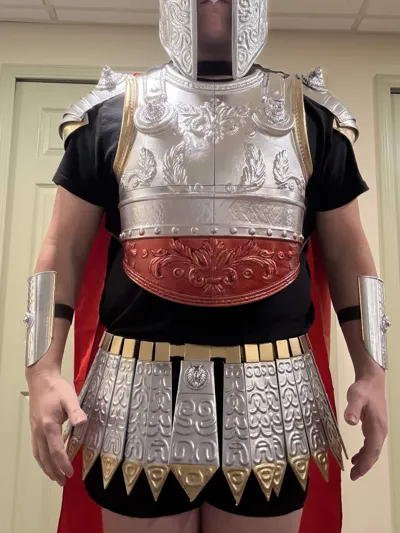
Wolf Emblem Locations:
- Helmet: Wolf emblem on forehead
- Shoulders: Wolf head motifs on pauldron faces
- Breastplate: Wolf emblem on each breast
- Bracers: Wolf emblem located right in the middle.
- Belt: Wolf emblem on center piece only.
The unified wolf theme creates a distinctive look while maintaining historical authenticity.
About Color:
Armor Finish:
- Base: Silver metallic spray paint (main armor color)
- Accents: Gold spray paint for decorative wolf emblems and relief details
- Apply 1-2 light coats of silver, allow to dry between coats
- Hand-paint gold details with small brush on raised wolf patterns
Wolf Emblem Painting:
- All wolf relief patterns are raised - perfect for gold highlighting
- Small detail brush recommended for wolf emblems
- Consider bronze or copper paint for wolf details as alternative
- Wolf eyes can be picked out with darker paint for dramatic effect
Painting Process:
- Wipe all pieces clean with damp cloth
- Optional: Apply gray primer for better paint adhesion
- Base coat: 1-2 coats silver metallic spray paint
- Allow 24 hours to cure
Advanced Finishing (Optional):
- Black wash in recessed areas for depth
- Dry brush dark colors on edges for battle-worn effect
Bill of Materials:
3D Printing:
- PLA or PETG filament: ~2.2kg (~$20-30)
- Print time: ~85 hours
Assembly Supplies:
- Super glue or plastic cement
- Hobby knife or flush cutters (for mane trimming)
- Sandpaper (optional)
Wearing System:
- 5-yard pack of 1-inch elastic band
- Additional super glue for elastic attachment
Paint & Finish:
- Silver metallic spray paint: 1 can
- Gold spray paint or acrylic: 1 can
- Red spray paint: 1 can
- Gray primer 2 cans, clear coat sealer 1 can
Costume Completion:
- Black t-shirt and shorts
- Leather sandals (Roman/gladiator style)
- Cape - red recommended (Amazon link in files)
Total Estimated Cost: ~$40-120
(Amazon product links for elastic, paint, and cape included in model files)
Perfect For:
- Cosplay conventions
- Renaissance faires and Roman festivals
- Historical reenactments
- Theater and film productions
- Halloween (premium costume quality)
- Educational demonstrations
- Living history events
Project Timeline:
- Printing: ~1 week continuous
- Assembly: 4-6 hours
- Painting: 1-2 days (including dry time)
- Total: ~3 weeks from start to completion
Tips for Success:
Printing:
- Don't forget to enable "Detect Thin Walls" for the mane (Plate 6)!
- Print largest parts first (shoulders, breastplate, belt)
Assembly:
- Dry fit everything before gluing
- Use clamps or tape to hold pieces while glue sets
Painting:
- Thin coats are better than thick coats
- Let paint fully cure 48-72 hours before handling
- Test paint on scrap piece first
Wearing:
- Practice putting it on before your event
- Bring safety pins for emergency repairs
Ave Caesar! May the wolf guide your path to glory! 🐺🏛️⚔️
License
You shall not share, sub-license, sell, rent, host, transfer, or distribute in any way the digital or 3D printed versions of this object, nor any other derivative work of this object in its digital or physical format (including - but not limited to - remixes of this object, and hosting on other digital platforms). The objects may not be used without permission in any way whatsoever in which you charge money, or collect fees.
Comment & Rating (11)