


Print Profile(1)
Description

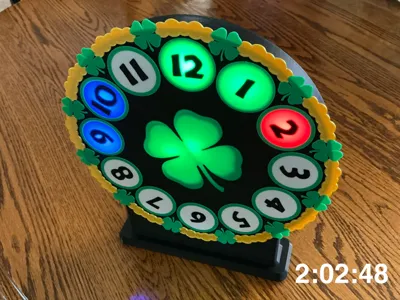
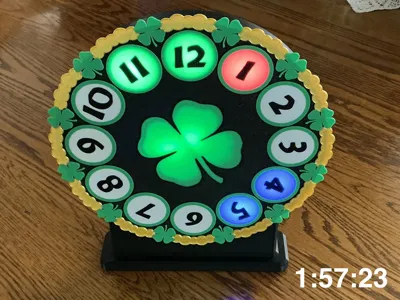
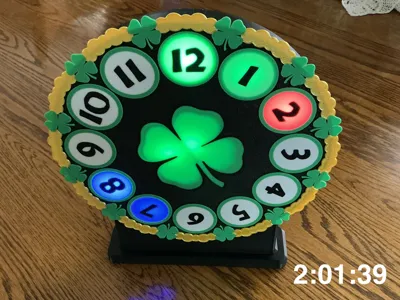
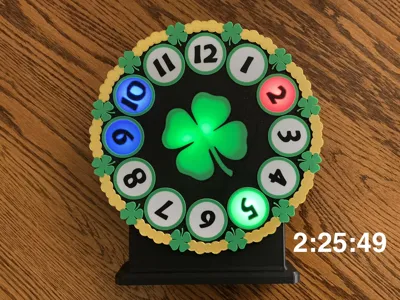
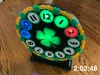
Enjoy “The Luck of the Irish” with this colorful animated light/clock with the face surrounded by 4-leaf clovers and Leprechaun gold!
This is a cute, fully electronic clock / lightbox without hands. The time is displayed by neopixel LEDs in the hours positions with fine location being set by the relative brightness of the minute color on either side of the minute value. The seconds value works the same as minutes. The 4-leaf clover detail in the center of the clock face lights up green. It's for desk, counter, or shelf display and the power is simple USB. If desired, it chimes the quarter hours and makes a soothing authentic tick-tock sound.
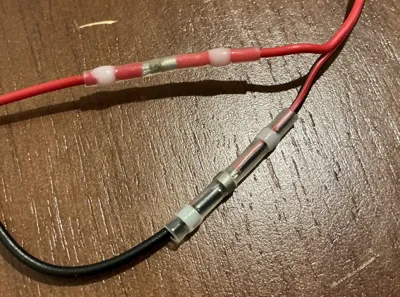
This project does not require soldering though there is a splice needed to add enough length to the pushbutton switch. I used “solder splices” that do the soldering for you. All the parts specified have plug or screw terminals or wires. The hardest electronic task is cutting the wires to length, stripping the ends, and getting the wires into the correct terminals. Electronics cost is about $60.
To read the time, if it's 6 minutes 35 seconds after 4, the 4 will be at 100% brightness in the hour color (red). To light 6 minutes, the “1” will be lit at 80% brightness and the “2” will be lit at 20% brightness with the minute color (green). The seconds value behaves like the minutes but in this case the 7 position is lit at 100% intensity blue. When 2 or 3 of hour, minute, and second light up the same neopixel, the colors will mix depending on the intensity values and colors. Unused digits not lit up with time values are off.
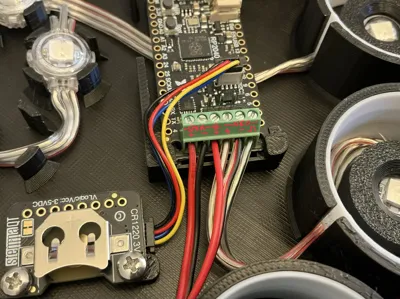
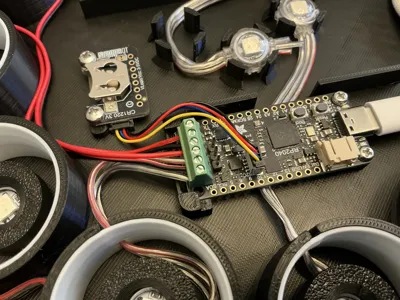
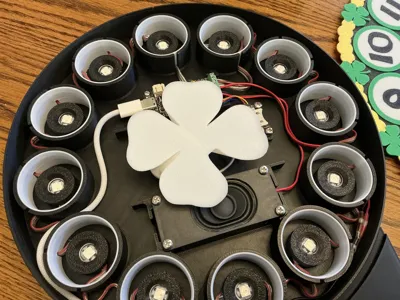
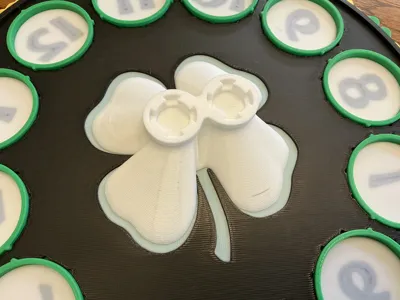
The clock features an Adafruit Prop-Maker microcontroller, a super-accurate real-time clock with optional coin cell battery backup (CR1220), a speaker to chime the hour and quarter hour, and 14 neopixels - 12 for the time and two to light up the center art. There is a light pipe of sorts to help get better illumination of the 4-leaf clover. The digit holders are indexed every 30 degrees so you can rotate them to various orientations during assembly.
There is a pushbutton on the back of the base to set the time. Press it and the 1 lights up red and then sequentially moves through the digits. When the correct hours lights, just press the button again to set that hours value. The clock will light and sequence through the minutes with green. When the proper minutes value is displayed, press the button again to select the minutes value. It will then display a blue running rabbit that is just a do-nothing display to show it’s waiting for you to mark the seconds. When your authority clock hits :59, press and release the button to finish setting the time. Whenever the button is released seconds are set to zero so a little timing makes setting the time easy.
For example, it’s 4:36. To set the current time you set it to 4:37, when the red dot gets to 4, press and release the pushbutton to lock in the 4. To set the :37 you wait for the green to light the 7 fully (35) and then light 8 the first two shades (:37). Then when the authority clock hits :59 seconds, press the button again. It takes about a second to actually set the time in the real time clock chip which is why you set the seconds at :59. That way, when the authority clock hits 4:37, the RTC is set to 4:37.
It’s much clumsier to describe the process than to do it. If you miss setting a digit, the display just cycles until you select. If you select the wrong digits, just complete setting the wrong time and try again. If you add the CR1220 battery (highly recommended), you won’t have to set it again until daylight savings time or when the battery runs down after 4-5 years or so.
Construction:
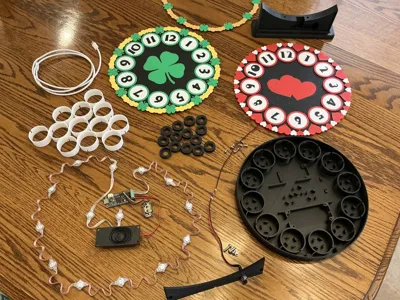
Print the parts. I used Bambu Basic green, jade white, and black PLA, and gold silk+ PLA on textured PEI with Bambu liquid glue especially on the white reflector rings. They don’t have much contact area but with glue they don’t need brims and any cleanup those bring to stay stuck down. If you don’t like glue you may need to add brims. The backplate has support under the hold-down tabs for the PropMaker on either side of the screw terminal strip. Sliding an X-Acto or other thin knife blade between the support and the PropMaker mounts top and bottom will make removal easier. The door for the back of the base has support in the screw head recesses. If you print the backplate first, when it’s done you can get busy wiring while the other parts print.
Whatever order you print in, once you have the faceplate and digits ready, set the digits into the holes in the faceplate in the desired orientation. There are index cuts every 30 degrees so you can orient the digits a number of different ways. Glue or spot melt them in place in the faceplate with silicone, thick cyano, or something like a soldering iron hot enough to spot melt the plastic on the back side of the faceplate. if you use cyanoacrylate/superglue be careful not to get haze on the front/display side where it would be visible. You want the digits secure where they don't vibrate. The speaker can make them buzz if they are loose.
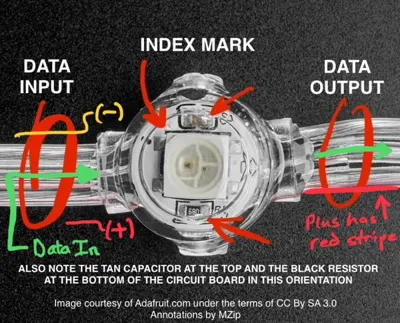
Before we can wire things up we need to verify which end of the neopixel string is the input end — the end that gets connected to the PropMaker. The input end should be the end with the male connector on it but that apparently isn’t guaranteed. See the photo in the lineup for how to tell for sure which end is input. Also note the red stripe along one lead -- that's +5V. The center lead is data. The third lead is ground. If you swap the ends and connect the output to the PropMaker it won’t hurt anything but they won’t light. What’s more important is not cutting the string to length until you verify it works. (Detail image courtesy Adafruit.com under the CC by SA 3.0 license. Annotations are mine. There is no endorsement or connection to Adafruit other than using their parts and being the source for the image. The closeup neopixel image is the only item bound by this license.)
Once you know which end is INPUT, clip the connector off right at the connector. We need that length to connect to the PropMaker. I routed the strand before stripping the ends. It protects the wires while routing but makes it harder to strip them later to connect to the PropMaker. Again, leave the strand full length until you know which end works as input. Starting with the input end at the 1 o’clock neopixel pocket, route the neopixel strand around the clock as shown in the photos. Don’t glue the retaining caps yet.
Fit the reflector rings into each neopixel pocket. You may need to flex the wires with a toothpick or small screwdriver to help clearance the neopixel wires to let the rings fully seat. Note there are 11 identical rings and one different. The different ring is the one spaced out slightly from the others on the reflector rings build plate and gets used in the 12 o’clock position. The slots on it are farther apart than the others. It’s pretty obvious which rings are which - just line up the slots.
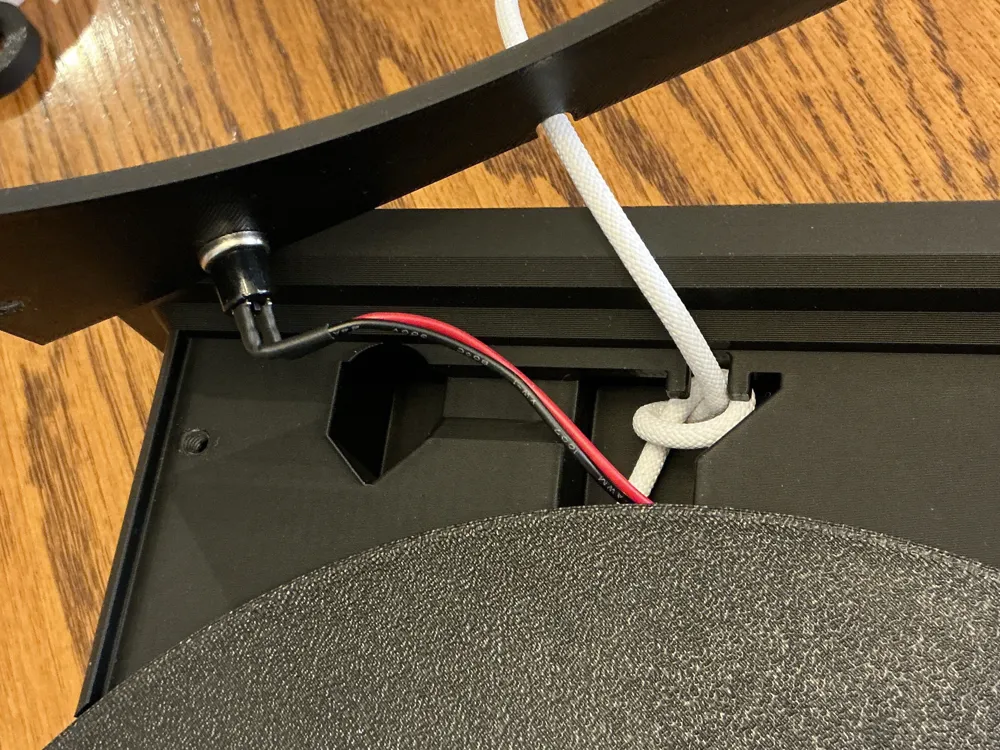
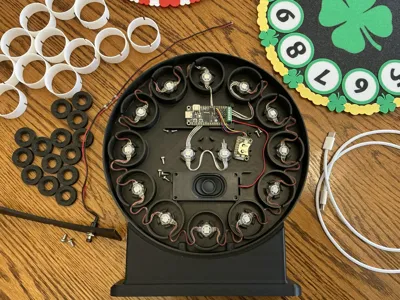
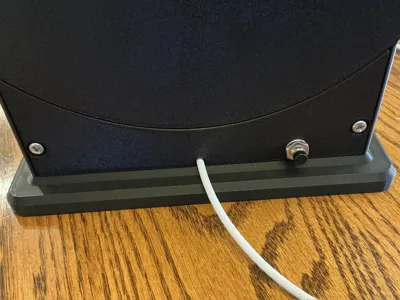
Mount the PropMaker (M2.5x6) and speaker (M3.0x6). Don’t mount the RTC yet. Mount the pushbutton to the base door noting that the door screw recesses and texture from the PEI plate are on the side facing out. Note the neopixel cable passes under the PropMaker. Attach the base using M4.0x12 screws while threading the USB cable through the port in the clock rim and out of the base while threading the pushbutton wires the other direction. Plug the USB cable into the PropMaker and tie a single knot in the cable to act as strain relief or wrap with a zip tie where the USB cable exits the base and mount the door to the base with M3.0x6 screws.
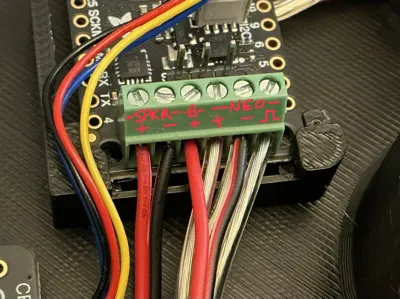
Cut the speaker wires to length (leave a bit of slack to make handling easier), strip about 4mm of insulation, and connect the speaker wires, pushbutton wires, and neopixel wires as shown in the photos. Connect the STEMMA cable to the RTC and PropMaker and mount that using M3.0x6 screws. Note the connectors only fit one way - the contacts are slightly offset. If you feel any resistance to pushing the connector home, double check you have oriented it correctly.
The PropMaker comes with test/demo software already installed to verify functioning. Just plug it into a USB power source and you should hear “Hi there!” a couple of times and see the neopixels all light up and start a color/fading animation.
If the neopixels don’t want to sit level, use the retaining rings to hold them down as far as they can hold the LEDs and let it sit a few hours. The wires will relax and start to take on the new “set”. You should be able to get the LEDs to all lay flat after a while without glue. When they all lay flat, glue the retaining rings in place to keep them there. Note - no retaining rings get glued on the center LEDs. Only glue retaining rings on the clock digit LEDs.
We need access to the small pushbuttons on the PropMaker during programming so don’t attach the faceplate and ring yet. Get it programmed (see below) and double check functioning — THEN attach the faceplate and decoration ring.
Attach the clock face with some dabs of clear silicone. Note the alignment notch. It’s easy to overpower but be careful and you can even feel it engage. When that’s all cured, any excess silicone should be easily removed by rubbing or pulling on it.
Parts List:
Adafruit PropMaker (https://www.adafruit.com/product/5768) - $19.95
Adafruit Neopixel Strand 4” pitch (https://www.adafruit.com/product/3631) - $27.50
Adafruit RTC Clock Module (https://www.adafruit.com/product/5188) - $13.95
Adafruit STEMMA Cable 50mm QT-QT (https://www.adafruit.com/product/4399) - $0.95
Adafruit Speaker 3W 4Ohm (https://www.adafruit.com/product/4445) - $3.95
Solder Seal Butt Connectors 26-24 AWG (Amazon ASIN B0CL1Q75VS) - $5.99
Momentary NO Pushbutton Switch w/Leads (Amazon ASIN B09C8C53DM) - $9.99
CR1220 Button Battery Cell ~$3
26-24 AWG wire to extend switch wires
2 each M2.5x6
8 each M3x6mm
2 each M4x12
USB power source - clock pulls 90mA
Programming:
The code pack for the PropMaker had to be moved to GitHub due to new rules so here's a link to it: https://github.com/Mzip-3D/NeoClock-Code/releases/tag/V.1.2_Neoclock
Programming is really easy. The PropMaker Feather looks like a USB drive when you plug it into your computer. It comes with a stock demo program loaded so we have to blow that away and install our custom code.
Download the PropMaker Neoclock zip archive and expand it. There is a file called 0_How_To_Install_The Software.rtf with more information on the actual steps and how to rescue should things go wrong. Everything you need is in the archive.
Hold the small “Boot” button on the PropMaker when you plug it into your computer. That should get you a drive labeled “RPI-RP2” on your computer. Next, drag and drop the adafruit-circuitpython-adafruitfeather_rp2040_prop_maker-en_US-9.2.0.uf2 onto the RPI-RP2 drive to copy the file in. That's the circuit python environment we need to run the actual code.
Note - 9.2.0 is now an older distribution of circuit python but it's the one I've been using and it works fine. If you have to have the newest version, the Neoclock code might still work but you'll probably also need to use new (consistent) library files that work with the new environment. It's an advanced topic for advanced users. If you just want to build a clock, there is no need to use the latest environment.
Anyway, once you get the environment properly set up, the drive will reset and remount as “CIRCUITPY”. You're almost done!
CIRCUITPY looks like a USB drive with some sample files in there. Delete them all. Next, copy all the files from the archive directory: “2 - COPY FILES INSIDE TO PROP-MAKER TO INSTALL NEOPIXEL CLOCK” into the PropMaker CIRCUITPY drive.
If you did it right, if you open the CIRCUITPY drive you should see two files -- boot_out.txt and code.py – and two directories – lib and sounds. The clock should light up a 0 hours, 0 minutes, and 0 seconds and start marking time from there. You can now set the time and position the clock somewhere the Leprechauns can see it!
Note - you can silence the tick-tock sounds, quarter hour chimes, and hour bongs separately. I just uploaded the v.1.0 version of the code archive and it has a directory in it called “Code Variations”. In there are different versions of code.py preconfigured for different sound configurations. There is silent, just ticks, ticks & chimes, and ticks, chimes, & bongs. In each directory is a code.py file. Just copy whichever configuration you want to use over the stock code.py (just ticks) and you should be set when it reboots.
Note there is also a volume setting you can adjust in the code. It ranges from 0.0 to 1.0 and stock configuration is 0.1. That makes the ticks about the same volume level as an escapement style clock and the chimes and gongs not too obnoxious. If you want to change the volume, you have to use a very basic editor that doesn't add extra formatting characters. Notepad is ok. Wordpad is not. If you end up corrupting the code.py file, just grab the configuration you want out of the archive and copy it over the code.py that isn't working. Should fix you up.
Also Note - I was trying to get this posted so people could build for St. Patrick's Day if they are of a mind. The code isn't thoroughly tested (but seems fine so far) so if anyone finds any bugs, please let me know.
License
You shall not share, sub-license, sell, rent, host, transfer, or distribute in any way the digital or 3D printed versions of this object, nor any other derivative work of this object in its digital or physical format (including - but not limited to - remixes of this object, and hosting on other digital platforms). The objects may not be used without permission in any way whatsoever in which you charge money, or collect fees.
Comment & Rating (0)