"Real" Wood Photo Frame


Print Profile(1)

Description

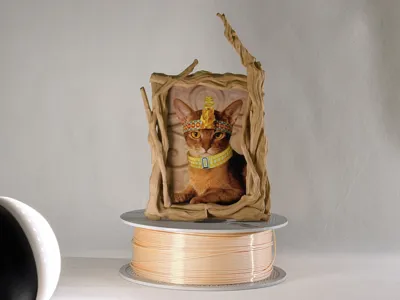
Simply Make a Photo Frame
Design Highlights:
- The overall appearance is formed by several intertwined wooden sticks resembling tree roots.
- A branch extends diagonally upwards from the upper right corner, reflecting the dynamic growth of plants.
- The branches are not solid but have some gaps, making it more natural.
Supported Photo Ratios:
- 6-inch 15.2cm×10.2cm (3:2) (requires printing an additional limiter)
- Large 6-inch 15.2cm×11.4cm (4:3) (default)
Printing Suggestions:
- It is recommended to print with dark wood-like filament. (I only have light-colored ones)
- The layer height of the main photo frame is approximately 0.08mm, which is crucial for the printing effect, modification is not recommended, it's worth your extra time!
- Supports are relatively easy to remove ^_^
Assembly Method:
- First, remove the supports from the main body.
(If your photo ratio is 4:3, please ignore this step) Install the limiter.
First, place the photo in the center of the back of the photo frame, then carefully place the two limiters on the sides, making sure to insert the limiter's tenon into the main body.

Place the backplate and install 4 pins to secure it.

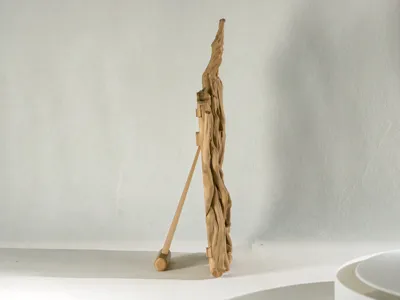
Note the shape of the four pins, they correspond one-to-one with the slots on the main body. You can use a stand to place it on your desk. The print profile includes 3 stands with different angles: 15°, 20°, and 25°. You can print the 20° stand first to check the effect. The stand slides into the slot on the backplate;
Alternatively, you can fix it to your wall using expansion screws or similar. In the print profile, there is a part designed for screws with a head outer diameter of 8mm and a major diameter of 4mm. There is also a part that includes negative parts for adjusting the head outer diameter and major diameter, allowing you to set the size according to your needs. This wall-mounting part also slides into the slot on the backplate.

- Actually, you could also add magnetic tenons to the back of the backplate to make a refrigerator magnet, does anyone need that?
License
You shall not share, sub-license, sell, rent, host, transfer, or distribute in any way the digital or 3D printed versions of this object, nor any other derivative work of this object in its digital or physical format (including - but not limited to - remixes of this object, and hosting on other digital platforms). The objects may not be used without permission in any way whatsoever in which you charge money, or collect fees.
Comment & Rating (4)