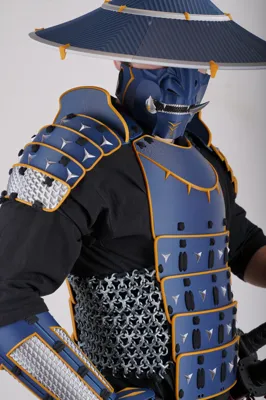
Samurai / Ronin Full Armor Set


Print Profile(11)

Bill of Materials


Description
Samurai / Ronin Full Armor Set
I started this project a few years ago but never completed it. The Wearable Armor contest was a good opportunity to complete it and share it with everyone here. All parts were designed with Blender 4.1 and the .blend file is provided. Goal of this project is to provide other designers with a basis they can modify and customise. I hope everyone has a good time printing this armor set and would love to see remixes of it. Happy printing :)
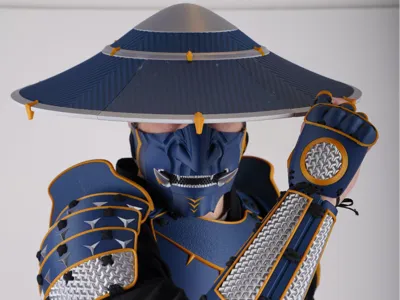
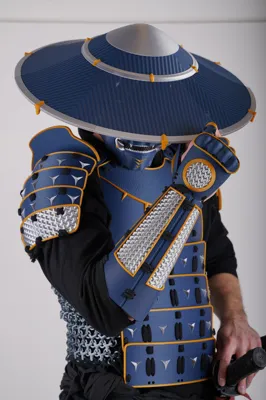
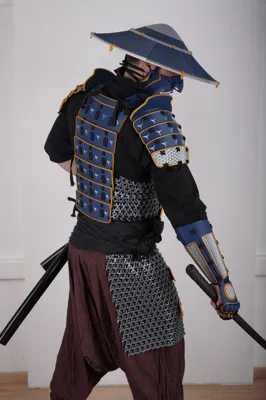
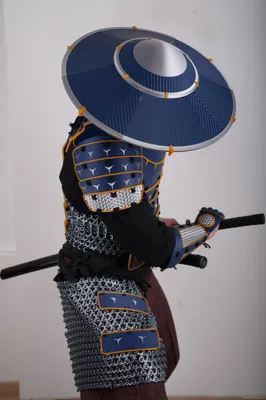
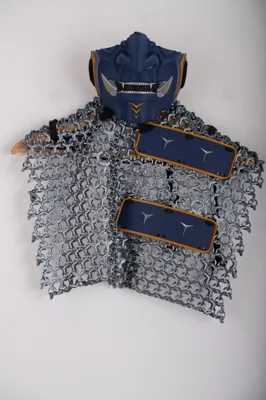
Armor Set includes:
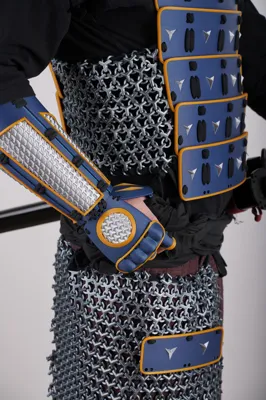
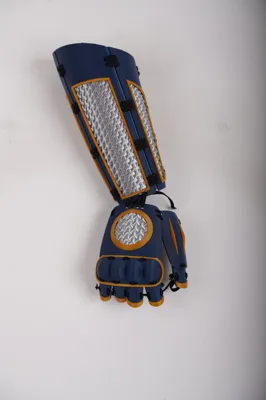
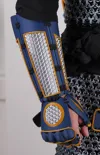
- Bracers
- Shoulders
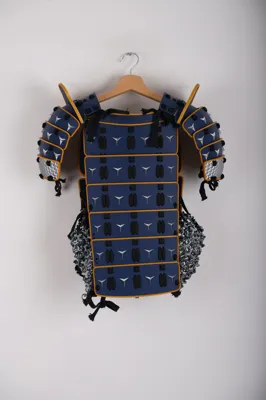
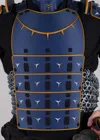
- Chest & Back
- Mask
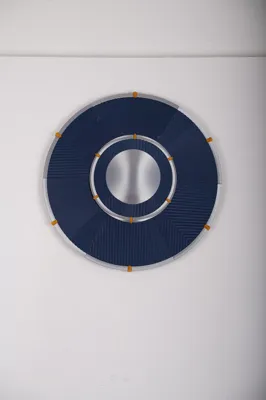
- Strawhat
- Chainmail & attachable plates
Swords & Scabbards in the photos are not included in this set.
Scaling Guidelines:
The model in the picture has a height of 1.78m and weighs about 74kg. Before printing I suggest exporting the stl files from BambuStudio or Blender and scaling to fit your measurements in a tool like Armorsmith. Most parts are designed to be forgiving if the scale it slightly off. The most important one to scale right is the Chest & Back since it will not look correct if it is to small or large so pay attention when scaling this, especially the width.
Keep in mind the split chest pieces and the shoulder “fin” part have holes that fit 1.75mm filament for pins (created with bambustudio). If you scale those parts ensure the holes are sized back to their original radious otherwise filament will not fit properly as pin support.
Priniting Guidelines:
The armor pieces in the photos were all printed with H2C (PLA SILK+ SILVER, PLA MATTE DARK BLUE, PLA SPARKLE GOLD and PLA BASIC BLACK only used for the mask mouth).
All pieces are carefully oriented in the 3mf files. Some are pushed slightly lower than the plate to ensure the print has a stable surface area on the printbed and doesn't fall. Default settings have 2 walls but if you want something more sturdy then I suggest increasing to 3 walls.
Some parts, like the Strawhat pieces or the top Chest piece, have additional supports to ensure the print is stable when they reach some more excessive angles.
The Bracer includes some that parts are connected with one another like the main forearm parts and the finger parts. This is done to make it easier to print. The parts are meant to be split once printed and attached together with laces. You can skip this for the forearm parts since it wont affect how the armor looks but finger parts need to be split. BE CAUTIOUS when seperating them to avoid breaking the parts in the wrong places.
If you print with more demanding materials like ABS or ASA you will need enclosure. The warping of these materials will make a lot of these parts pop off the print bed. Ensure the temperature is high enough inside the enclosure. If your printer does not support chamber temperature setting turn up the bed to heat up the chamber before starting the print. You might also consider increasing the brim or adding a raft.
Assembly Guidelines:
For the assembly I used the following materials:
- Any 1.75mm filament for alignment pins
- Super glue (prefarably gel but liquid works)
- 20m of flat lace (~1.5cm wide)
- 5m of elastic lace (~0.5cm wide)
- 24 Self Tapping Screw BT2x6(OPTIONAL)
Connecting parts with Laces
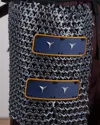
All parts are designed to be tied together with laces to look closer to traditional japanese samurai armor. The picture below has a closer look at the chest.

You can tie the pieces together however you like but this pattern is one example that definitely works. The 1.5cm lace should be used for the Shoulders, Chest, Back and for attaching Chainmail connecting the chest and back.
For the Bracers, I suggest using the 1.5cm lace for the forearm pieces and the 0.5 elastic lace for the Hand and Finger pieces.

Assembling the Strawhat
The Strawhat is created by 1 middle piece and 6 outer pieces. The one in the photo was assmbled by glueing all pieces together with superglue. There is the option to use Self Tapping Screws (BT2x6). Holes for the screws are already modelled. BE CAUTIOUS when inserting the screws not to seperate layers.

Assembling the Mask
Mask requires superglue to attach the 2 claws. Do a dry fit before applying the glue to make sure they are in the correct position.
I used 1.5cm lace for the mask.

Assembling the Shoulders
Shoulders are tied together with 1.5cm lace. The top piece of the shoulder is printed in 3 separate pieces that are glued together. The “fin” part is split in 2 and has holes that will fit 1.75mm filament as pins that help with alignment and strength. Cut some filament pieces, do a dry fit and then apply superglue.
Then glue the fin part to the other top shoulder part on the socket. Gel superglue is better here to better fill the gaps between the socket and the fin.
CAUTION: Scaling these parts might affect the size of those holes. I suggest scaling the part along with the holes and then scale the holes down until they have the original radius before scaling.

Assembling the Chest & Back
The chest & back assembly is straight forward. Use 1.5cm lace to tie pieces together. If you print the top chest part in 2 split pieces use filament as pins for proper alignment and then superglue it together.
Assembling the Chainmail
There are 2 versions of the chainmail. The first one I used as Torso side pieces. Connecting the Chest and Back together. In my case it fits properly.
The second version is designed so you can connect multiple pieces together to make it as large piece as you want. I connected 4 pieces together to create the part covering the thigh in the pictures.
Chainmail parts are connected with one another by snapping them together. There are 2 types of interconnecting parts that can be seen in the picture below. Top type is for 3 single edges (once per 4 chainmail pieces connected together). The rest of the interconnecting parts are all like the bottom type, 1 double edge connected to 1 single edge.
One could do an entire armor out of this chainmail design alone with some proper editing :)

This concludes the assembly instructions. Make sure to do some dri fitting of the pieces before applying glue. Hope you enjoy. Don't hesitate to post your makes. Happy printing :)
License
You may create derivative works based on this object, provided that all such derivative works are published exclusively on the MakerWorld platform and include proper attribution to the original creator. You may not share, upload, host, distribute, or publish this object—or any derivative work of this object—on any other digital platform, marketplace, or distribution channel. Commercial use of this object and any derivative works is strictly prohibited. This includes, but is not limited to, selling, renting, sublicensing, or using the object in any context in which you receive monetary compensation or other financial benefits.
Comment & Rating (80)