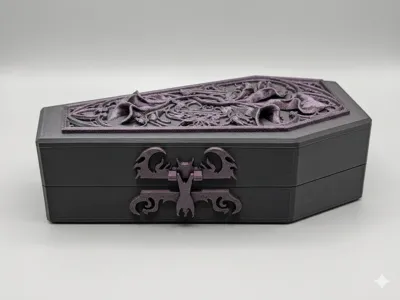
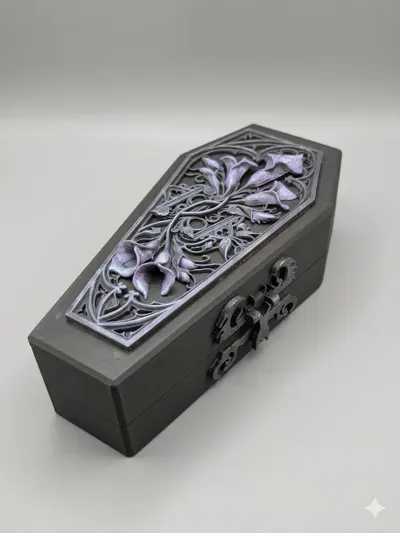
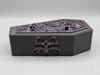
Goth Ring Jewelry Box w/ Calla Lilies & Bat Latch


Print Profile(1)
Bill of Materials


Description
I wanted a box to store my own rings, and I knew I wanted it to be unusual but beautiful. The box itself is sturdy and easy to print, and the print in place hinge should give you no trouble. I tried printing the lily topper multiple different ways to get the best result, but it comes out the nicest if you print it flat with variable layer height (don't worry, I already set that in the print profile). The bat latch is maybe my favorite part! It's also print in place.
Once you've printed all of the pieces, you just need to glue the topper onto the lid, and the latch onto the side. The easiest way to attach the latch is to install the magnets first (the will press fit in, but you should really super glue them a little bit to make sure they don't pull themselves out). Then position the connected pieces of the latch so that one half sits on the lid and the other half sits on the bottom. Once you find a position you like, mark it with a bit of chalk or something. Then apply superglue to the back of both halves of the latch, line it up with your chalk marks, press for 30 seconds and then wait for it to try. Easy as pie.
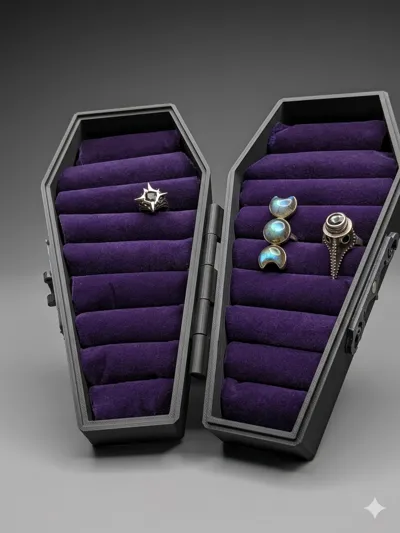
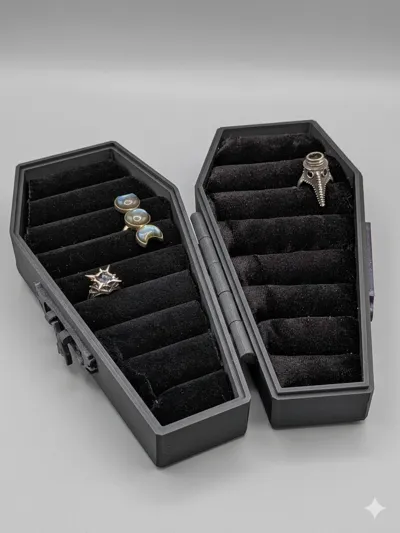
For the interior, I made my own ring rolls because you're not likely to find a pre-made tray that is coffin shaped! There are multiple different ways to do it--you can find several tutorials on YouTube, which is what I did. This is one that I watched:
Another option is to buy a ring tray and cut it to the coffin shape. I did that as well, and it does produce the nicest rolls. However, it's more challenging to cut and it can get a little messy. The left side of the photo showing black interior rolls is the tray cut to shape. The right side of that photo shows another techniqueof wrapping felt rolls in fabric. I included the insert if you want to do that: roll up your felt, glue it down to the insert, trim the edges, and then drape a piece of fabric over the rolls. Push the fabric down between the rolls, gluing it down as you go. Personally, I found this method to be a lot of work and didn't produce my favorite results. However, it's the most versatile because you can use any fabric/color you'd like. What I found to be the fastest/easiest method is to wrap felt rolls individually in adhesive-backed velvet and then trim them to the coffin shape. That's what I did to get the purple interior. You can buy adhesive-backed velvet in multiple colors on Amazon.
I decided to make one version painted with Inca Gold and Rub N Buff. For that I used Inca Gold Violet and Graphite, and Rub n Buff Pewter. It's very easy to do and gives a lovely result. Otherwise the decorative elements look great in lots of different materials.
License
You may create derivative works based on this object, provided that all such derivative works are published exclusively on the MakerWorld platform and include proper attribution to the original creator. You may not share, upload, host, distribute, or publish this object—or any derivative work of this object—on any other digital platform, marketplace, or distribution channel. Commercial use of this object and any derivative works is strictly prohibited. This includes, but is not limited to, selling, renting, sublicensing, or using the object in any context in which you receive monetary compensation or other financial benefits.
Comment & Rating (26)