Gas Meter Smart Meter Reader for BK-G4 MT


Print Profile(1)
Description
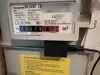
With this model, a **Honeywell BK-G4 MT gas meter** can be made smart and integrated into **Home Assistant**
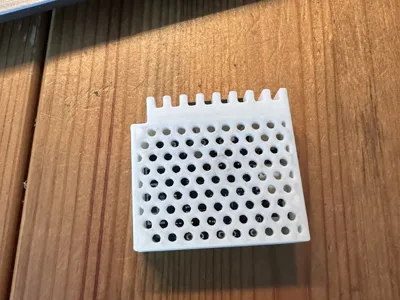
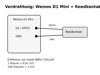
The Gas Smart Meter Reader consists of a 3D-printed housing/holder, a **Wemos D1 Mini / ESP8266**, and a directly soldered **reed switch**. The reed switch detects the gas meter's pulses. ESPHome counts these pulses and calculates the gas consumption in m³ from them
This way, the current meter reading or gas consumption can be automatically displayed in Home Assistant and used, for example, in the energy dashboard
The reed switch is soldered directly onto the Wemos D1 Mini board. No separate sensor cable is needed
On my Honeywell BK-G4 MT it states:
**1 imp = 0.01 m³**
This corresponds to:
**100 pulses = 1 m³**
Important Safety Notice
This model does **not** interfere with the gas meter. It is only attached externally
Nothing on the gas meter is opened, altered, or seals tampered with. The Gas Smart Meter Reader is only attached to the outside of the meter
Work on gas installations, gas pipes, or sealed parts may only be carried out by qualified personnel
In case of gas smell or uncertainty, immediately contact the responsible network operator or specialist company
Required Parts
- 1× 3D-printed housing / holder
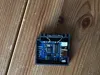
- 1× Wemos D1 Mini / ESP8266
- 1× Reed switch in elongated design
- Optional: some glue or hot glue for fixing the board
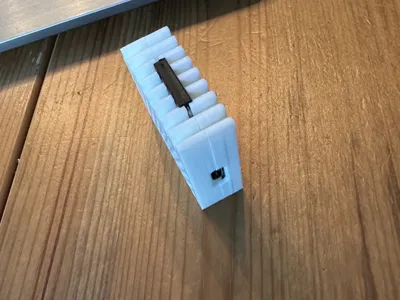
Used Reed Switch
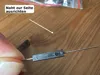
I used an elongated reed switch / magnetic switch
The alignment of the reed switch is important:
The **seam on the reed switch must point to the side**
The seam must **not point upwards towards the gas meter**. If the seam is misaligned, the reed switch may not detect any pulses or only unreliable ones
Before final assembly, the function should be tested
Wiring
The reed switch is soldered directly onto the Wemos D1 Mini pins and used like a simple switch
| Wemos D1 Mini | Reed switch |
|---|---|
| D1 / GPIO5 | Connection 1 of the reed switch |
| GND | Connection 2 of the reed switch |
In the ESPHome configuration, the internal pull-up is activated for GPIO5:
mode: INPUT_PULLUP
This eliminates the need for an additional pull-up resistor
Assembly
- Solder the reed switch directly onto the Wemos D1 Mini board
- Use D1 / GPIO5 and GND for this
- Ensure that the seam of the reed switch is later aligned to the side
- Insert the Wemos D1 Mini into the printed housing
- Place the reed switch into the designated groove
- Position the Gas Smart Meter Reader on the outside of the Honeywell BK-G4 MT
- Connect the device to ESPHome
- Check in Home Assistant if pulses are detected
- If no pulses are detected, slightly move the housing or the reed switch and test again
Meter Factor
On the Honeywell BK-G4 MT meter, it states:
1 imp = 0.01 m³
This implies:
100 pulses = 1 m³
In ESPHome, gas consumption is therefore calculated as follows:
Gas consumption = pulses × 0.01
If the current meter reading is to be adopted, the starting value must be entered in pulses:
Pulses = current meter reading in m³ × 100
Example:
Meter reading: 3278.29 m³ Start value: 327829
This value is entered in the ESPHome configuration for initial_value
ESPHome Example Configuration
# ============================================
# ESPHome configuration for Gas Smart Meter Reader
# Honeywell BK-G4 MT + Wemos D1 Mini + Reed switch
# ============================================esphome:
name: gas-smartmeterreader
friendly_name: Gas Smart Meter Readeresp8266:
board: d1_mini
restore_from_flash: truepreferences:
flash_write_interval: 5minlogger:
api:
encryption:
key: !secret gas_smr_api_encryption_keyservices:
- service: update_counter_pulses
variables:
counter_pulses: int
then:
- globals.set:
id: total_pulses
value: !lambda 'return counter_pulses;'ota:
- platform: esphome
password: !secret gas_smr_ota_passwordwifi:
ssid: !secret wifi_ssid
password: !secret wifi_password
min_auth_mode: WPA2ap:
ssid: "Gas-Smartmeterreader"
password: !secret gas_smr_ap_passwordcaptive_portal:
globals:
- id: total_pulses
type: int
restore_value: true
initial_value: '0' # Enter the current meter reading in pulses herebinary_sensor:
- platform: gpio
id: internal_pulse_counter
pin:
number: GPIO5 # D1 on Wemos D1 Mini
mode: INPUT_PULLUP
name: "Live Pulse"
filters:
- delayed_on: 100ms
on_press:
then:
- lambda: id(total_pulses) += 1;
- output.turn_off: led
on_release:
then:
- output.turn_on: ledsensor:
- platform: template
name: "Gas Consumption"
device_class: gas
unit_of_measurement: "m³"
state_class: "total_increasing"
icon: "mdi:fire"
accuracy_decimals: 2
lambda: |-
return id(total_pulses) * 0.01;
update_interval: 60s- platform: wifi_signal
name: "WiFi Signal"
id: wifi_dbm
update_interval: 60s- platform: uptime
name: "Uptime"
id: device_uptimeoutput:
- platform: gpio
pin: GPIO2 # D4 / internal LED
id: led
inverted: true
Home Assistant
The sensor is created in Home Assistant as gas consumption with the unit m³
The ESPHome configuration uses:
device_class: gas state_class: total_increasing unit_of_measurement: "m³"
This allows the sensor to be used in the Home Assistant energy dashboard, provided Home Assistant correctly recognizes the sensor
Print Settings
I printed the model with the **standard print profile**
A normal standard profile with a 0.4 mm nozzle was used. No special settings were required for me
PLA or PETG is suitable as a material. For warmer rooms or permanent use, PETG is recommended
Notes
This model was created and tested for my **Honeywell BK-G4 MT**
Other gas meters may have different housing shapes or sensor positions. In this case, the Gas Smart Meter Reader may not fit, or the reed switch may need to be positioned differently
The ESPHome configuration must be adapted to your own Wi-Fi, your own secrets, and the current meter reading
The starting value initial_value should not simply be adopted, but must be calculated to match your own gas meter
DE:
Wenn du das Modell gedruckt hast, freue ich mich sehr über eine Bewertung, einen Kommentar oder ein Make. Schreib gern dazu, was dir gefällt oder was ich verbessern kann – so werden die Modelle für alle besser.
Boost Me (for free)
Ein Boost unterstützt neue Ideen und weitere praktische Projekte.
EN:
If you printed this model, I’d really appreciate a rating, comment, or make. Feel free to share what you liked or what could be improved – it helps make the models better for everyone.
Boost Me (for free)
A boost helps support new ideas and more practical projects.
Documentation (3)
License
You shall not share, sub-license, sell, rent, host, transfer, or distribute in any way the digital or 3D printed versions of this object, nor any other derivative work of this object in its digital or physical format (including - but not limited to - remixes of this object, and hosting on other digital platforms). The objects may not be used without permission in any way whatsoever in which you charge money, or collect fees.
Comment & Rating (0)