


Print Profile(3)


Description
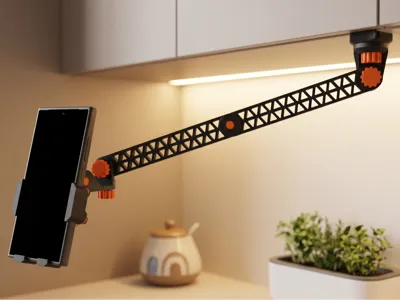
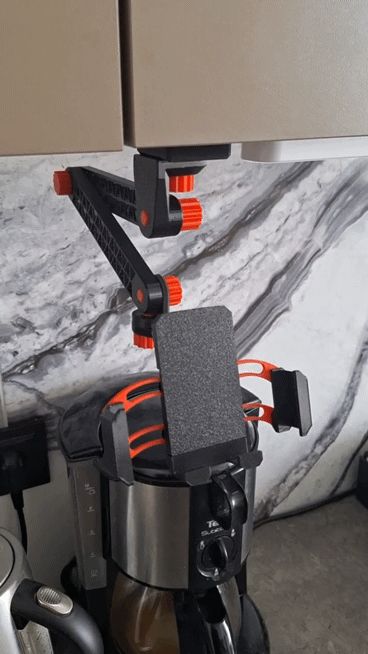
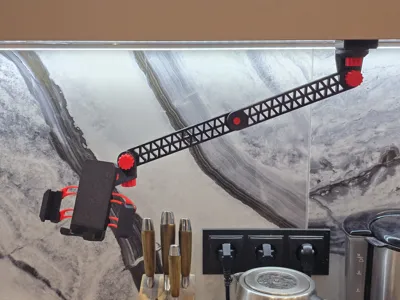
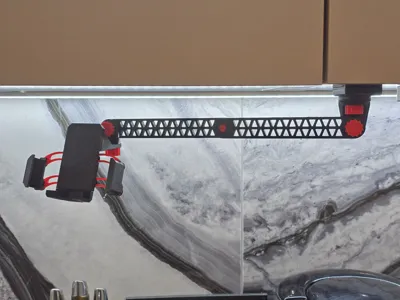
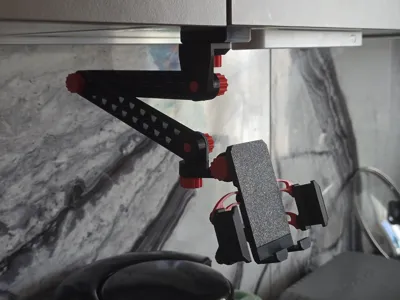
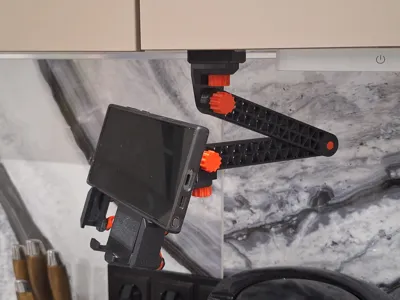
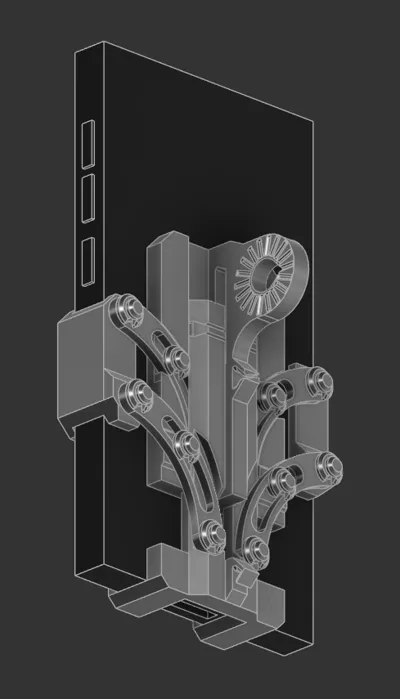
Tired of flimsy phone mounts that sag, wobble, or require metal hardware? Meet the ultimate heavy-duty, 100% 3D-printable modular arm station. Combining a premium smart gravity-locking holder, an engineering-truss articulated arm, and a rock-solid reinforced C-clamp, this professional-grade system is built to secure heavy flagship smartphones (like Ultra and Pro Max series) with absolute stability.
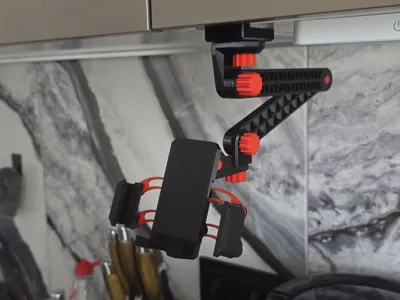
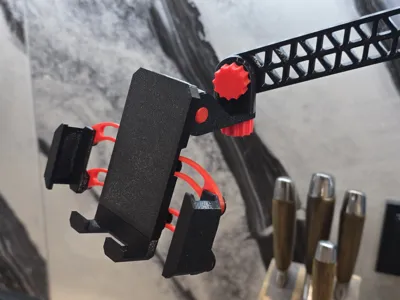
🛡️ Smart Gravity Locking Upper Unit
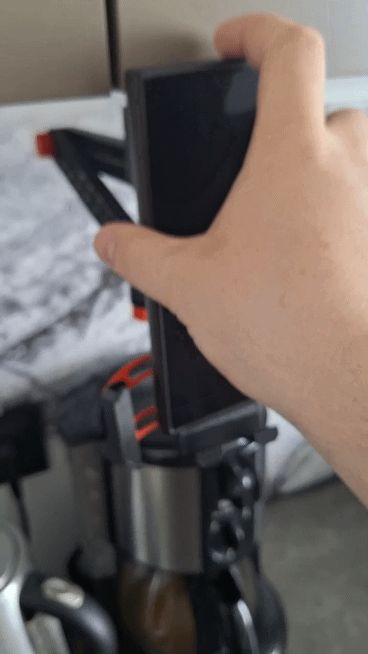
- Automatic Drop-and-Lock: Simply place your phone on the cradle. The phone's weight triggers the side clamps instantly via a synchronized 4-bar linkage system.
- Zero Tilt, Parallel Precision: Dual arc links on each side ensure the jaws stay perfectly vertical, eliminating any unwanted tilting or misalignment.
- Elastic Band Return: Uses a simple rubber band on the back to automatically snap open the clamps the moment you lift your device.
- Drop Safety Catch: An integrated vertical limit pin ensures the slider mechanism never over-extends or slips out under extreme movement.
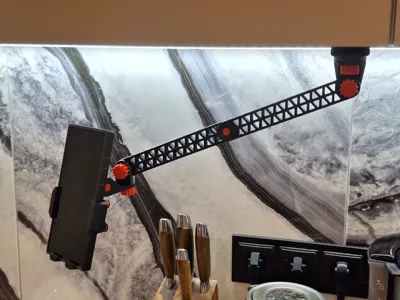
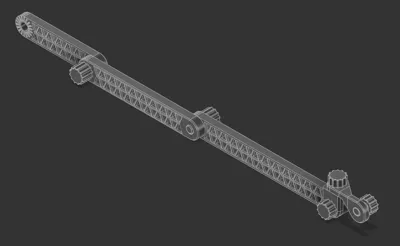
🧩 Truss-Core Modular Articulated Arm
- High-Rigidity Truss Profile: Designed using structural engineering principles with integrated triangular cutouts. This maximizes bending and torsional resistance while keeping the weight minimal.
- Dead-Lock Hirth Joints: Connections feature an 18-tooth radial gear mesh with a 20° adjustment index and 0.5 mm tooth height. Once tightened with the heavy-duty M10 knobs, it guarantees zero-slip mechanical locking under heavy load.
- L-Pivot Horizon Compensation: The specialized L-shaped head isolates the tilt and rotation axes, allowing you to perfectly level your camera horizon or position the mount upside-down without dead zones.
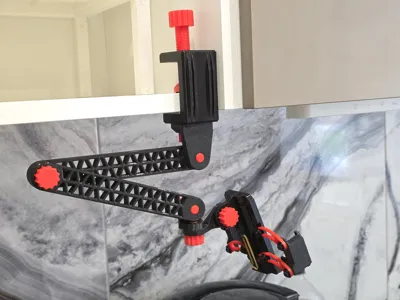
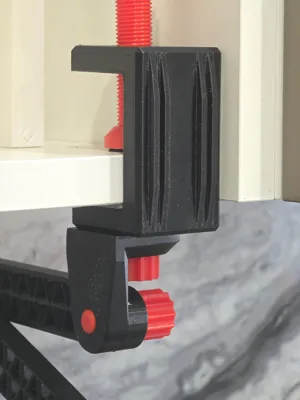
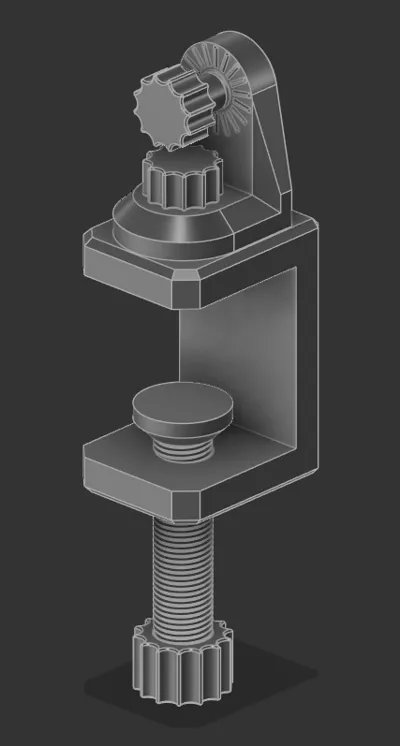
💪 Power-Grip Stiffened C-Clamp Base
- Reinforced Structural Frame: The heavy С-shaped clamp features 4 external stiffening ribs to completely prevent plastic flexing under high static tension at maximum arm extension.
- 15mm Power Screw & Swivel Pad: Features a massive 15 mm primary screw with an ergonomic hand-turn knob and a rotating flat pressure foot that maximizes surface grip while protecting your desk from scratches.
- 360° Free Pan & Multi-Screw Versatility: The L-Base connector allows smooth 360° free horizontal rotation (yaw) without loosening, while the package includes three separate bolt lengths (20, 40, 60 mm) to perfectly fit any desk thickness.
📐 Technical Specifications
| Parameter | Value / Metric | Mechanical Advantage |
|---|---|---|
| Clamping Range | 70 mm – 118 mm | Fits 99% of modern smartphones with thick cases |
| Max Device Thickness | 13 mm | Fully compatible with heavy armor/rugged cases |
| Modular Arm Lengths | 100 mm / 150 mm / 200 mm | Mix and match lengths to customize your total reach |
| Arm Joint Indexing | 18 teeth (20° steps) | Mathematical precision for predictable angle settings |
| Max Desk Thickness | Up to 40 mm | Fits securely on thin glass shelves or thick workbenches |
| Hardware Standard | Custom M10 & M15 Threads | Heavy-duty printed threads optimized for tool-less hand tightening |
How to assemble the holder with arms
Phone Holder:
- Print List: 1 HolderBase, 1 HolderBottom, 1 HolderBottomStopper, 1 HolderSideLeft, 1 HolderSideRight, 2 HolderArcLeft, 2 HolderArcRight, and 10 HolderShims.
- You can use the provided .3mf file, where all of these objects are already arranged on the build plates.
- Tip: Try printing HolderArcLeft, HolderArcRight, and HolderShim on a smooth, non-textured plate. This will help the holder slide more smoothly.
- Take the HolderBase and place one HolderArcLeft and one HolderArcRight onto the middle pins, ensuring the arrows on the arcs are pointing inward.
- Tip: For better sliding and a cleaner look, it is best to place the arcs with the build-plate side facing away from the base.
- Secure the arcs using two HolderShim clips. Try to slide, it should be easy.
- Slide the installed arcs inward, then position the HolderBottom part so that the middle pins fit into the holes on the arcs.
- Place the HolderBottomStopper into the cutout on the HolderBottom part and into the hole in the HolderBase.
- Place the second HolderArcLeft and HolderArcRight onto the bottom pins of the HolderBase and the outer pins of the HolderBottomStopper, ensuring the arrows point inward.
- Lock the arcs in place with four more HolderShim clips.
- Tip: Test the slider. It should move easily; if it is too stiff, check the pins for any remaining support material or try reducing the height of the clips.
- Insert the HolderSideLeft part into the left side of the arcs so the pins fit into the holes, then secure it with two HolderShim clips.
- Repeat this process for the HolderSideRight part on the right side.
- Choose an elastic band size that allows the holder to compress the bottom part snugly, but without pushing the phone out of the mount when it was installed.

Holder Arm:
- Print List: 2 ArmBig (either 2 ArmMiddle or 2 ArmSmall if you want another size), 1 ArmHingeFirstPart, 1 ArmHingeSecondPart, 1 ArmBoltBig (20 mm with big cap), 1 ArmBoltMiddleHinge (16 mm with small cap) and 2 ArmBoltSmallHingeConnect (12 mm with small cap).
- You can use the provided .3mf file, where all of these objects are already arranged on the build plates.
- Connect the two ArmBig parts together using an ArmBoltBig.
- Align the side of the first arm (which features the thread and small pins) with the side of the second arm (which features the unthreaded hole and small alignment holes).
- Connect the larger side of the ArmHingeFirstPart to the threaded hole of the ArmBig using the ArmBoltMiddleHinge.
- Rotate the ArmHingeFirstPart 90 degrees, so that its shorter side is parallel with the arm.
- A bolt with a low-profile cap is needed here to allow the ArmHingeSecondPart to rotate freely.
- Connect the smaller side of the ArmHingeSecondPart to the smaller side of ArmHingeFirstPart using the ArmBoltSmallHingeConnect.
- Align the small pins on the ArmHingeSecondPart with the small holes in the ArmHingeFirstPart.
- You should now have an exposed, threaded side on the ArmHingeSecondPart, complete with alignment pins.
- Connect the holder (assembled in the Phone Holder section) to the open hole using the final ArmBoltSmallHingeConnect.

Holder Clamp:
- Print List: 1 ClampBase, 1 ClampTopPart, 1 ClampBigBolt60 (either 1 ClampBigBolt40 or 1 ClampBigBolt20 depends on the table or shelf size), 1 ClampBigBoltCoverNut and 2 ClampBolt.
- You can use the provided .3mf file, where all of these objects are already arranged on the build plates.
- Screw the ClampBigBolt60 (or an alternative size) into the large threaded hole of the ClampBase from the outside.
- Thread the ClampBigBoltCoverNut onto the ClampBigBolt60 from the inside of the ClampBase until it is secure.
- Connect the unthreaded side of the ClampTopPart to the small threaded hole on the ClampBase from the outside using the ClampBolt.
- You should now have an exposed, threaded side on the ClampTopPart, complete with alignment pins.
- Connect the unthreaded hole of the arm assembly (built in the Holder Arm section) to the open hole of the ClampTopPart using the final ClampBolt.

🖨️ Pro 3D Printing & Assembly Tips
- Material Recommendations: Use PETG, ABS, or ASA for maximum mechanical durability and long-term tension hold. High-quality PLA is excellent for standard desk setups.
- Print Orientation for Strength: Print all joint pins, arms, and structural bolts horizontally to ensure the layer lines run along the length of the parts, maximizing load-bearing capacity.
- No Metal Screws: The upper unit assembles using modular cylindrical pins and quick snap-fit C-clips. No glue or metal hardware needed!
💡 Troubleshooting:
For smoother articulation, avoid printing the C-clips on a textured build plate. Alternatively, adjust the C-clip scale in your slicer (Z-height to 95–98%, diameter to 103–105%) to reduce mechanical friction.
❤️ Enjoyed this print?
All my models here are completely free for personal use. If you like my design and want to show your appreciation — or help me buy more filament for testing new projects — you can support my work by purchasing this model on Cults3D: https://cults3d.com/:4450669
Looking for the desktop stand version? You can find the original Gravity Desk Station here:
https://makerworld.com/uk/models/2736212-gravity-adjustable-heavy-duty-phone-desk-stand#profileId-3033465
License
You shall not share, sub-license, sell, rent, host, transfer, or distribute in any way the digital or 3D printed versions of this object, nor any other derivative work of this object in its digital or physical format (including - but not limited to - remixes of this object, and hosting on other digital platforms). The objects may not be used without permission in any way whatsoever in which you charge money, or collect fees.
Comment & Rating (4)