Pig Nose Fidget Presser · Double Stress Relief


Print Profile(2)


Description


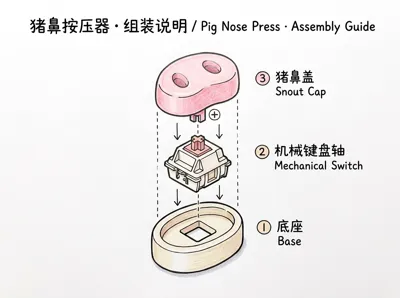
Pig Nose Fidget Presser · Assembly Instructions
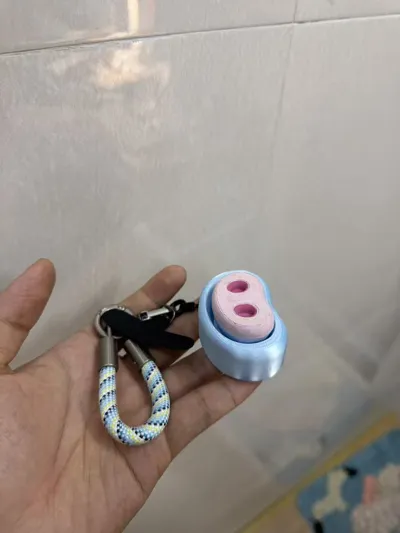
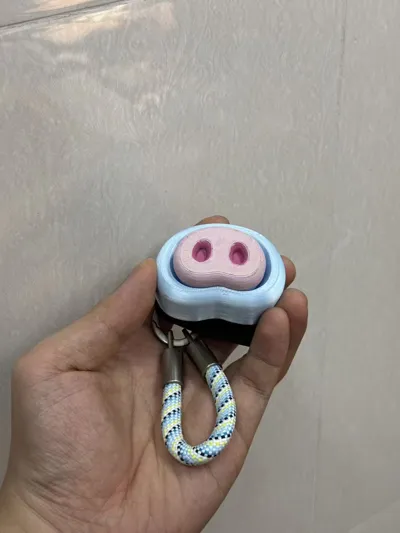
A "clicky" pig nose fidget toy that can also be hung on your person 🐽🔑
📦 Parts List
| No. | Name | Description |
|---|---|---|
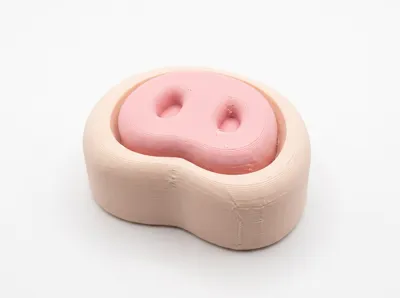
| ① | Base (3D Printed) | Beige oval-ring shell, with a square mounting hole in the middle and a lanyard hole on the side |
| ② | Mechanical keyboard switch | Cherry MX style switch, provides tactile feel and sound |
| ③ | Pig Nose Cap (3D Printed) | Pink dual-nostril cap with a cross (+) slot at the bottom |
| ④ | Lanyard | Passes through the side hole of the base, can be tied for fixation |
| ⑤ | Keychain (Lobster Clasp) | Spring lobster clasp, opens with a press, for quick attachment |
Also prepare: No tools needed, can be assembled by hand.
🔧 Assembly Steps
Step 1 — Install the Switch
Align the ② mechanical keyboard switch with the square hole in the middle of the ① base, with the switch pins facing downwards, and press vertically until the buckle "clicks" into place.
✅ Check: The switch should not wobble, and the four corner buckles should be in place.
Step 2 — Attach the Pig Nose Cap
Align the cross slot (+) at the bottom of the ③ Pig Nose Cap with the cross stem (+) at the top of the switch, and press gently downwards until it reaches the bottom.
✅ Check: The cap is pressed all the way down, rebounds smoothly, and has a crisp feel when pressed.
Step 3 — Thread the Lanyard
Thread the ④ lanyard through one of the side lanyard holes of the base, pull it out through the other hole, then align the two ends and tie a knot to secure it, forming a loop.
✅ Check: The knot is secure, the loop size is appropriate, and it's not easy to loosen.
Step 4 — Attach the Keychain
Open the spring clasp of the ⑤ lobster clasp, clip it into the lanyard loop, and release to lock it. Then you can attach it to keys, backpacks, belts, or zipper pulls.
✅ Check: The lobster clasp spring opens and closes smoothly, and it doesn't detach after being clipped.
Step 5 — Finish
Press the pig's nose and enjoy a moment of portable stress relief! 🐷✨
💡 Tips
- Want a different feel? Simply pull off the pig nose cap and replace it with a different switch: Red switch = smooth and quiet, Brown switch = slight tactile bump, Blue switch = crisp and loud click.
- Quick attachment: The lobster clasp opens with a press, no need to re-tie knots, making it convenient to switch between different items.
- Disassembly: Hold the base and pull the pig nose cap vertically upwards. Be careful not to twist or pry it left and right to avoid damaging the cross stem.
- Cleaning: Wipe with a slightly damp soft cloth. Avoid prolonged alcohol immersion for PLA printed parts.
⚠️ Precautions
- Contains small parts (switch, lobster clasp, etc.). Do not allow children under 3 years old to play with it to avoid accidental ingestion.
- The lanyard and lobster clasp are only for attachment. Do not pull forcefully or hang heavy objects.
- FDM/PLA printed parts should avoid high temperatures and direct sunlight (recommended <50°C) to prevent deformation.
License
You shall not share, sub-license, sell, rent, host, transfer, or distribute in any way the digital or 3D printed versions of this object, nor any other derivative work of this object in its digital or physical format (including - but not limited to - remixes of this object, and hosting on other digital platforms). The objects may not be used without permission in any way whatsoever in which you charge money, or collect fees.
Comment & Rating (0)