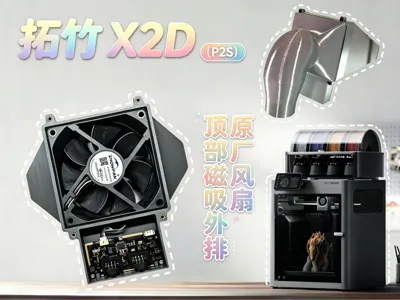
Bambu Lab X2D(P2S) Official External Exhaust Fan | Top-Mounted Magnetic Enhanced Ultimate Cooling Solution


Print Profile(1)

Description
Bambu Lab X2D / P2S Top Magnetic Original Fan External Exhaust Mod Solution
I. Product Introduction
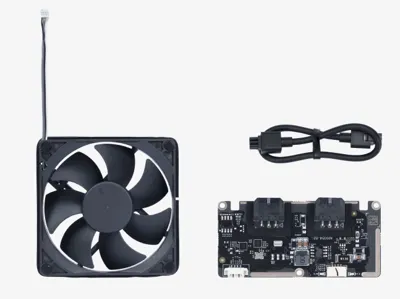
This project is an original top magnetic external exhaust mod kit specifically for Bambu Lab X2D and P2S, offering an advanced cooling upgrade solution that is non-destructive to the original machine. The entire solution fully reuses the printer's original external exhaust fan and motherboard, requiring no replacement of third-party hardware, no firmware modifications, and no circuit changes. It simply reconstructs the machine's airflow through 3D printed structures, upgrading the original rear exhaust to a top-mounted, targeted exhaust that conforms to the physical principles of thermal convection.
The kit supports two casing versions: direct exhaust / external ducted directional exhaust, which can be installed as needed to effectively expel high-temperature hot air, odors, and fine dust from printing, significantly improving printing stability for high-temperature filaments.
Core adaptation prerequisite (essential):
For boxed high-speed printers like Bambu Lab X2D and P2S, installing a top riser has become a mainstream modification for users, offering two irreplaceable core values: first, it effectively raises the machine body, thoroughly solving the common problem of PTFE tubes rubbing against the top cover and wearing out, significantly extending the lifespan of filament tubes; second, it can be paired with a magnetic window opening structure to enable chamber convection in high-temperature summer printing scenarios, quickly releasing accumulated heat from the machine body and avoiding print speed drops and defects due to high temperatures.
This set of top magnetic external exhaust module is precisely based on the dedicated development of mature riser cooling and targeted iterative upgrades. It requires an exclusive magnetic cooling riser and its dedicated backplate to be installed.
(For details, see link: https://makerworld.com.cn/zh/models/2651677-tuo-zhu-x-pxi-lie-ding-bu-dai-deng-ke-yao-kong-san#profileId-3063887)
P2S does not require an additional backplate! Combined with the exclusively modified all-in-one multifunctional riser with drawers (see link for details:), these three components work together to form a complete top ecosystem that integrates pipeline protection, official external exhaust kit, magnetic convection cooling, directed exhaust gas removal, item storage, and exhaust duct bearing capacity.
The entire structure offers precise alignment, closed-loop airflow, and maximum stability, making it the optimal multi-functional combination solution for Bambu Lab X2D/P2S models, balancing daily cooling with exhaust gas extraction needs. This module cannot be adapted to a bare original machine alone; it requires pairing with a magnetic riser base and does not support independent use with a bare machine. The magnetic cooling riser provides huge benefits for Bambu Lab X/P series printers and is almost a must-have accessory. When combined with the exclusively modified all-in-one multifunctional riser with drawers, it can fully leverage the machine's top advantages. Experienced users have tested and found it effective (X2D original external exhaust was replaced with this solution). For specific advantages, please refer to the link above.


II. Original Rear Exhaust Structure Defects & Advantages of This Solution
Core Problems with the Original Rear Exhaust Structure:
The original fan is mounted at the rear-center, which has two major drawbacks during long-term use:
① Trapped heat at the top cannot be dissipated: Hot air naturally rises, and all printing heat sources accumulate at the top of the chamber. However, the original low-level exhaust cannot remove the high temperatures trapped at the top, easily leading to heat buildup in the chamber, extruder clogs, unstable printing, and persistent odors inside the enclosure.
② Leadscrews easily accumulate dust and grease: The rear airflow path directly passes through the leadscrew transmission area. Printing dust and debris are continuously blown by the airflow onto the leadscrew lubricant surface, accumulating over time to form a greasy sludge, increasing operating resistance and accelerating wear. This requires frequent disassembly for maintenance and cleaning, leading to high equipment upkeep costs.
③ High modification cost for P2S models: Most traditional rear modifications require replacing the entire machine backplate, resulting in high modification costs, poor versatility, and insufficient lightweighting.
Key Improvements of This Top External Exhaust Solution:
① Fully rationalized airflow path: The fan is moved to the very top of the machine body, directly drawing air from the accumulated heat zone. Hot air, exhaust gas, and dust are extracted as soon as they rise, leading to faster chamber cooling and more thorough exhaust.
② Full protection of leadscrew transmission structure: The airflow path no longer passes through the leadscrew area, fundamentally preventing dust and oil accumulation, greatly extending the leadscrew maintenance cycle, and maintaining transmission accuracy and smoothness.
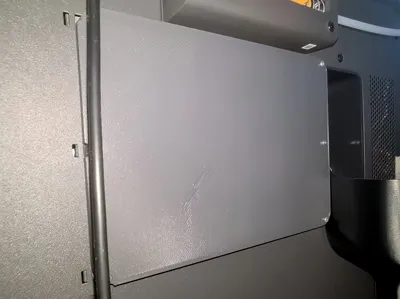
③ No need to replace the machine backplate: Comes with a dedicated original rear-opening sealing printed part, which directly closes off the machine's bottom and rear native turbulent exhaust channels, concentrating air pressure for upward exhaust, ensuring no damage to the machine and zero hardware replacement.
④ Magnetic, non-destructive, and free disassembly: Multi-point strong magnets on the back ensure precise alignment and a tight fit with the dedicated riser surface. Printing is free from vibration, abnormal noise, or detachment. It can be quickly disassembled and restored by hand, making maintenance extremely convenient.
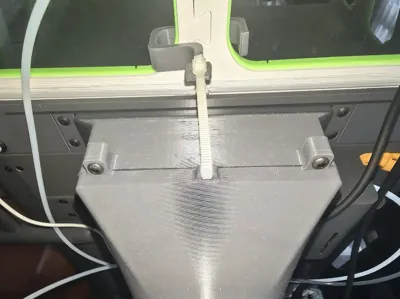
⑤ Adaptable to thickened ducting for external exhaust: Can be paired with the exclusive all-in-one multifunctional riser with drawers, which has its own external mounting points. In addition to accommodating aluminum foil exhaust ducts, it can stably mount thickened fabric-based flexible exhaust ducts, solving issues of heavy ducts sagging and pulling on the casing, making it suitable for long-term printing in sealed rooms for odor removal and heat dissipation.


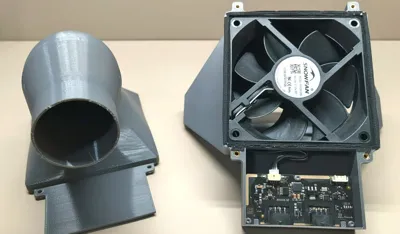
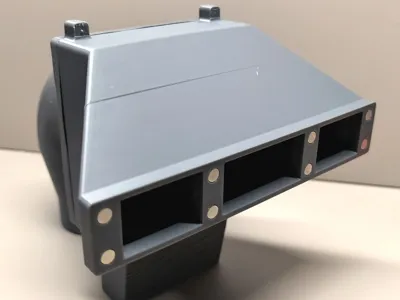
III. Overall Structure and Function Description
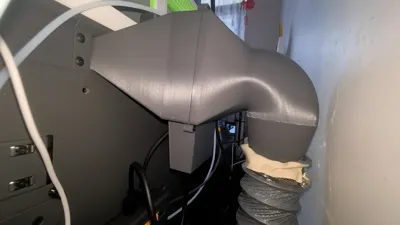
Dual-mode top cover compatibility: Provides two top covers, direct exhaust and ducted external exhaust. The direct exhaust mode offers faster cooling in well-ventilated environments; for sealed home environments, an exhaust duct can be connected to direct waste gas and odors outside.
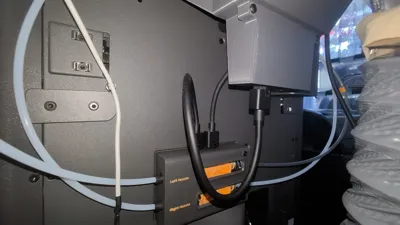
Full reuse of original circuit: Uses the original fan motherboard, with vertical and neat wiring, directly connecting to the machine's buffer interface. No winding, no gantry interference, stable operation.
Closed-loop airflow throughout the machine: Riser lifts the machine body + sealed bottom and back + side window convection pressure relief + targeted top exhaust, resulting in cooling efficiency far exceeding the original structure.


IV. Installation Guide!!
The entire process is non-destructive to the machine, requires no machine modification, and can be completed with just printed parts + simple component assembly.
Printing Notes:
Installation can begin after printing the required parts. The base distinguishes between dedicated X2D and P2S bottom casings, which are not interchangeable (the X2D bottom casing has a clearance for the remote extruder). Print the corresponding bottom casing for your model;
The top cover is universal for both models, divided into direct exhaust and ducted external exhaust versions. The external exhaust version is further subdivided into hookless and with-hook versions. It is highly recommended to print the top cover with hooks and use the matching hooks;
If you have already printed the riser version compatible with this cooling module, there is no need to print the rear exhaust port baffle;
If the original backplate retains cooling holes, then you must print the closed airflow baffle;
For the X2D dual-head model, the configuration file includes three sets of PETG main material + PLA support dual-material print files (interchangeable). Supports are easy to remove. If dual-material printing is not required, the complete single-material version can be selected. All printing parameters are pre-set. Simply import into BambuStudio and verify the filament configuration to use.
1. Pre-embed heat-set inserts (critical preliminary step)
All fan and casing fixing points require pre-embedded heat-set inserts to prevent stripped threads or loose locking during long-term disassembly and reassembly:
Fan bottom fixing holes: Use M3×3×4.2 heat-set inserts [red arrow]
Top casing fixing holes: Use M3×3×4.2 / M3×5×4.2 (M3*5 is more secure) [blue arrow]


The casing is universally secured using M3×5/M3×8 screws (M3*5 recommended)
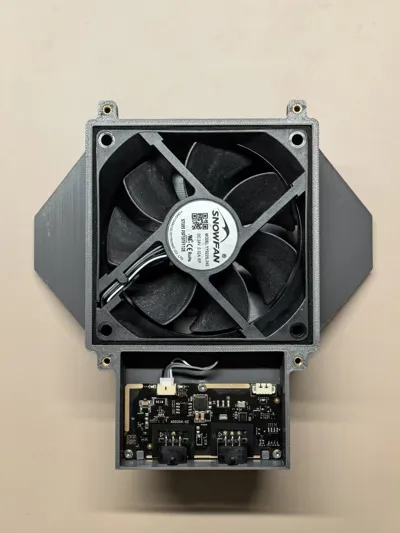
2. Circuit Board Fixing
Use the original screws included with the kit's parts package. Align and snap the external exhaust control board into its dedicated slot in the printed casing, then tighten it securely without any suspension or wobbling. No heat-set inserts needed!

3. Original Fan Installation
The fan with the LOGO faces outwards, and the side without the frame faces the printer. Do not install it in reverse;
Remove the foam from the screw holes at the bottom of the fan, and pre-insert 4 M3×8 / M3×10 screws into the lower screw holes of the fan (red marked holes)
Route the fan cable neatly from the bottom retaining clip and plug it into the corresponding interface on the circuit board;
Press down from top to bottom to snap it into the casing, keeping the circle of sealing foam at the top;
Use a card to press and secure the side sealing foam, ensuring overall airtightness;
Insert the hex wrench from the original parts box into the reserved access hole from the top, and tighten the four bottom fan screws. (Insert through the green marked holes)


4. Rear Magnetic Pillar Installation
For the magnetic holes on the back of the casing, you can choose to install Φ6×6mm magnetic pillars or stack two Φ6×3mm magnetic pillars;
Apply a small amount of 502-type liquid super glue to the bottom of the holes, then press the magnetic pillars to cure, ensuring they do not detach due to long-term vibration.

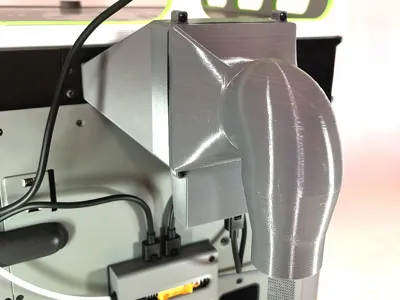
5. Top Cover and Exhaust Duct Adaptation and Installation
Freely install the direct exhaust top cover or the ducted top cover as needed;
Lightweight aluminum foil duct: If lightweight, it can be directly fixed by structural alignment and magnetic adsorption, no additional accessories are needed;
Heavy fabric-based duct: It is recommended to use the top cover with hook holes, combined with dedicated printed hooks + zip ties for fixing, mounted on the multi-functional riser's external mounting points. This ensures stable load-bearing without sagging, suitable for long-term continuous printing.
Then, seal a circle of sponge weatherstrip around the screw holes to ensure the top cover is securely sealed after installation.
Align the top cover and then tighten it with M3*5 (recommended) / M3*8 screws.


6. Machine Alignment and Installation
Align and magnetically attach the assembled top external exhaust module to the dedicated riser's top surface, ensuring a tight fit without looseness. Hook the hooks behind the top riser and secure them with zip ties. Finally, directly connect the tail cable to the printer's buffer interface. The main installation is complete.


7. Original Cooling Vent Sealing Plate Installation
After printing the sealing baffle and its matching small clip parts, refer to the official P2S external exhaust installation wiki tutorial. Uniformly press the clips into the baffle body in the same direction, then use the screws provided with the kit to tighten and fix from the back, and then attach the matching sealing foam; after completion, align it with the printer's original rear fan position, press to snap it into place, and tighten to secure it. The installation logic of this baffle is essentially consistent with the existing official Wikipedia tutorial. For detailed operations, please refer to the complete illustrated guide on Wikipedia: https://wiki.bambulab.com/zh/p2s/manual/external-exhaust-fan-kit


V. Required Parts List (Essential for Assembly, Summary Only, See Installation Guide Above for Details)
Heat-set inserts: M3×3×4.2 + M3×5×4.2
Fixing screws: M3×5, M3×8, M3×10
Cylindrical magnets: Φ6×6mm or two Φ6×3mm stacked
Auxiliary consumables: Small amount of 502 super glue
Standard tools: Printer's original hex wrench
Optional accessories: Exhaust duct (50mm diameter), zip ties
VI. Ecosystem Links
【Bambu Lab X2D/P2S Dedicated Multi-functional Magnetic Riser (Essential Base)】

License
You shall not share, sub-license, sell, rent, host, transfer, or distribute in any way the digital or 3D printed versions of this object, nor any other derivative work of this object in its digital or physical format (including - but not limited to - remixes of this object, and hosting on other digital platforms). The objects may not be used without permission in any way whatsoever in which you charge money, or collect fees.
Comment & Rating (0)