A1, A2L Swiveling PTFE Tube Guide - Parametric


Print Profile(1)
Description
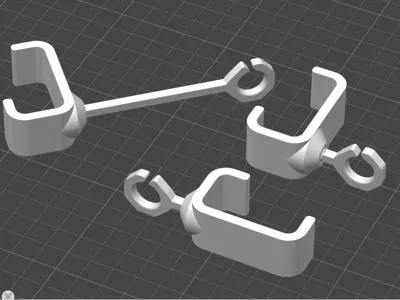
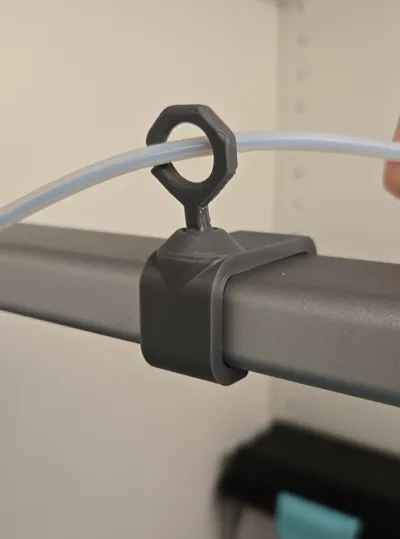
Bambu A1 and A2L Swiveling PTFE Tube Guide - Parametric, with Print-in-Place Ball Joint
If you've ever glanced over mid-print and noticed your drybox or your AMS Lite slowly sliding toward the print bed - pulled there by a taut filament tube - this one's for you.
PTFE tube management is one of those details that seems trivial until it isn't. A loose or unsecured tube puts real tension on whatever it's attached to: a desktop spool holder, an AMS Lite, or a drybox on a shelf. Some existing guides rely on a dovetail joint or a friction fit that works fine in theory - until the repeated motion of printing slowly works the joint loose, and by the time you notice something is wrong, your setup has already been dragged somewhere it shouldn't be. I learned this the hard way so I designed my own.
My design uses a fully print-in-place ball joint: it articulates freely so the tube always follows the print head without resistance, but the ball is physically captured inside the housing - there's no clip, no friction fit, nothing that can pull apart under load. The lever is printed horizontally so its strength doesn't rely on layer adhesion at all. And the C-clip uses a carefully angled opening that holds the tubes in place during normal use.
Fully Parametric
Configure four values to match your setup:
- Guide placement - top of the printer (usually for external spools) or towards the front (usually for a side-mounted AMS Lite)
- Guide diameter - size the C-clip to your tube count and diameter
- Lever length - a short lever works for most prints; increase it if you frequently print very tall models and need more slack
- Ball joint offset - position the guide towards the front, center, or back of the top bar
Pre-configured standard variants are published alongside this model, so if your setup is typical you can go straight to printing without touching a single parameter.
Printing note
After printing, gently move the lever in the joint until it becomes loose and starts swiveling.
Longer lever variants require a small horizontal bridge support under the lever. The included print profiles handle this automatically.
Happy printing !
License
You shall not share, sub-license, sell, rent, host, transfer, or distribute in any way the digital or 3D printed versions of this object, nor any other derivative work of this object in its digital or physical format (including - but not limited to - remixes of this object, and hosting on other digital platforms). The objects may not be used without permission in any way whatsoever in which you charge money, or collect fees.
Comment & Rating (0)