Tamiya C11 Rear Wing and Diffuser


Print Profile(1)

Description
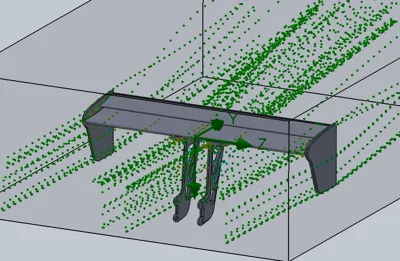
Tamiya C11 Rear Wing and Diffuser. It is modeled to be a closer representation of the real car with actual down force of 95 grams at 30mph.
The top smaller airfoil needs to printed with supports on the underside and printed slow because of vibrations on the top since it is so tall; see the picture for reference. Superglue the airfoils to one side of the end plate first and let it dry completely before bonding the other endplate. Use 2x M4x6 button head screw to attach the wing to the supports; first cut the thread into the lower air foil and then remove the screw and secure the support to lower airfoil.
The wing support will replace the stock support and reuse the stock hardware. Attach the wing first and after the diffuser. The diffuser can be secure with double side on the underside of the car/top surface and to the face of the rear bumper. The diffuser will slide on the stock circular bore on the rear bumper and between the wing supports. Align the diffuser before tapping it securely.
I printed all the items with a 0.12 layer for the best appearance. I used 6 layers on the airfoils so they are 100% filled and for smoother printing and again the top smaller airfoil printed best for me with supports. I used 3 layers and 65% infill on the supports. They can be 100% if you want to. The light is kind of tricky to print because of the small holes but eventually it will work out.
Comment & Rating (12)