
A1 mobile phone delay shooter; A1 Delay Shooting Controller (Phone Edition)


Print Profile(1)

Description
Using an Old Headphone Cable to Control Your Phone for Time-Lapse Photography, Suitable for the A1 Series
Using an old headphone cable to control the phone for time-lapse photography, suitable for the A1 series
Please ensure you read through everything before printing to ensure the success of the time-lapse photography.
Please make sure to read through everything before printing to ensure the success of the delayed shooting.
Principle Explanation and Installation: Principle explanation and installation
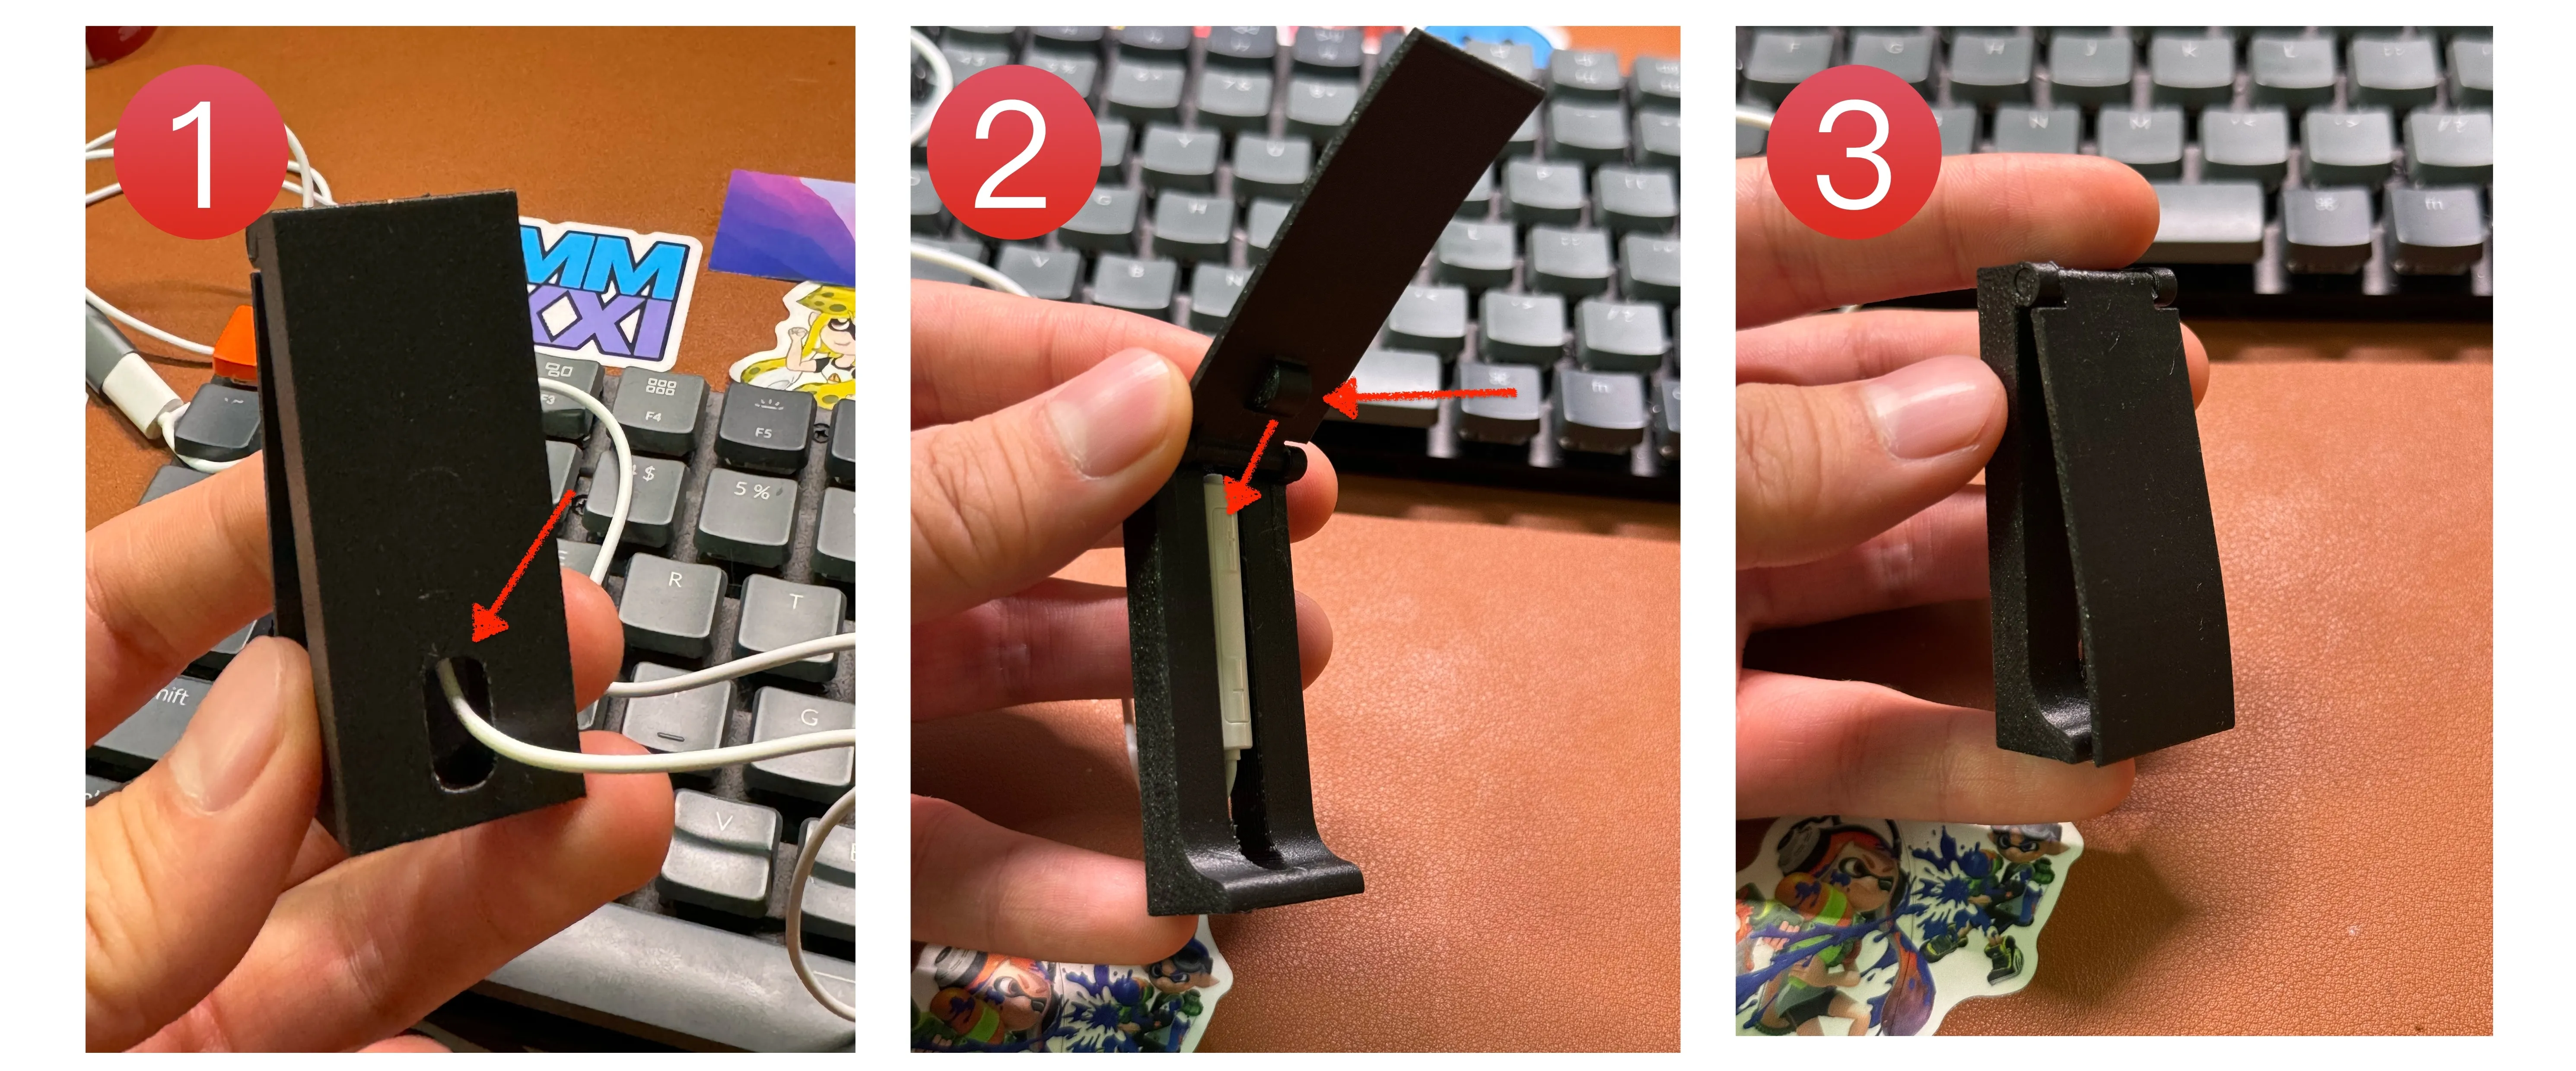
1. Appearance
Appearance
2. Utilize the raised button to press the earphone key, thereby triggering the phone camera to take a photo.
Press the raised button on the earphone to trigger the phone camera to take a photo.
3. The hole on the back is for threading the headphone wire through.
The hole on the back is for threading the headphone wire through.
It is necessary to secure the earphone wire using double-sided tape to prevent it from shaking during multiple presses, which could lead to a failed photo capture. (I recommend using 3M strong double-sided tape for this purpose. )
You need to use double-sided tape to secure the earphone wire to ensure that it does not shake during multiple presses, which could lead to a failed photo capture.(I recommend using 3M strong double-sided tape for this purpose. )
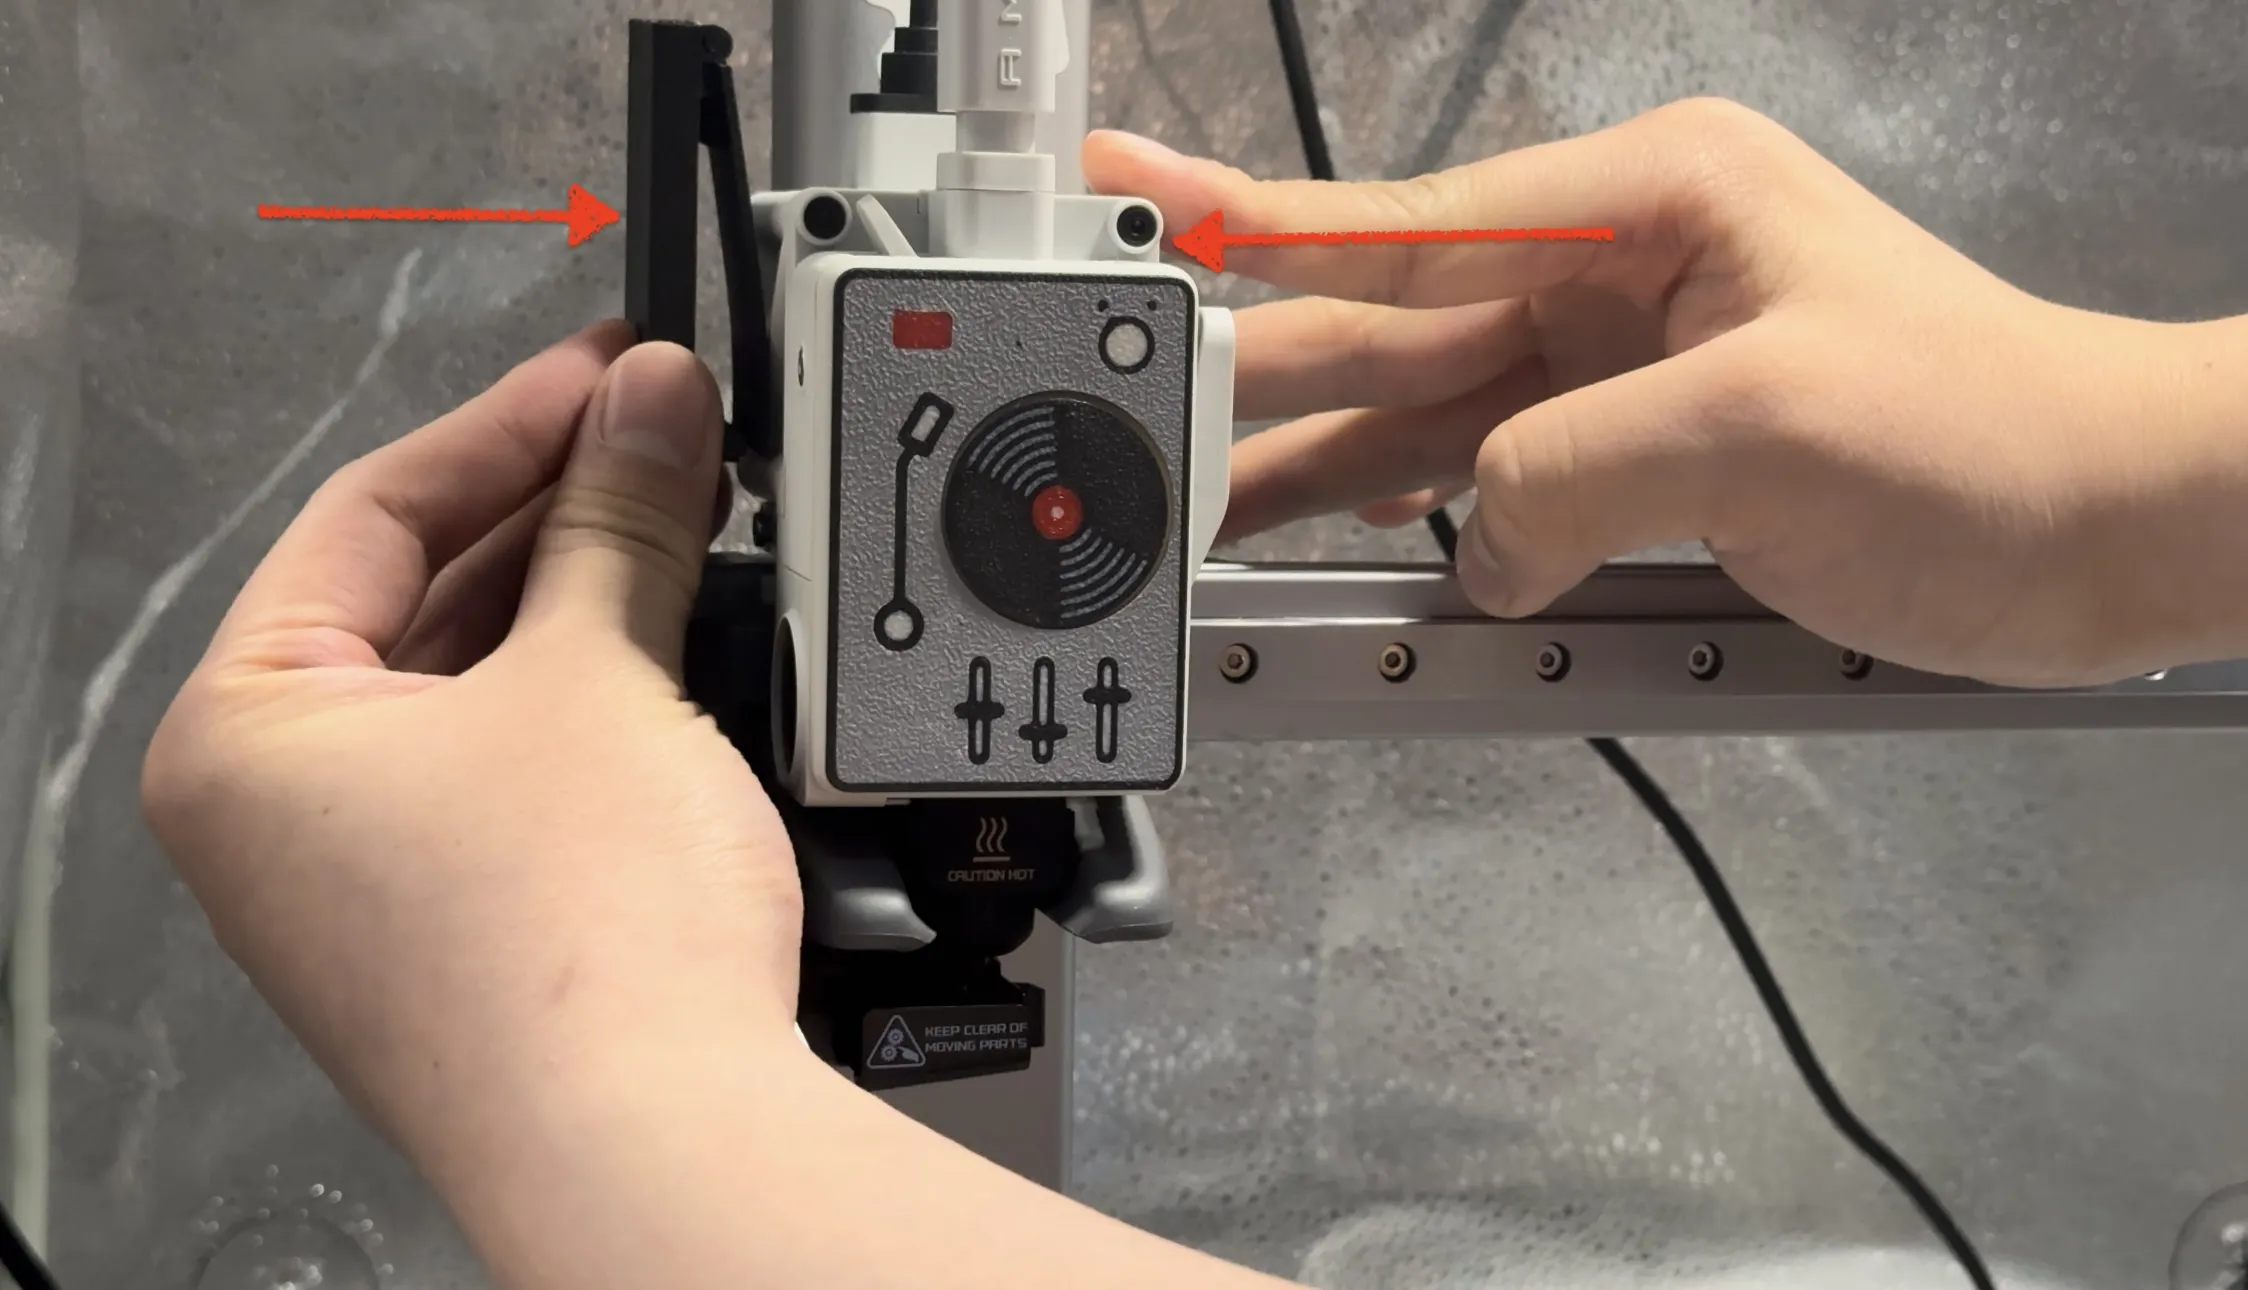
4. Move the print head to the far left and hold it there.
Move the print head to the far left and hold it there.
5. Hold down the time-lapse capture button and bring it close to the print head, then stick it to the gray area on the far left of the track.
Hold down the time-lapse capture button and bring it close to the print head, then stick it to the gray area on the far left of the track.
6. Manually move the print head left and right while connecting the headphone cable to the phone. Move the print head manually to ensure successful triggering of the photo capture.
Manually move the print head left and right while connecting the headphone cable to the phone. Move the print head manually to ensure successful triggering of the photo capture.
Slicing Settings Slice setting.
The picture shows the original Huawei earphones. If the width of your earphone controller is less than or equal to 6.8mm, you do not need to make any changes; you can directly print the standard version. If the width of your earphone controller is greater than 6.8mm, please read the following content carefully.
The picture shows the original Huawei earphones. If the width of your earphone controller is less than or equal to 6.8mm, you do not need to make any changes; you can directly print the standard version. If the width of your earphone controller is greater than 6.8mm, please read the following content carefully.
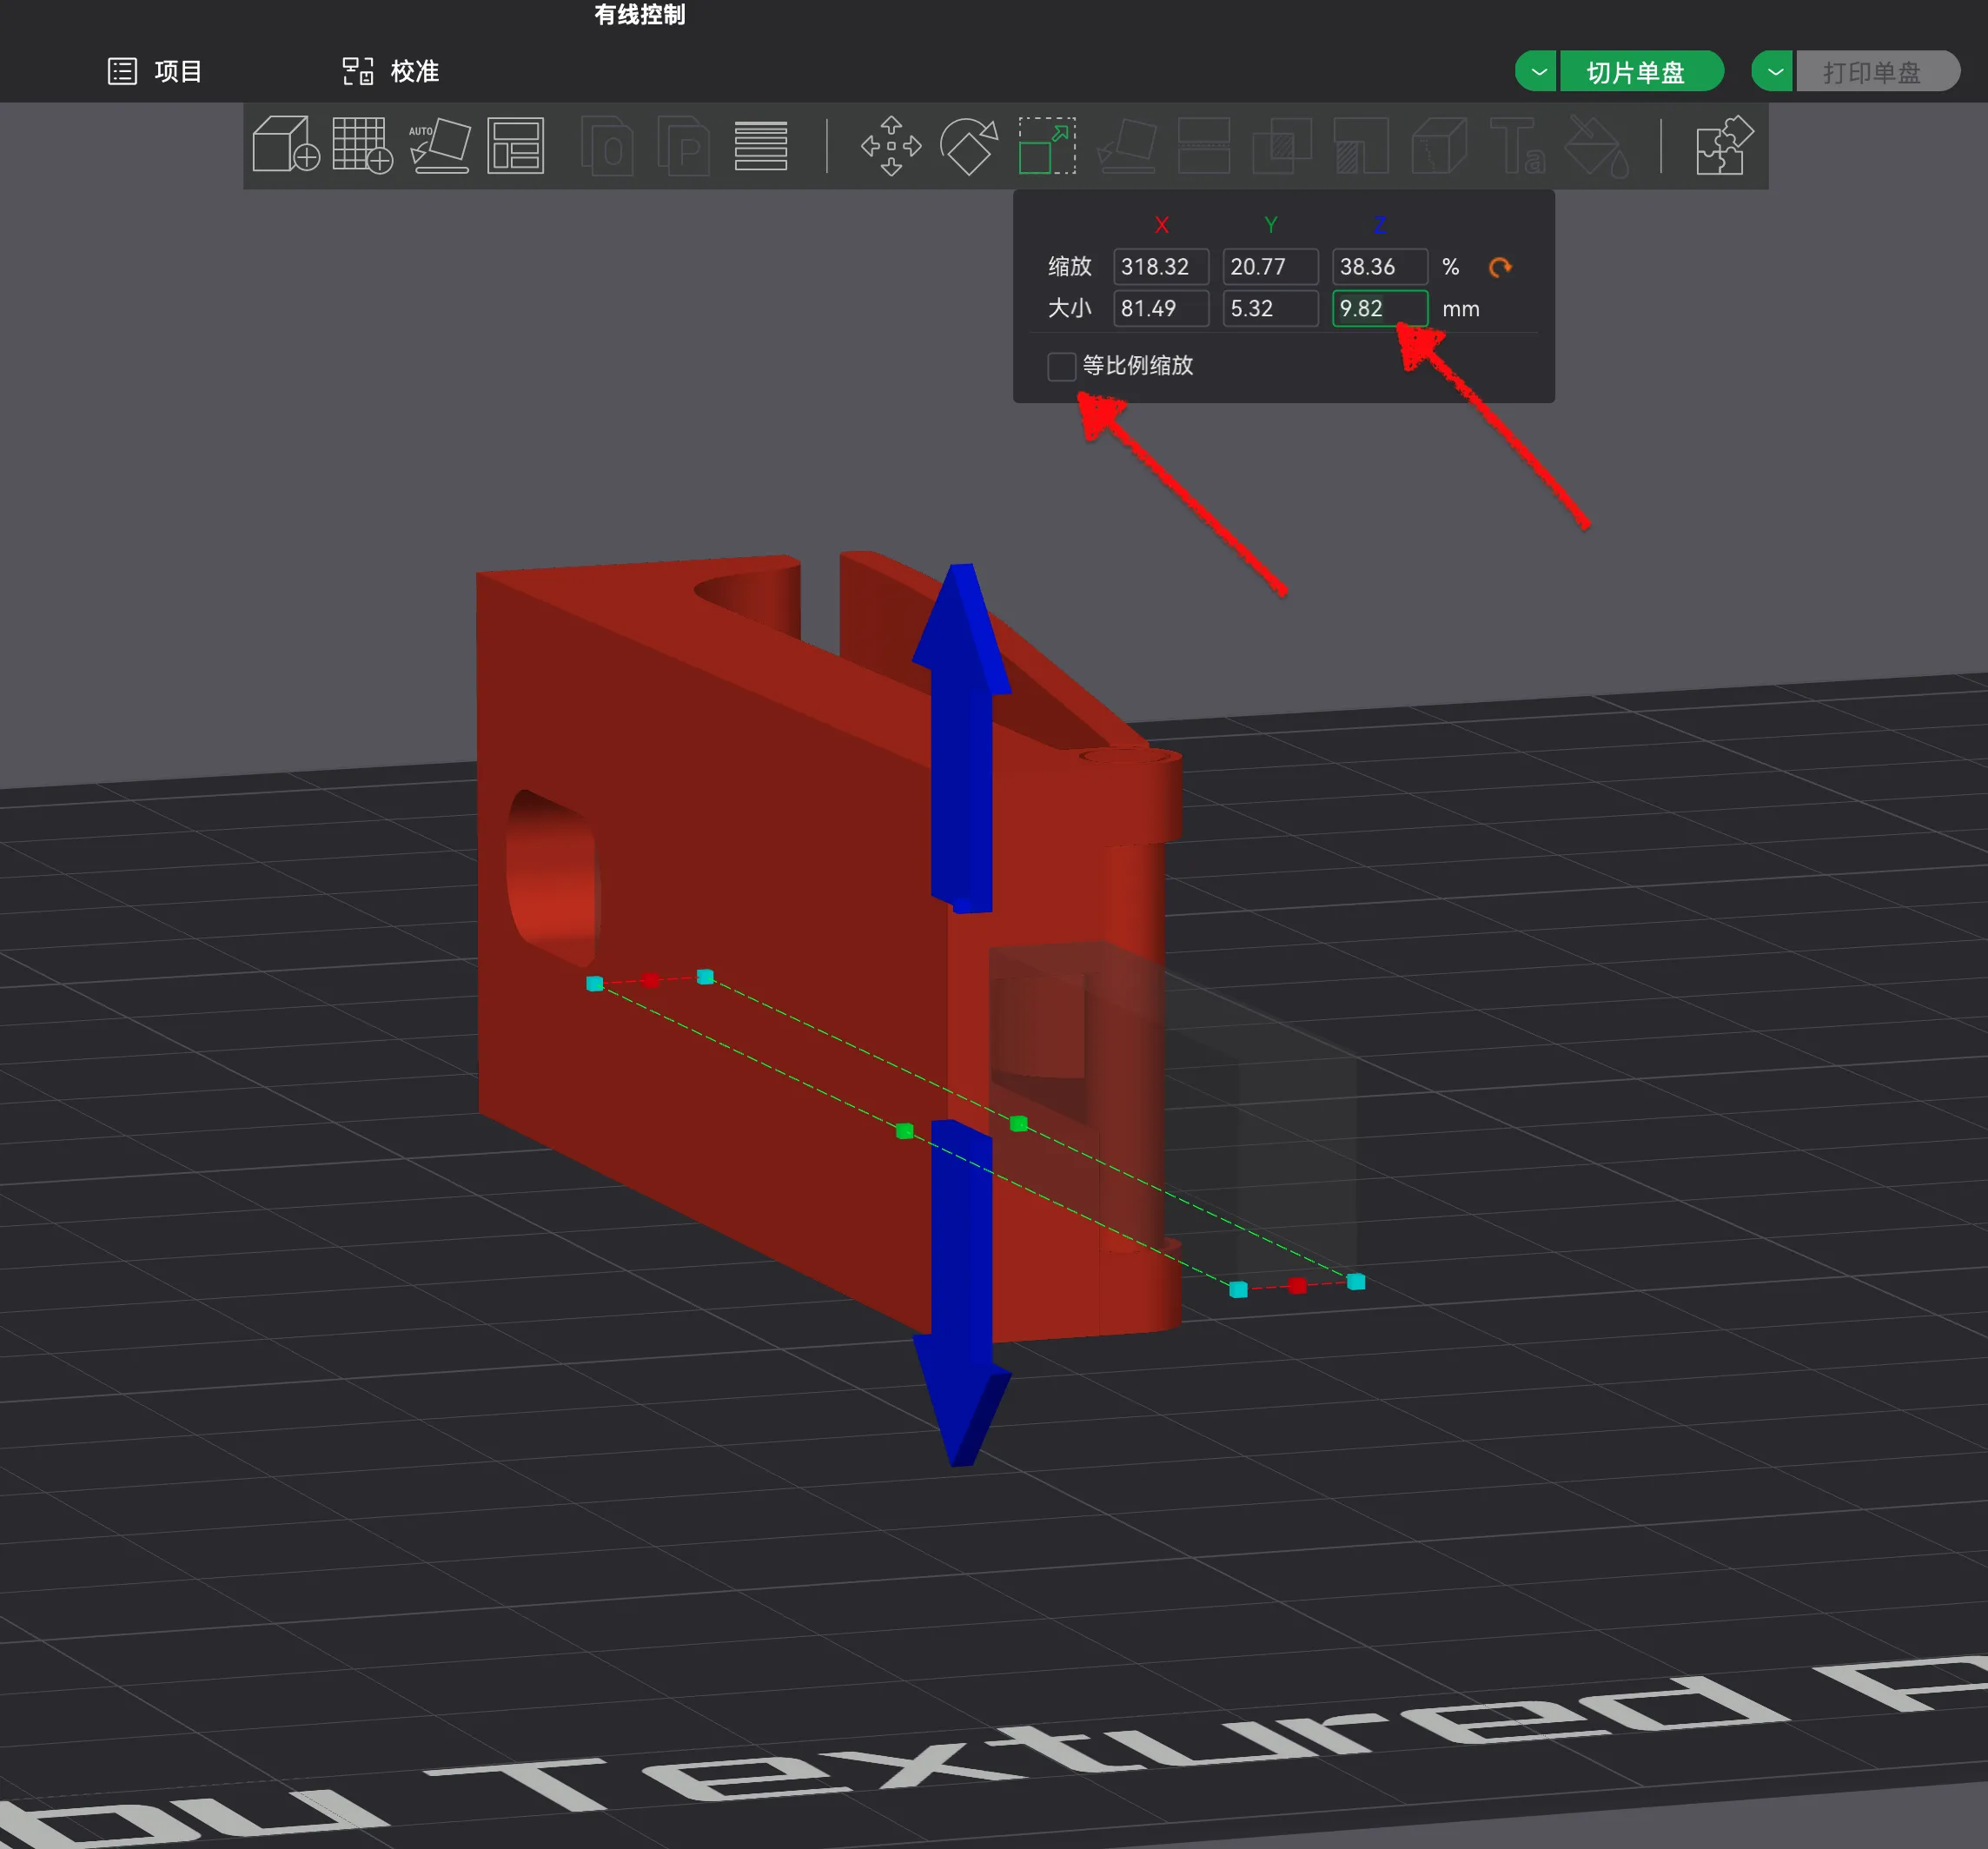
If your earphone wire controller is larger than 6.8mm, you can choose the modified version in the second slice file. Select the gray negative part, choose scaling, and uncheck uniform scaling. Enter the Z-axis scaling, measure the width of your earphone wire controller, and increase it by 1mm so that the earphone control wire can fit.
(Note: Do not modify any parameters other than the Z-axis direction, including position and other information.)
If your earphone wire controller is larger than 6.8mm, you can choose the modified version in the second slice file. Select the gray negative part, choose scaling, and uncheck uniform scaling. Enter the Z-axis scaling, measure the width of your earphone wire controller, and increase it by 1mm so that the earphone control wire can fit.
(Note: Do not modify any parameters other than the Z-axis direction, including position and other information.)
G-code Code Modification (Ensure the Stability of the Shots.) G-code modification (Ensure the stability of the shots.)
If you can capture a stable image, please do not modify the G-code arbitrarily to avoid affecting the 3D printer.
Please make sure to first enable the time-lapse photography and test if you can capture a stable image. If the captured image is blurry or if the z-axis position is unstable, this may be due to insufficient time given for the phone to capture the image before the printer starts moving. In this case, you will need to continue reading and modify the G-code code accordingly.
If you can capture a stable image, please do not modify the G-code arbitrarily to avoid affecting the 3D printer.
Please make sure to first enable the time-lapse photography and test if you can capture a stable image. If the captured image is blurry or if the z-axis position is unstable, this may be due to insufficient time given for the phone to capture the image before the printer starts moving.In this case, you will need to continue reading and modify the G-code code accordingly.
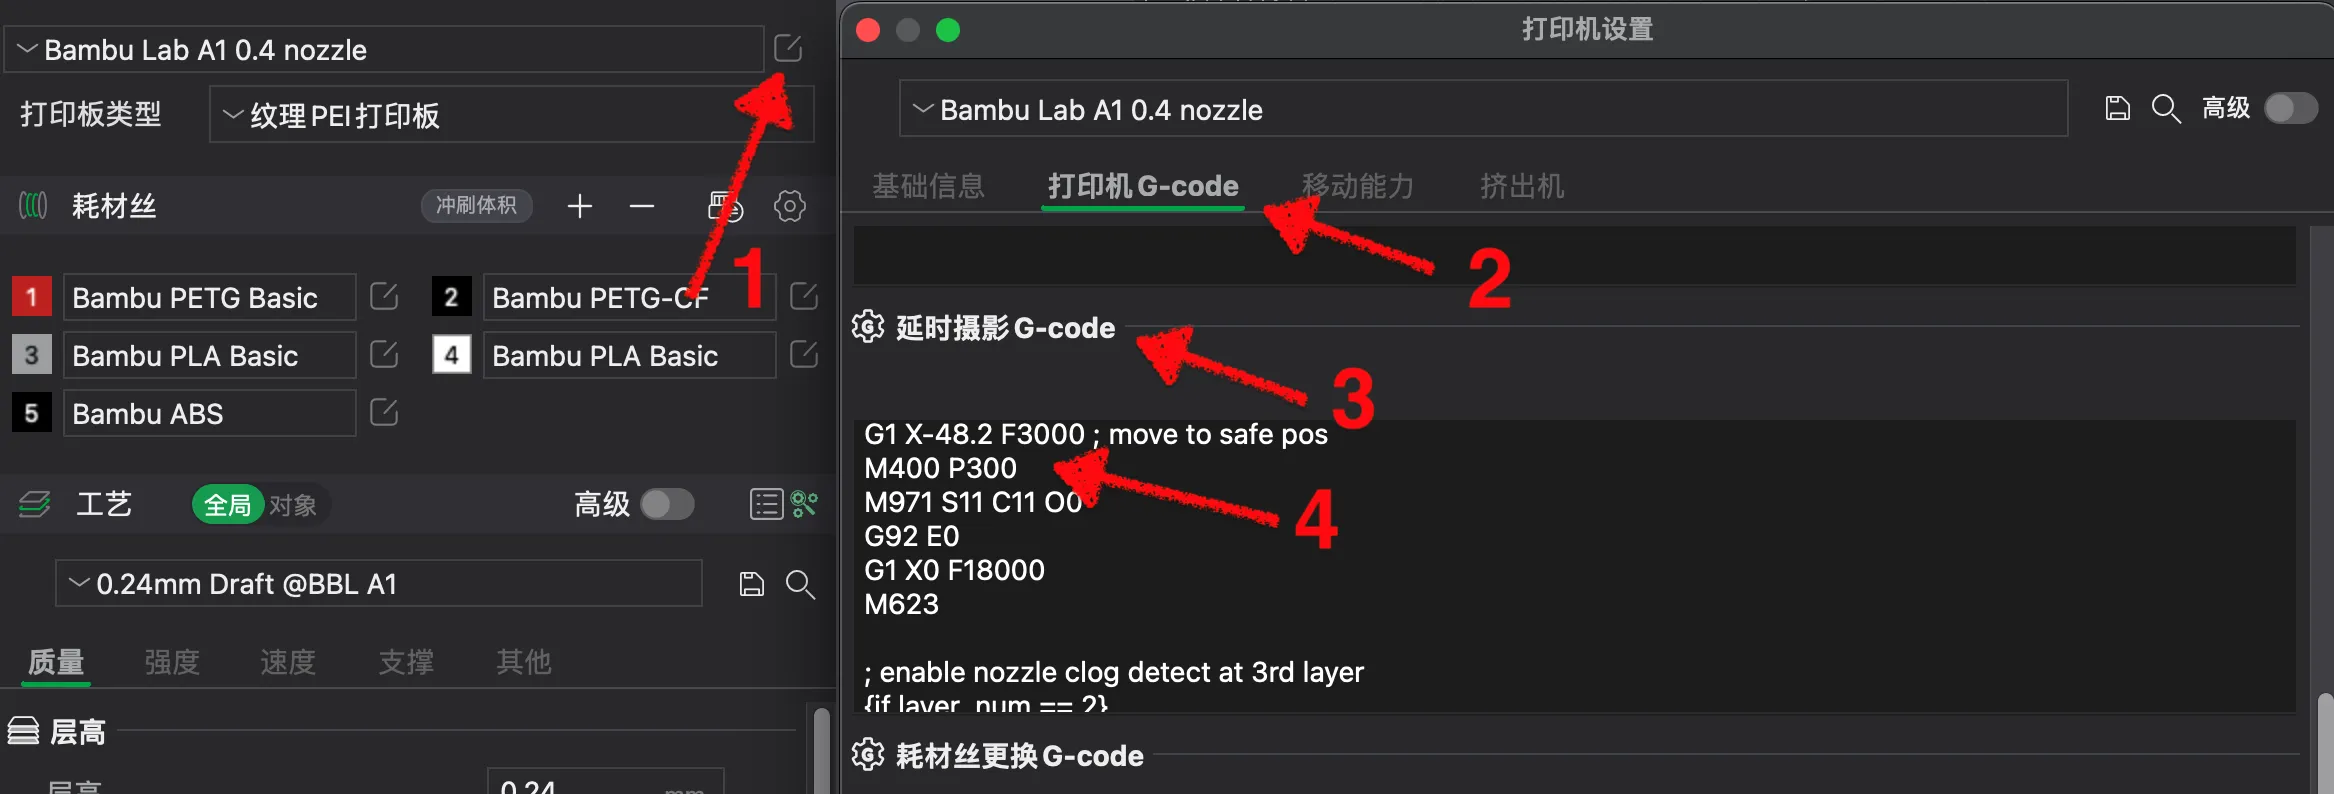
- Click the button next to the printer.
- Select G-code.
- Drag the slider on the right to choose the time-lapse photography G-code.
- Find the line of code "M400 P300".
- Replace it with the following line of code.
- Click the button next to the printer.
- Select G-code.
- Drag the slider on the right to choose the time-lapse photography G-code.
- Find the line of code "M400 P300".
- Replace it with the following line of code.
Original code:
M400 P300
M971 S11 C11 O0
G92 E0
G1 X0 F18000
M623
Replace with:
M400 P10; Stay on the far left for 10 milliseconds
G92 E0
G1 X0 F18000; Return to the origin
G4 P500; Stop for 500 milliseconds, which is 0.5 seconds.
M623
You can also choose to replace it directly with the uncommented version below:
M400 P10
G92 E0
G1 X0 F18000
G4 P500
M623
You can adjust the line of code 'G4 P500' based on the response speed captured by your phone. The 500 represents 500 milliseconds, which is 0.5 seconds. This indicates the time to wait for taking a photo. If you encounter situations where the photos are blurry or the z-axis position is uncertain while shooting, you can increase the time appropriately to ensure clear and stable shots.
You can adjust the line of code 'G4 P500' based on the response speed captured by your phone. The 500 represents 500 milliseconds, which is 0.5 seconds. This indicates the time to wait for taking a photo. If you encounter situations where the photos are blurry or the z-axis position is uncertain while shooting, you can increase the time appropriately to ensure clear and stable shots.
Due to manually increasing the waiting time, please remember to enable the smooth mode of time-lapse photography to ensure print quality.
Due to manually increasing the waiting time, please remember to enable the smooth mode of time-lapse photography to ensure print quality.
Finally, please remember to lock the exposure, shutter, white balance, and other shooting parameters on your phone to ensure consistency in each photo. I wish you success in capturing high-quality time-lapse videos with your phone. The G-code section may not be perfect, as I am learning G-code for this project. There may be errors, so I welcome any corrections from experts.
Finally, please remember to lock the exposure, shutter, white balance, and other shooting parameters on your phone to ensure consistency in each photo. I wish you success in capturing high-quality time-lapse videos with your phone. The G-code section may not be perfect, as I am learning G-code for this project. There may be errors, so I welcome any corrections from experts.
License

You shall not share, sub-license, sell, rent, host, transfer, or distribute in any way the digital or 3D printed versions of this object, nor any other derivative work of this object in its digital or physical format (including - but not limited to - remixes of this object, and hosting on other digital platforms). The objects may not be used without permission in any way whatsoever in which you charge money, or collect fees.


Comment & Rating (1)