
The Blooming Flower - Snaps together!


Print Profile(3)


Description
Real flowers don't last forever, but this blooming flower will!
This Mothers Day, give a mom a flower she can watch bloom whenever she wants
Simply turn the base of the stem to reveal the flower inside
Snaps together, no additional materials or glue needed!
Want it to reveal something else instead? Print the pedestal instead of the rose to add your own flower or surprise!
If you choose to add your own object inside, I have included large and small petals to allow for a range of sizes of objects. I have alos included large and small stems.
Printing notes:
-Make sure your filament's flow ratio is properly tuned.
-I would suggest adding some glue stick to the plate when printing the stems as the print head can apply a lot of torque to the stop of the stems causing them to detach from the plate
-Use at least 3 walls for the flower base and screw parts

Assembly instructions (see gif below for visual):
- Put the stem together (you might need to give it a good push as there is a ledge in the stem to hold on to the screw)
- Snap the petals on the base of the flower (be gentle! like a real flower, the petals are delicate. Also, make sure they SNAP!)
- Screw the stem onto the flower base
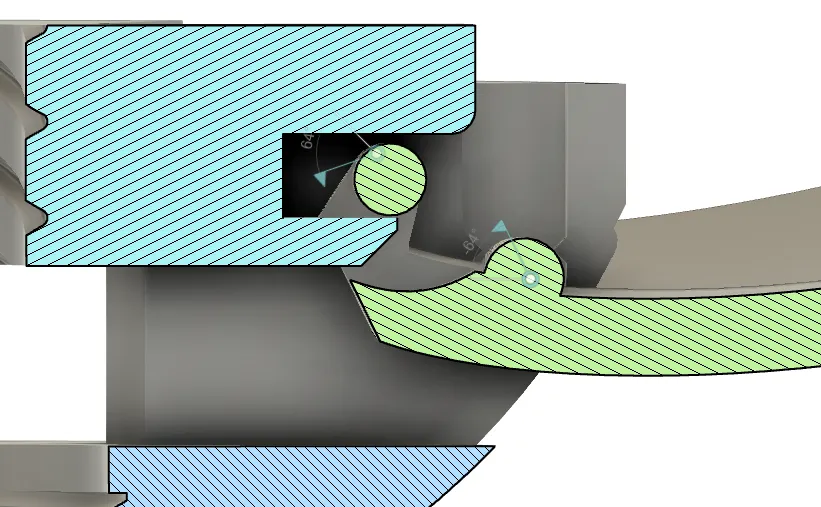
- This is probably the trickiest part. Place the star shape part onto the base of the flower. Slightly turn the base of the stem to allow it to screw on a little. Now you need to make sure all the petals are lined up properly. make sure the catches on the petals are all above the bottom notch of the star part but below the top of the star part. See picture below for visual
- Once you have the mechanism working, screw on the flower (or the pedestal and your own object) and it is ready to enjoy!
License

You shall not share, sub-license, sell, rent, host, transfer, or distribute in any way the digital or 3D printed versions of this object, nor any other derivative work of this object in its digital or physical format (including - but not limited to - remixes of this object, and hosting on other digital platforms). The objects may not be used without permission in any way whatsoever in which you charge money, or collect fees.


Comment & Rating (121)