EMT Conduit Filament Spool Shelf


Print Profile(1)

Bill of Materials

Description
I wanted a new way to store my spools, that needed to fit a few criteria:
- Spools are not stacked on top of one another, so every spool is accessible without moving/removing others
- Cost per spool stored is low
- Must fit on the metal shelving I have next to my printers (No wall mounts, as I rent)
I couldn't find a solution that fit all three of these. Most solutions did fit criteria 1, but finding a solution for 2 and 3 at the same time was difficult. Either solutions were low cost, but wall mounted, or they were free standing, but used A LOT of filament. Eventually I came across a shelf that used EMT conduit as the horizontals, but still used a large bit of filament printing the entirety of the vertical sides.
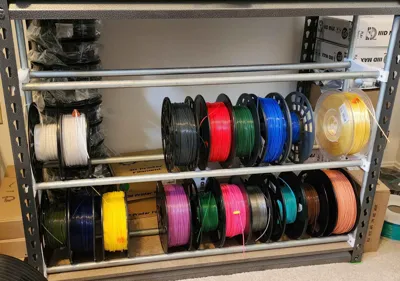
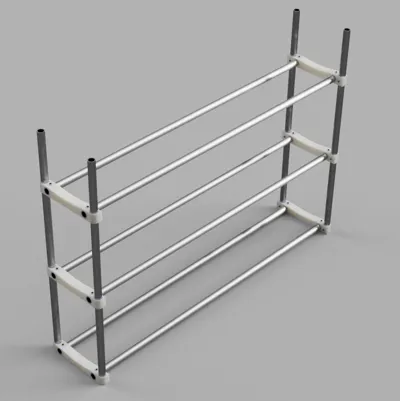
Instead I wanted a solution that used EMT as the verticals as well. 10 foot sections of 1/2in EMT are cheap at $6.50 at my local hardware store, and can support a lot of weight. Plenty to complete the span across my metal shelving unit without intermediate supports. With 3 levels of storage available, this solution as I have built it can store 33 spools of filament, requiring 3 lengths of EMT and just under 300g of filament. This puts the total cost of materials at $23, or about 70 cents per spool. Compare this to some of the fully printed solutions that can run upwards of 350g PER SPOOL stored, the cost savings add up.
Another key of this system, is that it is entirely customizable to your needs. Need more layers? Use longer vertical rods. Have a wider space to cover than I did? Use longer horizontal rods. Based on the spools that I have been able to load, it seems that a full 10 foot length shelf using one continuous conduit should hold just shy of 40 spools. From my research, this may be close to the weight limit for the tubing before excessive bending, so all that needs to be done is an extra vertical support in the middle to split the weight into completely manageable sections.
NOTE: The brackets are meant to be held in place on the conduit using machine screws. The brackets themselves can slip along the conduit without them, and may cause a collapse if they are excluded entirely. The holes are sized for M3 screws, and I used a 3/32 bit to drill pilot holes, then followed up with an M3x0.5 drill/tap bit to cut the threads in the conduit. This ensures the brackets will not slip along the conduit. Included in the print files is a drilling jig to help drill the holes in the round conduit.
For my shelf, I found a spacing of 240mm in height to be enough for easy spool access. If you want more or less room, just change where you mount the brackets on the vertical conduits!
ADDITIONAL TOOL REQUIREMENTS:
Drill
2.5mm Drill Bit
M3 Tap
Method of cutting steel conduit
Useful Tools:
Deburr tool / Reamer
2.5mm Hex tool
Documentation (1)
License
You shall not share, sub-license, sell, rent, host, transfer, or distribute in any way the digital or 3D printed versions of this object, nor any other derivative work of this object in its digital or physical format (including - but not limited to - remixes of this object, and hosting on other digital platforms). The objects may not be used without permission in any way whatsoever in which you charge money, or collect fees.
Comment & Rating (16)