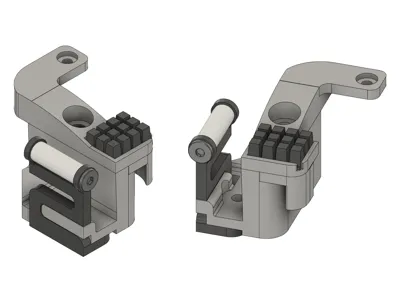
Scrubbler V2 Nozzle Wiper REMIX - Fix Height P1S


Print Profile(5)
![[newest] Revision #3 (ASA), 0.2mm layer, 3 walls, 18% infill](https://makerworld.bblmw.com/makerworld/model/US62db16597a36ae/216545384/instance/2025-01-31_aef5e83f96b47.png?x-oss-process=image%2Fresize%2Cw_100%2Fformat%2Cwebp)
![[old] Revision #1 (ASA), 0.2mm layer, 3 walls, 18% infill](https://makerworld.bblmw.com/makerworld/model/US62db16597a36ae/216505994/instance/2024-07-14_012ce5e3add56.png?x-oss-process=image%2Fresize%2Cw_100%2Fformat%2Cwebp)
![[old] Revision #2 (ASA), 0.2mm layer, 3 walls, 18% infill](https://makerworld.bblmw.com/makerworld/model/US62db16597a36ae/216505956/instance/2025-01-22_9beaeb11194d4.png?x-oss-process=image%2Fresize%2Cw_100%2Fformat%2Cwebp)

Bill of Materials

Description
This is a remix of Adam L's The Scrubbler: Enhanced X1/P1 Nozzle Wiper
Does NOT work if you have first layer scan enabled on the X1.
Uses the Bambu A1 (not A1 Mini) style of silicone wiper. Link to Bambu Lab store.
3rd party wipers might also work, but I have not tested them: https://amzn.to/4p0sXM3
When I printed his design for my P1S, the original PTFE wiper ended up being slightly higher and the hotend/silicone sock was colliding with it.
I modified the way it mounts to the printed part in order to bring it back down to the original height.
I also noticed that with certain 3rd party print sheets, the tab could collide with the printed part (see last photo). I shifted this part over to the left by 0.4mm and added a chamfer on the corner. I also moved a screw closer to the front.
Please refer to the first URL above for full install instructions.
⚠️⚠️Revision #1 vs. Revision #2 vs. Revision #3⚠️⚠️
In most cases, Revision #1 should be fine. I created Revision #2 after feedback from a couple people.
On a small number of printers, the tab on the print sheet could interfere with part of the printed piece, so I modified the geometry.
Revision #3 has further improvements that should ensure compatibility for as many people as possible.
Also made it slightly easier to install with some larger holes.

The 3x4 silicone pad for Revision #3 needs to be cut closer to the “nubs”. See example diagram:

For anyone with issues setting up the custom start GCODE:
- In Bambu Studio or Orca Slicer, go to the Prepare tab and click the edit icon next to your printer.
- Navigate to the Machine G-code tab.
- In the Machine start G-code, paste the following code between the lines in the screenshot below.
- Save.

;===== Scrubbler nozzle wipe start ABL_5/20/24 ==================
G90 ; ensure absolute mode (should already be in it, but here for safety)
G1 Z10 F1200 ; Make sure we don't hit the bed during wiping passes
G1 X128 Y265 F30000; start position, should be very close to where steel plate rub seq. ended
G91 ; relative mode
G1 X-45 F30000 ; run snake pattern from top back to front, run at max acceleration.
G1 Y-0.5 ; increment y slightly , and repeat back/forth while incrementing y.
G1 X45
G1 Y-0.5
G1 X-45
G1 Y-0.5
G1 X45
G1 Y-0.5
G1 X-45
G1 Y-0.5
G1 X45
G90 ; restore to absolute mode
G1 X128 Y265 ; return to start position.
G1 F3000 ; restore previous acceleration;===== Scrubbler nozzle wipe end ================================

Comment & Rating (613)