Enclosure for A1


Print Profile(4)


Description
Premise, this project was done following many request recived after publication of my model for A1 Mini.
personaly I dot have the A1 printer, so I recived the information needed with the collaboartion of another user that asked me to prepare this project.
Like I said for the A1 mini projevct, I know that the A1is not created to work in an enclosure etc, but Ithe goal of this enclosure is strictly estetical and finalized to protect from dust etc so, when whne the printer works I suggest to keep the door and the roof open.
Respect to the A1 mini project, this structure is project to be a littel more easier to assembly also if more big.
The mounting of chassis is easy, all are interlocking peaces and their fixing is renforced by glue, below what I used:

Insert the joint pieces (in red in the picture) into the appropriate seats (circled in red) like in the picture below.

repeat for all connection, (one joining piece to connect two pieces of structure).
all joining pieces shoulb be ready with just one print (if i did not wrong the calculation ;-) ).
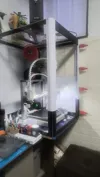
the finisched structure shoul be like below

Index of bambu studio plates:
- plate 1: rear left corner (3 pieces)
- plate 2: front left corner (3 pieces)
- plate 3: rear right corner (3 pieces)
- plate 4: front right corner (3 pieces)
- plate 5: door hinges + low central crosspieces (6 pieces)
- plate 6: high front crosspiece (3 pieces)
- plate 7: high rear crosspiece (3 pieces)
- plate 8: high left crosspiece (3 pieces)
- plate 9: high right crosspiece (3 pieces)
- plate 10: handle bicolor (AMS needed - 1 piece)
- plate 11: high front crosspiece (32 pieces)
For the panneling, I used the 3mm DiBond material below an example photo,

I cut it of the measures needed, I suggest that when you glued all pieces of chassis, you take the measure alone to cover better the detail, below a picture of all cover needed.

for who want an approximately measures of the panels, it is here below:
- left and right panels: 600x568 mm
- rear and front panel: 600x518 mm
while for the roof and the door I use a policarbonato always of 3 mm also it cutted after the chassis is glued, to have more detailed measure.

for who want an approximately measures of the panels, it is here below:
- roof: 610x560 mm
door: 510x478 mm
in the end for the door hinges I used a Pin like in the photo belw (usually used for shelves) diameter 5 mm and for the handle a magnet of 10 mm diameter.

I hope that also this project should be appreciated like the previous one for A1 Mini.
for those who are curious below the link for A1 mini project.
License
You shall not share, sub-license, sell, rent, host, transfer, or distribute in any way the digital or 3D printed versions of this object, nor any other derivative work of this object in its digital or physical format (including - but not limited to - remixes of this object, and hosting on other digital platforms). The objects may not be used without permission in any way whatsoever in which you charge money, or collect fees.
Comment & Rating (810)