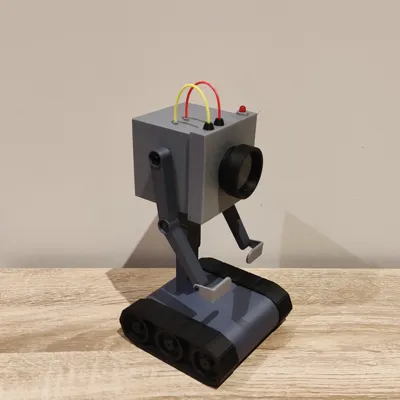
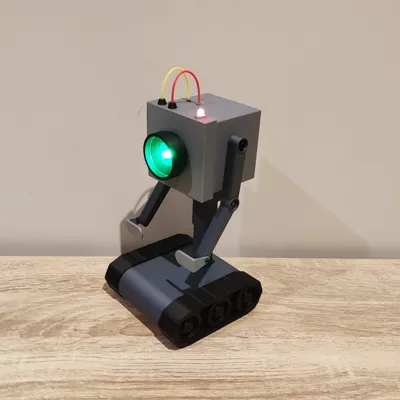
The Purpose Robot/Butter Robot from Rick and Morty


Print Profile(1)

Bill of Materials


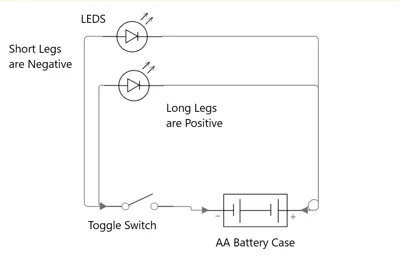
- Red LED x 1:
- Green LED x 1:
- AA Battery Case x 1: 2 slots for 3 volts
- On/Off Toggle Switch x 1:
- Wire x 1:
- M3 Screws x 2: 3mm to 8mm
- M2 Screws x 2: 3mm to 8mm
Description
Thanks for checking out my model! Interested in supporting my work or selling prints?
Support Crew – Show some love and help keep the projects flowing
Galactic Maker Foundry – Sell physical prints of my original designs
Foundry License+ – Sell prints and use my photos for listings
🎉 Supporter-only Discord coming soon – get early access, tips, and sneak peeks!
Membership
Join here to support or get a license
Inspired by the iconic Purpose/Butter robot from Rick and Morty Season 1, Episode 9, this 3D printed model brings the quirky character to life with some unique enhancements. Now you can relive the existential dread and humor of this beloved robot right at home!
Key Features:
- LED Integration: The robot comes to life (well, sort of) with a red and green 5mm LED, powered by 2 AA batteries. Who knew existential crises could be so bright?
- Realistic Lens: Using a slice of the lens model as a mold, we crafted a clear lens with UV resin, adding that extra layer of realism. Just don’t ask it about its purpose.
- Filament Wires: The wires on top are creatively made from off cuts of red and yellow filament. It’s like giving the robot a colorful, albeit meaningless, new hairdo.
- Magnet Slots: Slots for magnets in the head and leg/body sections allow for rotation, though honestly, it’s not needed. The robot already knows it’s going nowhere fast.
- Sturdy Assembly: The arms attach to the body using M3 3mm to 8mm screws, and the hands with M2 3mm to 8mm screws. Alternatively, glue can be used if you’re in a hurry to get it questioning its existence.
- Alignment Pins: 5mm x 5mm pins help align the threads and foot and body/legs models when gluing. CA glue is recommended, but any should work. You know, just like any of us searching for meaning.
Dimensions:
- Height: 190mm
- Width: 110mm
- Depth: 110mm
Components Required:
- 1 x 2 Slot AA battery case
- 1 x 5mm Red LED
- 1 x 5mm Green LED
- 1 x Toggle switch
- 24 AWG Wire
- 2 x M3 3mm - 8mm screws
- 2 x M2 3mm - 8mm screws
Enjoy bringing this little robot to life, and remember, even if it can't find its purpose, it can still add some Rick and Morty humor to your day!
License
You shall not share, sub-license, sell, rent, host, transfer, or distribute in any way the digital or 3D printed versions of this object, nor any other derivative work of this object in its digital or physical format (including - but not limited to - remixes of this object, and hosting on other digital platforms). The objects may not be used without permission in any way whatsoever in which you charge money, or collect fees.
Comment & Rating (61)