Watchmaking Faceplate for Proxxon 150E


Print Profile(1)

Bill of Materials
- M4screw(8-12mm) x 3: Adjustment
- M4screw(20-25mm) x 3: Clamping
- Spring:0.4x5x10mm x 3:
- M4nut x 6:
Description
This is a functioning watchmaker's faceplate. It allows to precisely fix irregularly shaped parts to process them in a lathe.
This one has M16 thread on the faceplate and fits Proxxon 150E lathe. I'm sure adaptations can be made to fit it to other lathes as well.
!!! This part might be spinning at high speeds in the lathe and can be potentially dangerous. Use all the necessary protection measures. The author does not take any responsibility for damage of harm caused by the model usage !!!
The model consists of the faceplate, upper jaw and lower jaw. Three of each upper and lower jaws are needed for the fully functional build.
Each jaws set accepts 2 screws. The inner (longer) screw clamps the jaw (both its position and the part it's holding). The outer (shorter) screw allows to adjust for the thickness of the part held. All the adjustment/tightening procedures can be done from the front side.
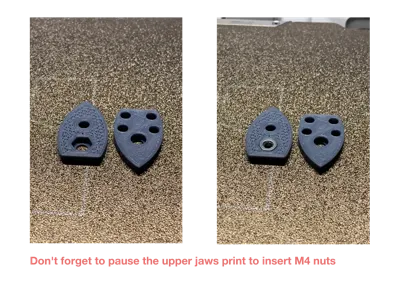
Each upper jaw requires an M4 nut inserted during printing. This guarantees that the adjustment thread is strong and reliable.
I recommend using a hex socket screws, but any other screw head would work as well.
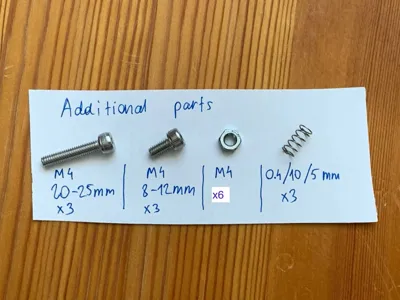
The model requires following additional parts:
- Long fixing screw: M4 20-25mm x3
- Short adjustment screw: M4 8-12mm x3
- Nut: M4 x6
- Spring (T/Diam/L): 0.4/5/10mm x3
Build process is as follows (also check the photos for more details)
- Print the parts
- Increase infill density and perimeters count to make sure the parts are sturdy (6 walls + 40+% seems OK to me)
- Make sure the layer height is low for the faceplate thread part to make sure it screws onto the shaft
- You'll need to insert M4 nuts into upper jaws part. Make sure to add a pause to the printing process at the last layer of printing the hex shaped hole in the jaws
- I recommend printing on a flat plate to get more precise parts, but I myself printed them on a textured plate and it turned out great
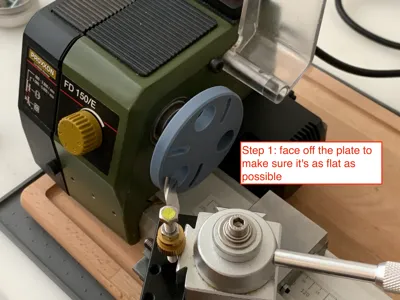
- (optional) Face off the plate to ensure maximal flatness and clean up the plate.
- (optional) Fix the lower jaws only to the plate and face off the raised “nose” part to make sure they're flat in relation to the plate
- Build the parts together
The plate works great together with a microscope centering solution: https://makerworld.com/en/models/584485
Support the author:
The model is free to use and published under CC-BY license, however if you want to support the model author you can do it here: BuyMeACoffee link
Comment & Rating (0)