Torsen Differential | Limited-slip differential


Print Profile(2)

Bill of Materials


Description
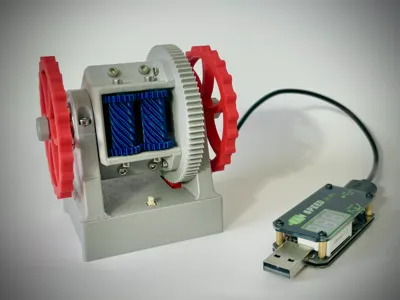
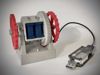
⚙️This 3D model shows the principle of operation of the torsion differential, a key part of the drive system in cars. ⚙️

👉Points of interest
- This differential allows more torque to be transferred to the wheel with better traction while reducing the slippage of the wheel with less traction, greatly improving the vehicle's stability and handling on slippery or uneven surfaces.
- This type of differential is used, for example, by sports versions of Audi or Lamborghini. This type of differential is popular for its reliability, durability and ability to improve vehicle performance without requiring complex electronic controls.
👉BOM
| Number | Name | Amount |
| 01 | Base | 1 |
| 02 | Sleeve | 2 |
| 03 | Housing-R | 1 |
| 04 | Housing-L | 1 |
| 05 | Case | 1 |
| 06 | Cover | 1 |
| 07 | Sun Gear-R | 1 |
| 08 | Sun Gear-L | 1 |
| 09 | Helical Gear | 6 |
| 10 | Spur Gear | 12 |
| 11 | Distance Ring | 2 |
| 12 | Gear Bigger | 1 |
| 13 | Gear Smaller | 1 |
| 14 | Nut | 2 |
| 15 | Screw | 4 |
| 16 | Wheel-L | 1 |
| 17 | Wheel-R | 1 |
| 18 | Motor Cover | 1 |
👉Assembly instruction step by step:
1. Put 05_Case into 08_Sun Gear-L. Then put 07_Sun Gear-R into 12_Gear Bigger. Gear Bigger + Case connect with screws 3x M2.5x10 (AA005). Don't forget to add two pieces of 11_Distance Ring!

2. Add bearings (608ZZ) +16_Wheel-L + 17_Wheel-R and finally 14_Nut. Important not to tighten the nuts!

3. The base of the differential should be ready. Now it's time to assemble the base!
15_Screw use to assemble 01_Base to 03_Housing-R + 04_Housing_L. Be careful not to swap Housings! 04_Housing_L is on the left side of the picture!

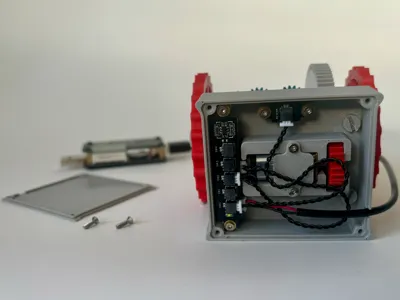
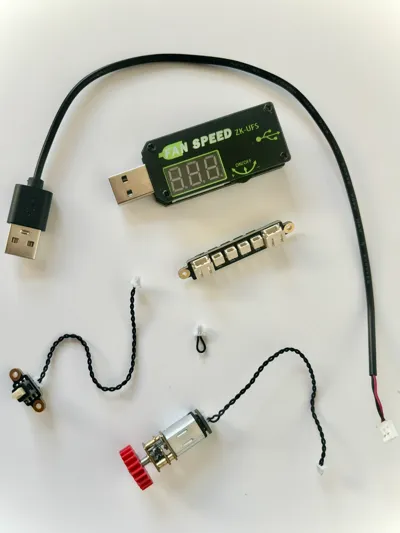
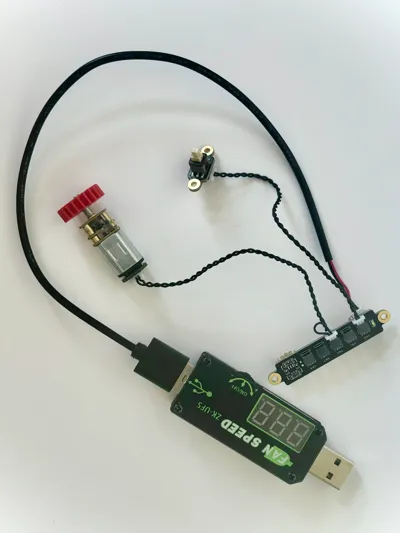
4. Now it is necessary to attach all the electrical components. Use 6x M2x8 screws to attach them. Don't forget to attach 13_Gear Smaller to the motor shaft! Push the USB cable through the prepared slot in the 01_Base. You can find the connection of the individual electrical components in the pictures.

5. Use 06_Cover to hide electronic components. Use 4x M2x8.

6. Insert the prepared differential into the base.

7. Fix the bearings with 02_Sleeve. Use 4x M2.5x10 screws.

8. The last step! Add 10_Spur Gear + 09_Helical Gear. Use 12x M2.5x10 screws! And you're done! 🥳🥳


License
You shall not share, sub-license, sell, rent, host, transfer, or distribute in any way the digital or 3D printed versions of this object, nor any other derivative work of this object in its digital or physical format (including - but not limited to - remixes of this object, and hosting on other digital platforms). The objects may not be used without permission in any way whatsoever in which you charge money, or collect fees.
Comment & Rating (18)