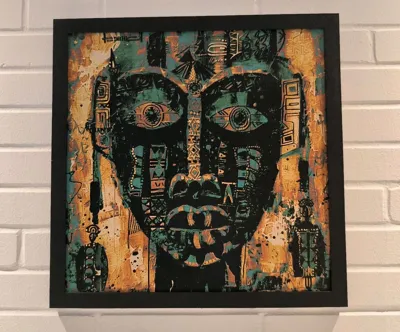
Frame Hueforge 400x400


Print Profile(1)

Bill of Materials
- Klebebabnd x 1:
Description
Boost Me (for free)
If you appreciate this frame and find it useful, I would be delighted to receive a boost ;-)
Assembly Instructions for the Modular Frame (400 mm x 400 mm)
Introduction:
This modular frame is specifically designed for images measuring 400 mm x 400 mm that can be divided into multiple sections. The construction is based on a robust grid (substructure) to which the image sections are adhered. The completed substructure is then inserted into the frame and secured with braces to ensure stability and security.
1. Image Preparation CLICK FOR CUTTING-HELPER CALCULATION
The image should be divided into 20 x 20 cm sections. The Bambulab Slicer or another slicer program is suitable for this purpose.
Note: Slightly adjust the image size to ensure a perfect fit within the frame. For a 400 mm x 400 mm frame, a reduction to 398.5 x 398.5 mm is recommended to allow for some leeway.
2. Substructure Preparation
The substructure consists of modular components assembled according to the instructions.
Tip: Use double-sided adhesive tape to securely fix the image sections.
- Apply tape to the corners.
- Additionally, apply an adhesive point every 10 cm.
3. Mounting the Image to the Substructure
Carefully adhere the prepared image sections to the substructure. Ensure the sections are precisely positioned to correctly assemble the overall image.
4. Inserting the Substructure into the Frame
Gently place the substructure into the frame.
Important: Ensure that the top of the image aligns with the wall mounts.
5. Attaching the Braces
The braces provide stability to the substructure.
Tools:
- Pressing Stamp: For inserting the braces.
- Rubber Mallet: For gently tapping the braces into place.
Procedure:
- Place the braces into the designated recesses of the frame.
- Position the pressing stamp and carefully tap with the rubber mallet until the brace is securely seated.
- Check that the substructure is firmly held between the braces and the frame.
6. Inspection and Completion
Verify that the image is correctly positioned and that the top of the image faces the wall mounts. Also, check that all braces are firmly seated and the image is securely mounted.
7. Links to Alternative Sizes
This frame system is also available in other sizes! Check out the following models:
- 200 x 200 mm: Click here
- 800 x 600 mm: Click here
- 800 x 800 mm: Click here
- 1000 x 800 mm: Click here
- 1200 x 1000 mm: Click here
Follow me on my channels!
Discover exciting projects, exclusive tips and tricks, and insider information! You can also ask me questions directly on my social media channels – I'll be happy to answer them. 😊
- TikTok: @toktikker46 – Entertaining clips and quick updates.
- YouTube: @jonnydasilva2311 – Detailed tutorials and exciting videos.
- Facebook Group: 3D Multicolor – Exchange and inspiration with like-minded individuals.
Click on “Follow” and be a part of it – whether on TikTok, YouTube or Facebook. I look forward to seeing you! 😊
License
You shall not share, sub-license, sell, rent, host, transfer, or distribute in any way the digital or 3D printed versions of this object, nor any other derivative work of this object in its digital or physical format (including - but not limited to - remixes of this object, and hosting on other digital platforms). The objects may not be used without permission in any way whatsoever in which you charge money, or collect fees.
Comment & Rating (31)