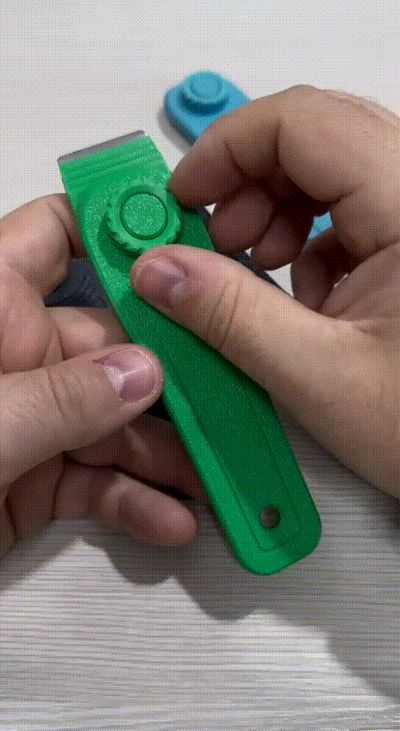
Scraper & Box Opener (three positions)


Print Profile(3)


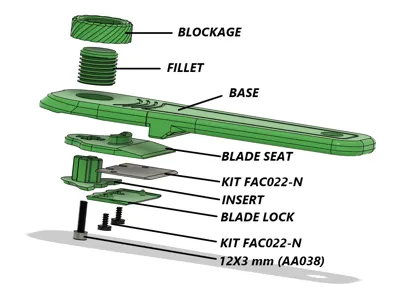
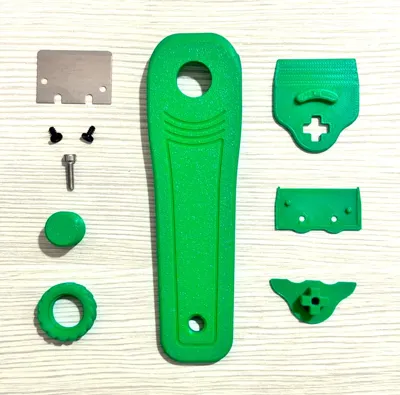
Bill of Materials


Description
Boost Me (for free)
This will allow me to have more energy to create new projects, thanks for your help
Here is my scraper, hope you like it.
REVISONE V2: 06/11/2024, gg/mm/aaaa
What components have been updated?
-BLADE SEAT, the screw seat is deeper
If I have longer screws what should I print?
-THICKNESSES, it is a thickness that I have to use with 9.30mm long screws
Where do I find these thicknesses?
-I created a separate .3mf just for those who use the longer screws

I made this review because thanks to your comments we noticed that on some kits released by Bambu Lab there are different screws. This does not happen if you use the FAC002-N kit that you find in the list.
Difference of screws:
KIT IN DISTINTA FAC002-N

OTHER KITS: USE THICKNESS

NOTE THE DIFFERENCES

FUNCTIONALITY:
It locks in three positions:
-position 1: allows you to use the tool as a spatula
-position 2: allows you to use the tool as a box opener
-position 3: makes the tool safe, avoiding accidental cuts

EXPLANATION OF OPERATION:
1- Unscrew the BLOCKAGE completely, reaching the limit switch
2-Press the FILLER, rotate clockwise to one of the desired positions
3-Screw the BLOCKGE
4-Ricorda di lasciare un Boosts :)

PRINT SETTINGS:
Print it with any material, I used Bambu material.
-Ugello 0.4mm
-Layer height 0.2mm
-Supports only on component (INSERT)
-40% grid filling
-6 Walls
REQUIRED COMPONENTS:
-KIT FAC002-N (Scraper with screws / Quantity 1)
-KIT AA038 (Screw 3x12mm / Quantity 1)

PROJECT:

STEP BY STEP ASSEMBLY INSTRUCTIONS:

STEP 1: Pay attention to the assembly direction
-BLOCKAGE
-FILLET

STEP 2:Removal of supports
-INSERT

STEP 3:
-BLADE SEAT
-INSERT

STEP 4:

STEP 5: 3x12 screw

STEP 6:
-KIT FAC022-N
-BLADE LOCK

STEP 7: Better location

STEP 8:
-Step 6
-screw kit

Happy printing, if you like follow me for other projects.
See you next time from MC2.project3D
License
You shall not share, sub-license, sell, rent, host, transfer, or distribute in any way the digital or 3D printed versions of this object, nor any other derivative work of this object in its digital or physical format (including - but not limited to - remixes of this object, and hosting on other digital platforms). The objects may not be used without permission in any way whatsoever in which you charge money, or collect fees.
Comment & Rating (409)