A1 Magnetic Adapter Print Head Front Cover Magnet


Print Profile(10)


Bill of Materials

Description
Print profiles: Print takes 27 minutes and only 4,2 grams of filament! Every profile contains different build plates. Only print the plate for your magnet diameter, there are models for 5 mm and 6 mm magnets, with version 2 I also added a PLA profile besides the standard (and recommended) PETG and a “tighter fit” plate, that has 5.9 mm magnet holes, which fit best for my slightly undersized 6mm magnets.
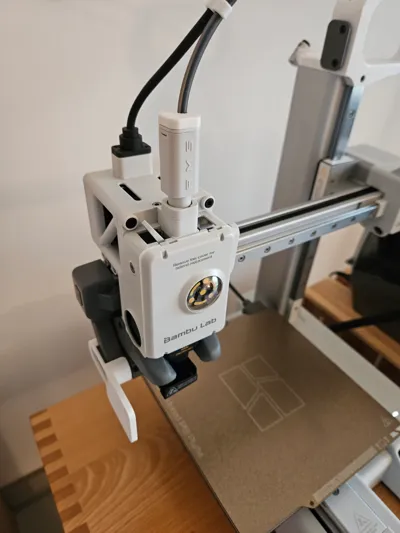
Description: This model makes the A1 (mini) print head cover magnetic like on the P/X series to make hotend-swapping easier and eliminate the danger of breaking off the clips that originally hold the cover. No modifications need to be done to the printer itself.
It is held to the print head by two D5x2mm/D6x2mm (recommended)/D6x3mm magnets and additionally secured against slipping in x- or z-direction by two pins that fit into existing holes in the extruder module. The lightweight design survived the full vibration calibration and various hours of printing without falling off and rattle-free.

New Version 2! prevents sliding along clips
Since I lately switched between my 0.4 and my 0.2 mm hotend quite often I noticed the cover would sometimes slide on the adaptor plate. I did not want to make the fit any tighter because that would bend the adaptor, nor did I want to get rid of the slide-on design, so I designed a small clip that locks the cover into place (see video below).
Assembly:
- press magnets into the holes
- place the two clips on the top end of the cover in the adaptor (so it is off-center)
- fold adaptor down
- slide adaptor to center, so it is secured by the two lower clips, too
Assembly video for version 2 (note the bottom right clip):
License
You shall not share, sub-license, sell, rent, host, transfer, or distribute in any way the digital or 3D printed versions of this object, nor any other derivative work of this object in its digital or physical format (including - but not limited to - remixes of this object, and hosting on other digital platforms). The objects may not be used without permission in any way whatsoever in which you charge money, or collect fees.
Comment & Rating (498)