Search models, users, collections, and posts

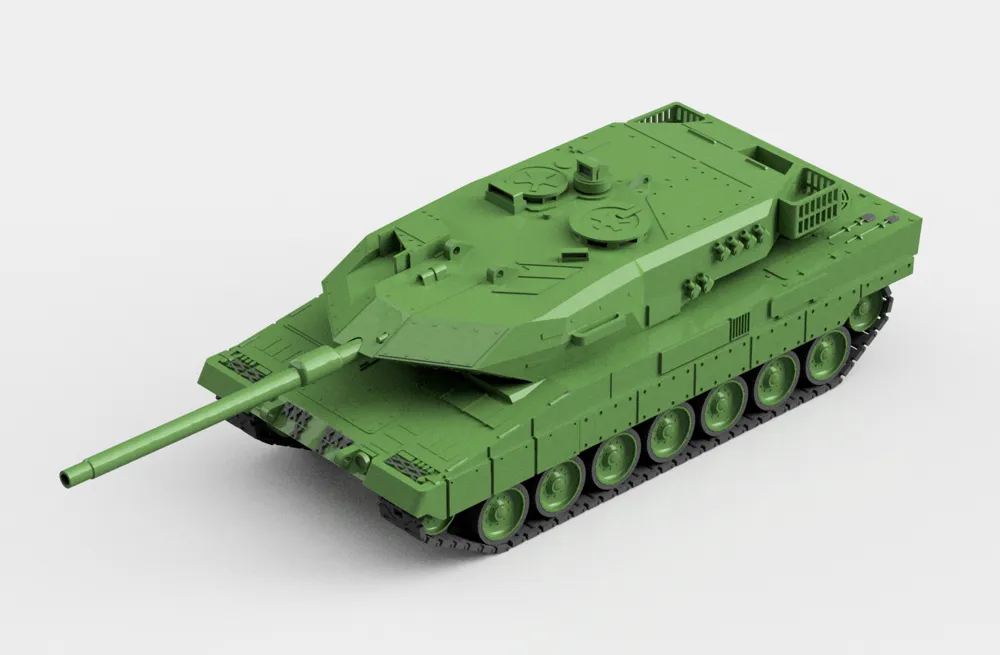
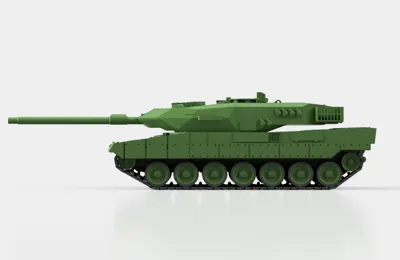
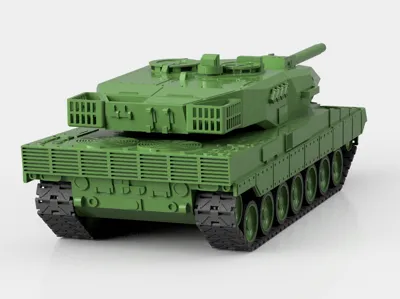
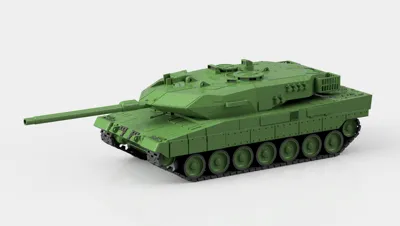
Leopard 2A6 German main battle tank 3D Model

Print Profile(4)

All
X1 Carbon
P1S
P1P
X1
X1E
A1
H2D
H2D Pro
H2S
P2S
H2C
X2D
A2L
A1 mini

X1C P1S P1P A1
X1C P1S P1P A1
Designer
36.9 h
4 plates
4.6(89)

A1 mini
A1 mini
Designer
26.7 h
7 plates
4.5(23)

Body parts were merged to avoid seams and shrinkage
31.6 h
4 plates
4.3(3)

A1mini Body parts were merged to avoid seams and shrinkage
34.8 h
7 plates
4.5(2)

Open in Bambu Studio
Boost
2252
4757
232
329
6.3 k
799
Released 

Description

If you like how my models are created, feel free to check out this link

I'm a student. If you like my work, please consider leaving a small donation, it will help me create more and more interesting models!

https://ko-fi.com/mikolajmazik

!!!"detect thin wall" OPTION HAS TO BE ENABLED IN SLICER!!!!

Tracks should be printed without supports!

I want to present you Leopard 2a6 tank in 1:35 scale, Tracks are fully movable but wheels are solid due to the strengh issues. If you have an idea for specific vehicle or camuflage, feel free to write to me!

Please, note that tracks should be printed with 0.08 layer height and slow speed.

Comment & Rating (232)

(0/1000)

looks great!
The designer has replied
8
Reply
Thanks for printing!
0
Reply
Boosted
wow. what kind of filament and color?
2
Reply
Same question, what material is it
Show original
0
Reply
it’s a nice model but I can’t see how to install the tracks over the back wheels. no matter how I put it, it does not fit.
9
Reply
Have you found a solution yet Because I also can't get the rings over the wheels
Show original
0
Reply
Hello you two I recently encountered the same problem and found a solution to assemble the whole thing Unfortunately the chains can no longer be moved, but that shouldn't be necessary with this model anyway -> I sawed off the "serrations" on each side of two chain links and positioned them precisely under the rear wheels The chain without serrations has enough play so that it closes flush Regards
Show original
0
Reply
Question: how do you put the treads together? They just fall apart when I try to get them to stick to each other.
0
Reply
Print Profile
A1 mini
This is a great model. Sometimes difficult to remove supports buth that could be mine settings. Print profile is good. Thanks for sharing.
3
Reply
When I printed mine, I used auto tree supports, but set them to "tree slim", and also checked the boxes for "on build plate only", and "support critical regions only". With that I got just a bit of support branches on the very edge of the two circular engine fans... and that area is hidden by the rear of the turret. Aside from that, the rest of the supports were really minimalized and easy to remove. I did however use "mouse ears" where a lot of the flat parts meet the build plate, just to add some extra security that things wouldn't jar loose during printing. Worked like a charm.
0
Reply
Replying to @CDPond_YYC :
Thanks for your feedback. That sounds indeed as an good solution for the problems that i had. I will keep this in mind. I will try it on other prints as well.
0
Reply
Replying to @user_51965691 :
For what its worth, I also spent a few minutes playing around with the model cutting tool in Bambu Studio, and found it actually really pretty easy to get to understand. You can use it to slice the tank hull in half in the horizontal plane (with the pieces laying flat on the plate, not in the vertical position). Once you've cut it in half, you have the ability to add pins (you tell it where you want them, and it automatically applies the pins and the matching holes in the other half of what you cut). Then you can lay down the parts flat to the plate and avoid the need for supports almost entirely... or if there are any that the software thinks are still required, they're really minimal and easy to remove. I did this with his Tiger I tank where he provides a one piece unified body for the tank. It works like a charm, and the pins and holes are very snug but absolutely functional. If you need a slightly looser pin fit, you can quickly sand the pin a little before fitting the two parts together.
0
Reply
I really enjoyed printing this. Device: A1 with AMS (AMS not necessary) Material: Bambu Basic Green and Bambu Basic Black I know my Color Decision is questionable, but i will paint it in the near future. The Chain links fit perfect, the Chain moves smoothly, but i´ve printed too many parts (56 excess)? @Mr. Mazik: I can send you my A1 file with a optimized Version. Reduced to 3 plates, deleted 56 Chains, deleted 3 rings. I set a fix Color for every part, sorted them, so every plate has one Color (no AMS needed). And every part has a Support/no Support preset). Its ok that you don´t allow remixes, but i think this would be helpful for other Users
3
Reply
Really that I will love to have ... My 75% reduction in size just can't work for the chain links. Giving up on it now.
0
Reply
Hi I would be interested in your optimized version would it be possible to get it Many thanks in advance
Show original
0
Reply
how many links on each track , and did you glue the rings on the wheels or just slide them on ?
(Edited)
0
Reply
I just had a look at the model. it's very detailed but there's an obvious error. There is no drive sprocket to power the tracks. Take a look at rear wheel of a Leo 2, you will see it has toothed sprockets to turn the track. EDIT: Further note, I can't find the muzzle reference unit (goes on the end of the gun barrel on one side). Also I can't see the manual emergency sight (the "steam gunnery sight") but to be honest I don't know where that is on the Leo 2). EDIT: I found the emergency sight. Muzzle reference is still totally missing.
(Edited)
The designer has replied
9
Reply
I am sorry for not including it, unfortunately I did not see this small detail when I was making this model
3
Reply
Muzzle reference? You mean the field collimator that's realigned after every 10 shots due to barrel heating, thus resetting the sightline to the barrel? We even had to do this more frequently in Shilo because the barrel got quite hot, inside and out
Show original
0
Reply
Nice Model, good do print.
3
Reply
Which filament color did you use?
0
Reply
Replying to @anakinfoxe :
Extrudr NX2 Military green
0
Reply
Print Profile
X1C P1S P1P A1
Great model, but had to cut it up a bit to reduce supports. Assembly of the tracks was very frustrating. I've glued some segments to the wheels because the connectors weren't strong enough to keep the track together. Printed in Polymaker Polyterra Army green and black for the accents on a H2D.
2
Reply
Please help me. I reduced the whole model to 75% of size. I can’t get the print of tracks/chain. it’s just getting bad for some of them in first layer which end up messing everything in later layers. Plate is clean, detect thin walls is selected, and 0.4 nozzle with 0.08 quality setting.
0
Reply
Hi, which Material do you use? It looks like there is a Problem with extrusion
0
Reply
Replying to @Print_Hamster :
PLA. Tried without reduction in size and end up getting my hotend assembly broken due to blob which happened :(
0
Reply
wanted to have a rear sprocket and moving tracks. used the hull and turret of this model but the tracks and it's wheels from a leopard 2A4 model on makerworld. result isnt perfect when looked closely but better than the original I also had to cut the inner part of the barrel to get the proper length. the model is nice overall and prints well but the wheels are definitively it's weak side.
0
Reply
https://makerworld.com/models/2167962?appSharePlatform=copy here's the model I used for wheels and tracks
0
Reply
Good, the only regret is that the tracks are not articulated
Show original
1
Reply

License

This user content is licensed under a Standard Digital File License.

You shall not share, sub-license, sell, rent, host, transfer, or distribute in any way the digital or 3D printed versions of this object, nor any other derivative work of this object in its digital or physical format (including - but not limited to - remixes of this object, and hosting on other digital platforms). The objects may not be used without permission in any way whatsoever in which you charge money, or collect fees.