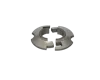
Z-axis lower bearing cover X1C / X2D / P1S / P2S


Print Profile(2)

Bill of Materials

Description
Membership
If you want to use this model commercially, please join my membership.
If you like my project, give me 👍, it will make it easier to reach others 🙂
Boost Me (for free)
Each project takes hours or days of design and testing. There are also a few or a dozen test prints to make sure everything fits as best as possible. If you like my project, appreciate my work and want new projects of this type to be created in the future, support me so that I will be motivated to continue working 😉
Thank you for current and future boost 😉
NOTE!!!
The model requires very precise fit to function properly. Filaments have different shrinkage rates, so you may need to slightly resize the model to fit. If you print with PLA or PETG, periodically check the model for deformation due to the high temperature inside the printer to avoid problems!
For the X2D printer, if it has a connector between the screws and a protruding bushing in the center of the bearing, we print the model from the third plate. Apparently, this version also occurs in the P2S printer, so we use that model as well.
Description:
I designed these covers because of dust, bits of filament and other things constantly sticking to the lower bearing.
The covers can be easily removed or lifted to lubricate the Z axis screw.
I added delicate notches at the bottom to make it easier to pry.
The cover does not interfere with the printer's operation in any way and does not limit it in any way.

Installation:
STEP 1:
Place the first part in its place.
STEP 2:
Slide the second part from above onto the first one along the Z-axis screw.

There is no need to use force, everything fits the ideal.
The screw at the back causes minor problems due to the small amount of space for the fingers, but just a moment of patience and you can put it on.
Please see my NEW model of the Z axis table cover, which stylistically matches this one:

Good luck and I invite you to test my other projects ;)
https://makerworld.com/en/@Piotrek.C
License
You shall not share, sub-license, sell, rent, host, transfer, or distribute in any way the digital or 3D printed versions of this object, nor any other derivative work of this object in its digital or physical format (including - but not limited to - remixes of this object, and hosting on other digital platforms). The objects may not be used without permission in any way whatsoever in which you charge money, or collect fees.
Comment & Rating (3938)