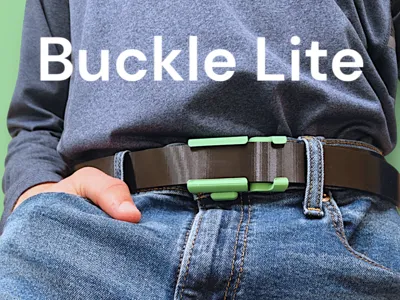
Belt 2.0


Print Profile(5)


Bill of Materials

Description
Here is a Revamp of Ratchet Belt 1.0!
What You Need to Know Before Printing:
-This Model Requires TPU Plastic
-When printing the buckle, select a more rigid filament type. As I have experimented with a variety of filaments, PLA doesn't always work. Only the rigid filaments like certain PLA, ABS, and PETG will yield good results and tension.
-I Highly Recommend Using my Print Profiles as there are certain niche settings that need to be in place for (hopefully) optimal printing.
What You Need to Know After Printing:
-Wait for the Buckle to COOL COMPLETELY after printing. Not doing so could ruin the spring.
Included:
-2 Buckle Styles
-4 Belt Sizes
-Trusted Print Profiles
Pros/Cons:
-You'll be the cool person at parties.
-You'll be coerced into printing other people their own belts.
-No taking off the belt of shame at TSA.
-It's all plastic; the buckle isn't invincible, but it is replaceable.
-It's very flexible (duh). You could fold/bend this thing many times and it will (almost) always spring back.
**NEW AND OPTIONAL**
I have now added a theoretically customizable magnetic belt attachment print profile! Wow that's a lot of descriptive words!
Assembly and Detachment:
-Firmly Grip the two edges of the belt until it bends upwards. -Slide The belt into the bottom slot- making sure that the bend goes over the peg. -Once everything is aligned, give the belt a little push to secure everything. |  |
-To remove the buckle, press firmly from the other side of the belt creating the bend again. - Squeeze the two edges of the belt as hard as you can while slightly pulling away from the buckle. |  |
Happy Printing!
License
You shall not share, sub-license, sell, rent, host, transfer, or distribute in any way the digital or 3D printed versions of this object, nor any other derivative work of this object in its digital or physical format (including - but not limited to - remixes of this object, and hosting on other digital platforms). The objects may not be used without permission in any way whatsoever in which you charge money, or collect fees.
Comment & Rating (157)