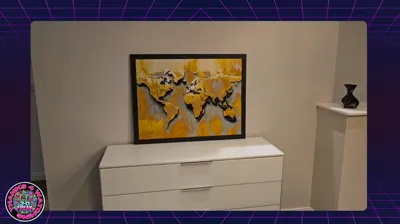
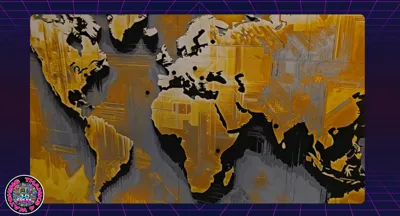
Magnetic Worldmap for your Travel Memory


Print Profile(7)


Description
Boost Me (for free)
IF YOU LIKE THE FILE WOULD BE HAPPY FOR A BOOST :)
Assembly Instructions for the Modular Frame
Introduction:
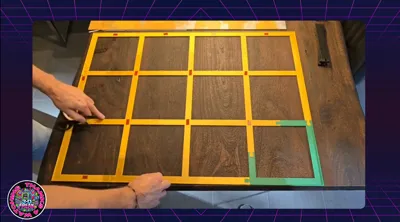
The modular frame is designed to securely and stably mount a picture divided into multiple parts. The construction's base is a grid (substructure) onto which the picture parts are glued. After the picture is attached to the substructure, it is inserted into the frame. The substructure is then secured with struts that are pressed into the frame to provide stability to the picture
1. Preparing the Picture CUTTING-HELPER-CALCULATION CLICK
- Print all necessary files
- Information for printers without AMS with manual color change (Swap Instructions):
- Start with Black available here
- At Layer #6 (0.56 mm): Change to Grey available here
- At Layer #10 (0.88 mm): Change to Mandarin Orange available here
- At Layer #13 (1.12 mm): Change to Lemon Yellow available here
- At Layer #17 (1.44 mm): Change to Jade White available here
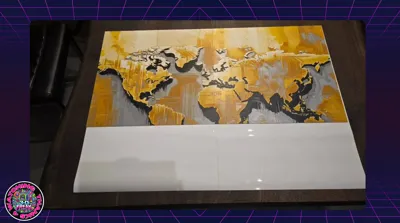
2. Preparing the Substructure
The substructure consists of modular parts that are assembled according to the instructions. Each picture part will later be glued onto a corresponding segment of the substructure
- Optional: Magnetic World Map
If the picture is to be magnetic, first glue the prepared picture parts onto the magnetic film before applying them to the substructure. This makes the world map magnetic, allowing pins to be placed to indicate your past travel destinations
Note: For a picture size of 800 x 600 mm, the magnetic film is needed twice. Click here for the recommended magnetic film on Amazon - Magnets for the pins I ordered here
- Tip:
Apply the double-sided adhesive tape so that all corners of the picture parts are well secured. Additionally, add an adhesive dot for every 10 cm of side length to ensure secure fixation - Recommended adhesive tape:
Click here for the recommended adhesive tape on Amazon
3. Mounting the Picture Parts onto the Magnetic Film
Once the picture parts are prepared, carefully glue them onto the magnetic film. Ensure that the picture parts are precisely positioned so that the complete image is correctly assembled. Afterwards, carefully glue everything into the substructure
4. Inserting the Substructure into the Frame
Once all picture parts are glued onto the substructure, it can be carefully inserted into the frame. Ensure that the picture is oriented correctly within the frame, so that the top side of the picture aligns with the wall mounts
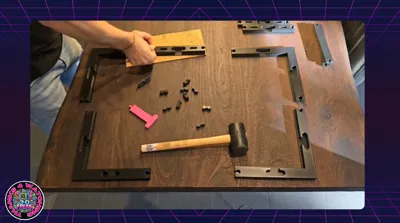
5. Attaching the Struts
To provide stability to the substructure, the struts must be pressed into the frame. Press the struts only until they lightly clamp the substructure to avoid damage
Tools:
- Press Stamp: For inserting the struts into the frame
- Rubber Mallet: For carefully pressing in the struts
Procedure:
- Place the struts into the designated recesses of the frame
- Place the press stamp onto the strut and tap gently with the rubber mallet until the strut is seated
- Ensure that you press the struts only enough to lightly clamp the substructure
- Check that the substructure is securely held between the struts and the frame
6. Attaching the Middle Struts and Connectors
For the middle struts, it is recommended to place a spacer under the strut to keep it stable while the other end of the strut is pressed into the frame. The connectors for the frame can also be carefully pressed into their designated recesses with a rubber mallet
7. Review and Completion
- Ensure that the picture is correctly positioned in the frame and that the top side of the picture faces the wall mounts
- Check that all struts are firmly seated and that the picture is securely and stably mounted
8. Alternative Picture Sizes
This modular frame system can be used for various picture sizes, e.g., 800 mm x 800 mm. The same principles apply to larger or smaller pictures. The minimum picture size is 600 mm x 600 mm, and the size can be expanded in increments of 200 mm
- For a 400 mm x 400 mm frame:
Click here for the corresponding model on Makerworld
Follow me on my channels!
Looking for more cool projects?
On my channels, you'll find news, tips, tricks, and real insider info about my models. The best part: You can ask me questions directly there, which I'll be happy to answer!
- TikTok: @toktikker46 – Fancy short, entertaining clips? Follow me here, and you're guaranteed not to miss anything!
- YouTube: @jonnydasilva2311 – For detailed videos and tutorials – a subscription would be a small thank you!
- Facebook Group: 3D Multicolor – Join the group to exchange ideas, ask questions, and learn from others!
Click 'Follow' and join in – preferably everywhere! I look forward to seeing you there!
License
You shall not share, sub-license, sell, rent, host, transfer, or distribute in any way the digital or 3D printed versions of this object, nor any other derivative work of this object in its digital or physical format (including - but not limited to - remixes of this object, and hosting on other digital platforms). The objects may not be used without permission in any way whatsoever in which you charge money, or collect fees.
Comment & Rating (10)