


Print Profile(1)

Bill of Materials

Description
Do you want to
- end an boring meeting?
- end the phone call with the annoying colleague?
- send a nice formulated f*** y** email?
- start the self-destruction countdown?
- order your next meal in style?
Or do you want to
- use a special mouse no one else has for your next presentation?
- use a mouse with a big, easy to use button even with disabilities?
Then I have good news, the mouse you have been waiting for is here!
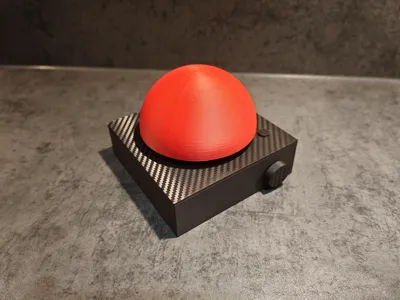
I printed it with PLA Matte filament in red and black on a Carbon Fiber Effect Plate.
The mouse is fully functioning:
- Left Click (Big red Button)
- Right Click (Small Button at the top right)
- Mouse Wheel (On the right side, with click!)
It should also look pretty badass in gold

Boost Me (for free)
if you enjoy my designs and projects, consider boosting me. Its free and helps me to create more.
Assembly Instructions:
- Print all Parts
Insert the Optical Lens and the Toggle Switch into the bottom part

Install the Scroll Wheel onto the PCB and install the PCB onto the base plate (see Instruction Video). Also install the Battery Holder with Leads. Pay attention to the path of the cable

Install the battery, the battery compartment lock and the Mouse Skates

- Slide the Top Part on the bottom part, it should snap into place easily ans secure it with 4 screws from the bottom. Please be careful not to tighten the screws too tightly
Insert the little Right Mouse Button into the hole at the top right, next to the hole on the side. In that hole you can carefully slide in the Mouse Wheel until its in place. The tip of the newly printed mouse wheel slides into the side of the existing mouse wheel, see image below.


Remove the Support from the big red button (if you haven't already)

Glue the rods/bars into place and put the spring mechanism into place. The spring should fit tight so it can be removed when it wears off to be renewed (a little bit heat and the spring is in the old shape)

- Put the big red button onto the base and be happy about your new mouse :)
The circled part in the image below is the pairing button and can be reached if you remove the big red button

License
You shall not share, sub-license, sell, rent, host, transfer, or distribute in any way the digital or 3D printed versions of this object, nor any other derivative work of this object in its digital or physical format (including - but not limited to - remixes of this object, and hosting on other digital platforms). The objects may not be used without permission in any way whatsoever in which you charge money, or collect fees.
Comment & Rating (11)