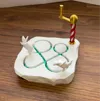
Ice Skating Polar Bear Automaton


Print Profile(8)


Description
Updates
- 2024-12-02
- Updated the gear covers to fit more snuggly, hopefully eliminating the need for glue. The old ones are still available to print under the “old gear covers” folder among the files. They are easier to disassemble.
- 2024-12-06
- Made a simple alternative of polar bear 2 wearing a santa hat :)
It's a bit more tricky to print, but it should require only two color changes, making it viable to print in two colors even without AMS. It's available under “alternatives” in the files folder, or as a separate print profile. I'd recommend printing the original parts before attempting this.
- Made a simple alternative of polar bear 2 wearing a santa hat :)
- 2024-12-14
- Updated the recommended print profile for reinforced axles with more perimiters and higher infill percentage. This will hopefully solve the problem with broken axles some people have been reporting :)
The Model
It's been a while since my last (and first) two creations, the Inchworm Caterpillar Automaton and Koi Fish Automaton. Ever since, I've had a third animal-themed mechanical piece in mind to complete a trio. And guess what, this is not the one!
Instead, I was inspired by the basic mechanics of a braiding machine, with the idea to make some kind of figure skating creature, which I thought would fit nicely with the Trip To The North Pole contest.
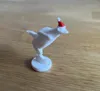
The inchworm and the koi fish were entirely made using CAD software. And while they do their job in conveying the basic idea of the respective animals, I knew this one would need some more detail to really work. So this time I challenged myself with learning some 3D modeling using Blender. It's not my strong suit, but I think I managed to make some pretty cute bears in the end, after a lot of trial and error.
So here's two polar bear friends figure skating on an ice floe!
Printing
As usual I used mostly standard settings, only changing to gyroid infill and lowering the infill percentage to 10%. The model requires no AMS and no supports.
The only thing to keep in mind is that the polar bears - while designed to be printed without supports - really benefit from using adaptive layer height to smooth out some of the steeper overhangs. My print profile has the bears printed by object instead of by layer, and adaptive layer height slider set to maximum quality, with additional smoothing. If the Polar bears fails despite this, I'd recommend using slim tree supports on the print bed only.
Ironing for the base and the cover is also very beneficial, but obviously takes a lot of time, which is why I left it out of my own print profile.
Assembly
There are no extra materials or tools needed for assembly.

Match Axles and Gears

- Each axle on the base is labeled A or B.
Find the gear with the matching letter and align it with its axle. Ensure the ridges between the circular slots align perfectly when the gear meshes with the axle.

Install the Spiral Gear

- Place the spiral gear onto the tall axle
Attach the Crank Shaft Base


- Press the crank shaft base into the crank hole. This will be a tight fit, so align it carefully and apply a bit of force if needed.
Assemble the Outer Lid


- Position the outer lid on the base, threading the spiral gear through the crank hole. This connection is designed to be snug but easy to disassemble.
Attach the Crank Handle

- Press the crank handle onto the top of the spiral gear.
Install the Upper and Side Covers

- Place the upper, left, and right covers onto their respective axles. They are not labeled like the gears, but should only fit if oriented the correct way.
Fit the Bears (which one doesn't matter)


- Bear 1: Place it in the slot closest to the vertical path, with the bear pointing upward.
- Bear 2: Turn the crank until Bear 1 points to the right, about to exit where it entered. Place Bear 2 just like Bear 1 in step a.
Secure the Bottom Lid

- Attach the bottom lid to the bottom axle.
Done! Turn the crank, and watch them skate!
Make sure to let me know if something isn't working, and I'll try to help!
Boost Me (for free)
love making things to share. I’d do it regardless, but a boost is a great way to supply me with filament for prototyping 🙂
Membership
Not sure anything I make is sellable. But if you'd like to sell printed copies of them, you can subscribe to my commercial membership 🙂
License
You shall not share, sub-license, sell, rent, host, transfer, or distribute in any way the digital or 3D printed versions of this object, nor any other derivative work of this object in its digital or physical format (including - but not limited to - remixes of this object, and hosting on other digital platforms). The objects may not be used without permission in any way whatsoever in which you charge money, or collect fees.
Comment & Rating (877)