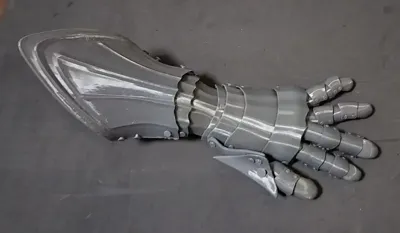
100% 3D-printed plate armor gloves, assembly model, highly flexible, with multiple interchangeable size parts


Print Profile(8)


Description
Boost Me (for free)
Creating something long overdue, something meant to be shared
A purely 3D-printed plate armor glove, an articulated model assembled with printed rivets, includes several interchangeable finger parts of varying sizes as a default. The slicing file contains instructions and tutorials. Most models eschew automatic orientation for efficient layout, though your slicer’s automatic orientation generally yields excellent results. Remember to calibrate hole-related print settings through experimentation; this will usually resolve most issues.
A purely 3D-printed plate armor glove, assembled into an integrated movable model through printed rivets, comes with several finger parts of different sizes that can replace the default model used. There are some text introductions and tutorials in the slicing, and most models do not use automatic orientation for easy layout. The automatic orientation printing success rate of the slicing software is very high. Remember to adjust the printing parameters related to the holes and do some tests, which can basically solve most problems.
Assembly Instructions:
Assembly instructions:
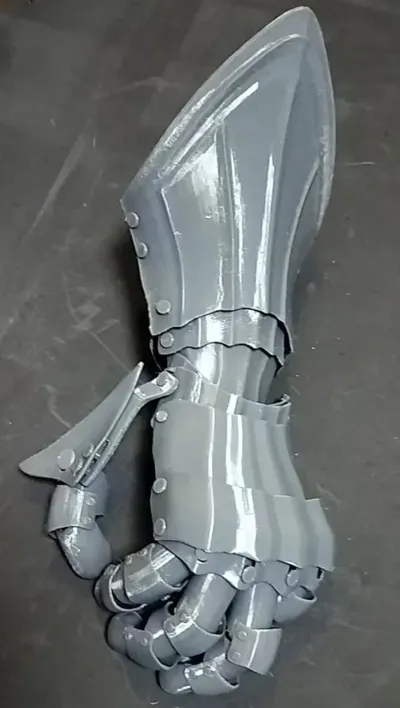
Secure using the provided printed rivets; fine-tuning contour and hole compensation parameters allows adjustment between hand-closure and requiring pliers
Use the following printing rivets to fix and fine tune the contour and hole compensation parameters, which can be adjusted between hand pressure closure to the point where pliers are needed

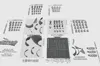
Plate 9 lists the required rivet types and quantities. For convenience, print the pre-assembled rivet model on the right; extra rivets are included for error correction.
The types and quantities of rivets that need to be used are listed on the 9 disks. If you are lazy, you can directly use the new disk to print the rivet model on the right side that I directly assemble into a combination. Each type of rivet has several more fault-tolerant rivets

Plate 8 provides assembly diagrams and guidance. Part placement is illustrated; assembly should be intuitive. (This description interface is less than ideal, so the tutorial is concise. The model largely replaces text instructions; incorrect rivet sizes will prevent assembly.)
On the 8th drive, there are the following assembly examples and text reminders. The relative positions of each part can be seen from this assembly reference. Generally, it should be easy to assemble (the "description" page is not very comfortable to operate, so the tutorial will not be too long. If the text is a little less, use this model instead of the tutorial. If the rivets of various sizes are taken incorrectly, they cannot be installed, and the operation is generally intuitive)

Plates 4 and 7 (left) contain the glove’s primary components; their size impact is minimal; print these first.
The 4th and 7th plates on the left are the main components of the gloves, and their size has a relatively small impact, so they can be printed first

Plate 5 (center) contains the default finger parts; Plates 1, 2, 3, and 6 offer alternative sizes. For size discrepancies with the default Plate 5, consult the corresponding models (refer to the volume numbers or model names for details) for appropriately sized replacements. Make fine adjustments (size changes are clearly indicated). Additional replacement models were created but removed for clarity; they will be added later if requested.
The middle 5 disks are default five finger parts, and disks 1, 2, 3, and 6 are all finger parts of different sizes. If there are size issues when printing the default size model of the middle 5 disks and you feel uncomfortable, go and look at the corresponding model. Replace the model near the corresponding size (see the volume number or model object name, which is explained in detail) and make minor adjustments (the changes in model diameter, length, and other dimensions have been written in the direction). We originally made more batch replacement models, but they are too messy. We will send them again later if there is a need,

This is an alternate slicing configuration (primary print files are on four plates; additional plates hold backup models, instructions, and assembly guides). This arrangement is aesthetically preferable (given the extensive number of spare parts). Users without similar organizational preferences might wish to create additional plates for a more natural arrangement.
This is another sliced version (the main printed files are placed in four disks, with spare size models, prompt texts, and assembly references outside the disks). I just think this arrangement is more aesthetically pleasing (after all, there are too many spare parts of different sizes)

Sizing for wearable models is challenging; extensive scaling and clipping yield uncertain results. Feedback is appreciated.
The size issue of wearable models is quite troublesome.
I spent dozens of minutes on batch scaling and cutting, but I don't know if the effect is good. Anyway, everyone can give some feedback.
Recommended Printing Workflow: (Per comment section suggestions)To minimize waste, first print several rivets, main components, and a small finger part to evaluate hole fit. Ensure the rivets fit easily and lock securely before proceeding with the main body. You can start by printing a plate of rivets, or the main parts—or print a few pieces at a time on new plates if you’re concerned about failure—and finish with the fingers. For smaller hands, scale accordingly; increase X/Y hole compensation and test thoroughly. Unsure of hand size? Test with a back-of-hand piece first. Size upper limit: 1-2 cm finger width, 7.5-8.5 cm palm width (excluding thumb base); length is less critical. I designed the connecting rivet’s front hole as a long slot; only the rear (circular) hole is visible, permitting slight forward/backward and lateral adjustment for diverse palm lengths.
Printing process suggestion: (Reminder in the comment section) To avoid waste, it is recommended to first select several rivet models, main parts, and finger parts with a small dot each for printing. Check if the holes match well. The rivets can be easily placed into the holes on the nail plate, and the two ends of the rivets can be closed and locked before printing the main body. It is also acceptable to print a plate of rivets first and the main body parts first. If there are too many, they can be disassembled into a new plate and printed bit by bit. In short, print the finger part finally. If your hand is too small, you can zoom in and out. Remember to increase the compensation for the x-y holes and then test it. If you don't know if your hand will be too small, you can first print a piece of armor on the back of your hand for testing. The upper limit of the size is that the finger width should be around 1cm to 2cm, and the influence of the palm is small. The width of the palm, excluding the thumb base, should be around 7.5cm to 8.5cm. The length requirement is very small, and there should be no person with a particularly long palm. I made a long groove on the front hole of the connecting rivet on the model. From the outside, only the rear hole can be seen. The rear hole is circular, and the front and rear parts can slide back and forth (slightly rotate left and right).

Wrist circumference: 5-6.5 cm. Source files are provided; Blender modification is recommended. Low-cost commercial use is permitted (considering it's a free model). Due to time constraints, I do not sell finished products; charging for this service is reasonable for those lacking time.
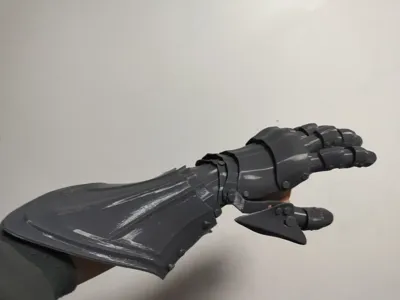
This plate armor glove features largely symmetrical parts. The right-handed version (shown below) is included in the slicing file for direct printing. These four models are mirrored versions of the originals, also manually manipulatable within your slicer. Including a separate right-handed version would be unnecessarily bulky.
Most of the parts of this plate armor glove are symmetrical on both sides. The right-hand version in the picture below is already in the slicing file and can be printed directly. These four models are obtained by mirroring the original models on both sides, and can also be manually manipulated in slicing software. Placing the right-hand version alone is too bulky.

Future Model Updates: (Time permitting)
This model will be updated in the future: (if available)
- Comment-based refinements (e.g., increased flexibility from previous iterations; an optional file will be added)
- More comprehensive size variations (9x9 or more)
- Fingertip optimization and pointed claw replacements (completed; pending printing verification; to be released with other optimized accessories)
- Additional aesthetic variations, such as shortened wrist armor (wrist-length) and more Gothic-style finger parts, provided as replacements.
- Many have requested a full suit of armor; this is feasible, but I have other projects; full chest armor alone is rarely printed (requiring multiple prints and assembly with imperfect seams). Future armor pieces will be produced incrementally, from smallest to largest, forming a complete set. Because I plan to also design Chinese-style armor and mechanical pieces, updates will be slower.
- Optimize according to the comment section (for example, my previous model had greater flexibility, and I will include an optional file in the future)
- More detailed model replacement parts (with a quantity of 9*9 or more)
- Fingertip model optimization and replacement of pointed claw fingertips (completed but requires me to print and verify, ready to be sent together with other accessory optimizations)
- More appearance replacement parts, such as short wrist armor (only up to the wrist), closer to some Gothic plate armor gloves. The finger parts of the fingerboard gloves are also replacement parts
- Many people say they hope that I can make a complete set of plate armor in the future. The overall difficulty is not that difficult, but I have other things to do. Moreover, the size of the chest armor alone is so large that only a few people will actually print it. The 3D printed parts need to be pieced together multiple times, which is troublesome and the gaps are not beautiful. Therefore, I will roughly make the subsequent models in the order of volume from small to large, and they will be a full body plate armor series. Because I plan to make Chinese style armor and I am more interested in making mechanical equipment that I am better at, updates to other parts of the armor will be slow in the future.
Comment & Rating (227)