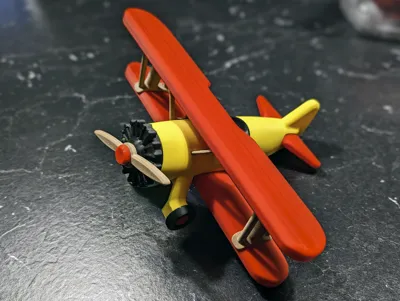
Boeing Stearman 75 Toy Plane


Print Profile(6)


Description
This is a toy plane that is based on the famous Boeing Stearman Model 75 biplane.
https://en.wikipedia.org/wiki/Boeing-Stearman_Model_75
The toy plane has a wingspan of 240mm and a length of 196mm. It can be completely assembled without using glue. All necessary clips and bolts are printed. I even included a small screwdriver.
Use the following settings for the wings: 0,12 layer height, 4 walls, 4 bottoms, 8 tops, 16% gyroid infill
The rest can be printed with 0,2 layers, 4 walls, 4 bottoms, 5 tops, 6% gyroid infill.
I recommend a brim only for the bolts. See my 3mf for more details and how I positioned the parts on the build plates.
Print the following parts with support:
- Fuselage (only for the cockpit)
- Wings (only for th bottom of the threads)
- Engine (not for the thread)
- Bolts (only for the head)
- Struts (use small tree support)
- Supports (use small tree support)
- Cockpit (only for the bottom of the thread)
Do not use support on the threads.
All parts will fit into a 200x200x200 build space.
A1 mini users need to split the wings into two parts (can be done with Bambu Studio) and glue them together after printing.
For assembly follow these steps:
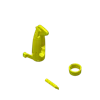
- put the front cover on the engine
- screw the engine to the fuselage
- insert the cockpit into the fuselage and secure it with a short bolt
- insert the lower wing into the fuselage and secure it with a short bolt
- insert the rear wing into the fuselage and secure it with a short bolt
- this is now a bit tricky: insert the middle supports into the fuselage and put the top wing on the supports
- now put one strut between the lower and top wing
- insert a long bolt through the lower wing into the strut and screw it to the top wing
- repeat for the other side
- clip the propeller and the wheels with the pins to the plane
- make funny engine noises and play with your new plane
Update 2023-12-11:
Thanks to sgioja and CatWhisker I was able to correct two design flaws (cockpit + wings) and re-oriented the wing support in the print profile. The STLs and the print profile have been updated accordingly.
Update 2024-02-17:
User doppelt-05 made a very creative add-on to this model. He added a pinwheel propeller so that the propeller spins when the wind is blowing.
You can find his model here on makerworld: https://makerworld.com/en/models/190364#profileId-210130
Disclaimer:
This work by blecheimer is licensed under CC-BY-NC-ND 4.0.
You are not allowed to copy this model to other 3D printing websites without my permission.
Comment & Rating (313)