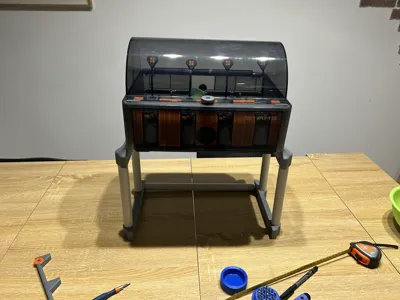
AMS Stack with PVC tube


Print Profile(6)
![25mm 3mm gap [0.2mm layer, 5 walls, 15% infill]](https://makerworld.bblmw.com/makerworld/model/US509e22f381201a/204624023/instance/2024-12-20_6321c349da1d6.jpg?x-oss-process=image%2Fresize%2Cw_100%2Fformat%2Cwebp)
![3/4in no-gap [0.2mm layer, 5 walls, 15% infill]](https://makerworld.bblmw.com/makerworld/model/US509e22f381201a/208741376/instance/2025-01-17_d365edcb333b7.jpg?x-oss-process=image%2Fresize%2Cw_100%2Fformat%2Cwebp)
![20mm 3mm gap [0.2mm layer, 5 walls, 15% infill]](https://makerworld.bblmw.com/makerworld/model/US509e22f381201a/204621664/instance/2024-12-20_f75e8977f74e4.jpg?x-oss-process=image%2Fresize%2Cw_100%2Fformat%2Cwebp)
![3/4in 3mm gap [0.2mm layer, 5 walls, 15% infill]](https://makerworld.bblmw.com/makerworld/model/US509e22f381201a/208741702/instance/2025-01-02_f4152ee1a58fe.jpg?x-oss-process=image%2Fresize%2Cw_100%2Fformat%2Cwebp)
Description
Boost Me (for free)
Did you find this model useful? Then a boost would be very much appreciated, you know that, don't you?
The Why
Printing an AMS stack requires almost an entire roll of filament and about a full day, if not more, in print time. My goal was to cut on that without compromising on robustness or solidity because these accessories are not cheap.
The How
By replacing the tall side parts of other stack solutions with pieces of PVC tubing (the kind used for electrical wiring) I managed to cut down on both print time and costs, more than halving on both fronts.
Assembly can be completed with either 12 screws (countersunk wood screws 3mm wide, 8-16mm long) or glue.
The Variants
I've elaborated two variants for metric pipes (25mm or 20mm tubes) and one for imperial ones (3/4in tubes).
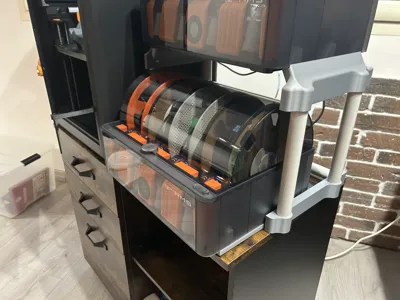
Gap or No gap?
If you print the profile with a 3mm gap, once assembled you'll end up having some space on the left and right side of the bottom AMS, allowing you to move the bottom AMS at will. This allows the use of short posts along with something like the AMS Caster Wheels which will let you move the bottom AMS easily in and out of the assembly for ease of spool change.
If you go for the 25mm or 3/4in tube, you can go for the tall posts, which allow opening the lid of the bottom AMS without requiring to move it: I don't recommend going for the tall posts with 20mm tubes as they flex too much for my taste.
In this case, the no-gap variant will result in a very stable solution, creating a solid link between the bottom AMS and the whole structure. WARNING: the no-gap version cannot be used with short posts as it will not allow spool changes in the bottom AMS.
| Tube OD | Short Posts (x4) | Tall Posts (x4) | Beams With Gap (x2) | Beams No Gap (x1) |
|---|---|---|---|---|
20mm | 250mm | not recommended | 400mm | not recommended |
25mm | 250mm | 380mm | 400mm | 394mm |
3/4in | 250mm | 380mm | 400mm | 394mm |
Accessories
One of the early adopters of this model has contributed a nice add-on providing a design for HSW brackets, allowing to attach HSW panels to the stacked AMS: please check his design here picking the correct profile according to your choice of PVC tubing.
The Cutting
PVC pipes are sold in 2m or 3m lengths so cutting those down to size is part of the work: the model is forgiving about the lengths, you don't need to be extremely precise and you have a 5mm tolerance, but a cutting guide is included on plate 3 in case, like me, you use a small handsaw for this part of the job.
I suggest starting with the beam(s) piece(s), sliding the two top parts of the stack beneath one AMS unit and measuring the gap between those: add 20mm to this measure or eyeball the required length and cut the two beams.

For the posts, the most important part is they are as equal in length to each other as possible: measure one post, cut it and use this very same post to measure all the others.
After cutting, use your deburring tool to ensure no rough spots are present: the posts are a very tight fit, and you might need a mallet to force them in.

The Assembly
With Screws

This is the method I prefer because it's more forgiving and you can easily fix any mistake. It requires self-tapping countersunk wood screws, the pointy ones easily available in any hardware store around the globe.
Start ensuring all the PVC pieces are correctly in place and you can see the PVC tube through the screw holes. Double-check that both the bottom part and the top parts are levelled and the AMS fits, then use the screws to tap into the PVC tubes.
I suggest NOT USING an electric screwdriver because it's easy to exceed torque and strip the plastics.

With Glue
If you prefer a permanent solution you can replace the screws with glue, but you'll need something that gives you some time to adjust the parts before setting, especially for the posts: this excludes most cyanoacrylate ones.
The beam(s) is a less tight fit and in that case, a fast-setting glue is probably more desirable.
License
You shall not share, sub-license, sell, rent, host, transfer, or distribute in any way the digital or 3D printed versions of this object, nor any other derivative work of this object in its digital or physical format (including - but not limited to - remixes of this object, and hosting on other digital platforms). The objects may not be used without permission in any way whatsoever in which you charge money, or collect fees.
Comment & Rating (29)